
HTML5, the fifth and current version of the HTML standard, is a markup language used to structure and present content on the World Wide Web. This article will help readers get acquainted with it.
HTML5 has evolved through the cooperation between the W3C and the Web Hypertext Application Technology Working Group. It is a higher version of HTML, and its many new elements make your pages more semantic and dynamic. It was developed to provide a greater Web experience for everyone. HTML5 offers great features that make the Web more dynamic and interactive.
The new features of HTML5 are:
- New sets of tags such as <header> and <section>
- <canvas> element for 2D drawing
- Local storage
- New form controls like calendar, date and time
- New media functionality
- Geo-location
HTML5 is not an official standard as yet; hence, not all browsers support it or some of its features. One of the most important reasons behind developing HTML5 was to prevent users from having to download and install multiple plugins like Silverlight and Flash.
New tags and elements
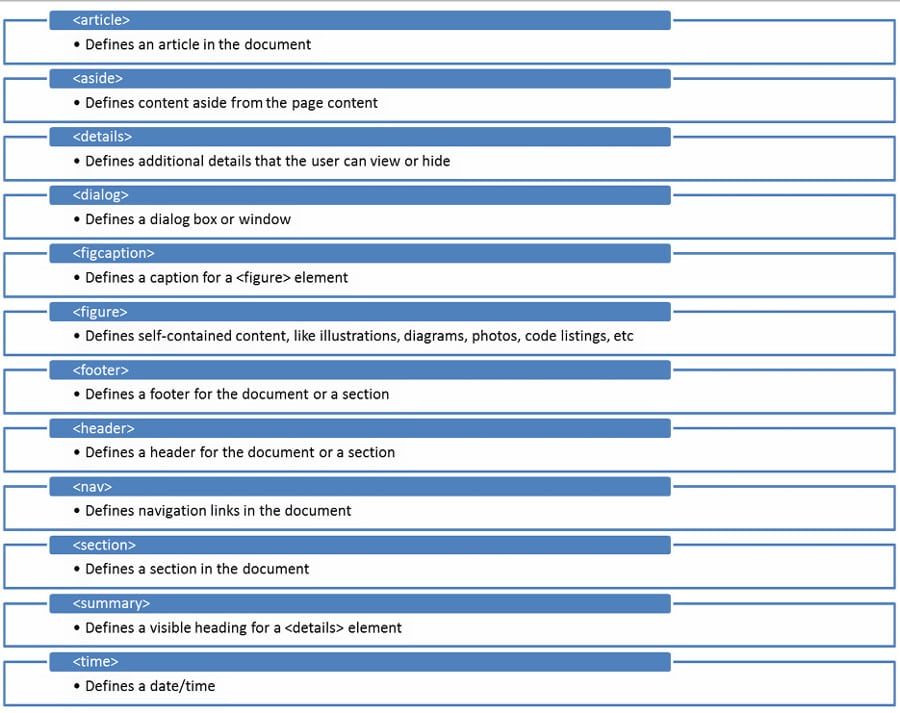
Semantic elements: Figure 1 displays a few useful semantic elements.
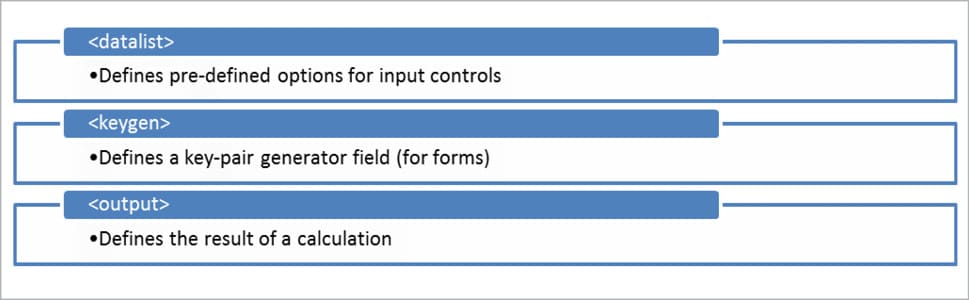
Form elements: The form elements present in HTML5 are shown in Figure 2.
Graphic elements: The graphic elements in HTML5 can be seen in Figure 3.
Media elements: The new media elements in HTML5 are listed in Figure 4.
Advanced features of HTML5
Geo-location
It is an HTML5 API that is used to get the geographical location of a website’s user, who has to first permit the site to fetch his or her location. This usually happens via a button and/or browser popup. All the latest versions of Chrome, Firefox, IE, Safari and Opera can use the geo-location feature of HTML5.
Some uses of geo-location are:
- Public transportation websites
- Taxi and other transportation websites
- To calculate shipping costs on an e-commerce site
- Travel agency websites
- Real estate websites
- Movie theatre websites can find movies playing nearby
- Online gaming
- For sites to feature local headlines and weather on their front page
- Job postings can automatically include commute times
How it works: Geo-location works by scanning common sources of location information, which include the following:
- Global Positioning System (GPS), which is the most accurate
- Network signals—IP address, RFID, Wi-Fi and Bluetooth MAC addresses
- GSM/CDMA cell IDs
- User inputs
The API offers a very handy function to detect geo-location support in browsers:
if (navigator.geolocation) {
// do stuff
}
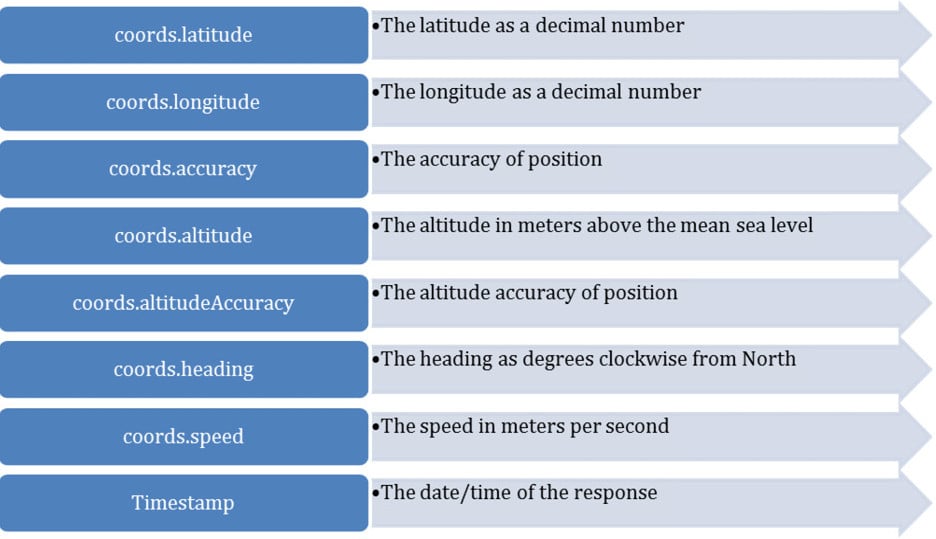
The getCurrentPosition API is the main method for using geo-location. It retrieves the current geographic location of the user’s device. The location is described as a set of geographic coordinates along with the heading and speed. The location information is returned as a position object.
The syntax is:
getCurrentPosition(showLocation, ErrorHandler, options);
- showLocation: This defines the callback method that retrieves location information.
- ErrorHandler(Optional): This defines the callback method that is invoked when an error occurs in processing the asynchronous call.
- options (Optional): This defines a set of options for retrieving the location information.
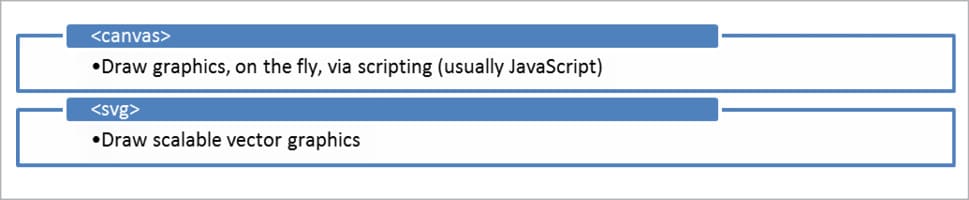
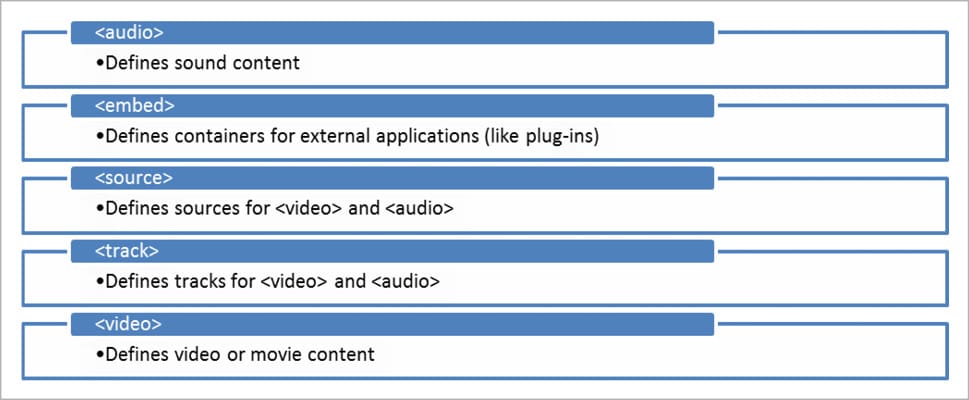
Figure 5 incorporates the set of properties returned by a position object.
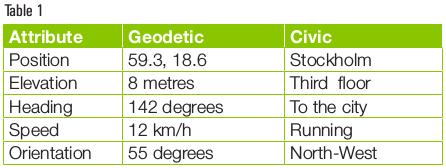
We can present location information to the user in two ways—geodetic and civil:
1. The geodetic way of describing a position refers directly to the latitude and longitude.
2. The civic representation of location data is readable and easily understood by humans.
As shown in Table 1, each attribute/parameter has both a geodetic representation and a civic representation.
Web storage
In HTML, to store user data on a local machine, we were using JavaScript cookies. To avoid that, HTML5 has introduced Web storage, with which websites themselves store user data on a local machine.
The advantages of Web storage, as compared to cookies, are:
- More secure
- Faster
- Stores a larger amount of data
- The stored data is not sent with every server request. It is only included when asked for. This is a big advantage of HTML5 Web storage over cookies.
There are two types of Web storage objects:
1) Local – this stores data with no expiration date.
2) Session – this stores data for one session only.
How it works: The localStorage and sessionStorage objects create a key = value pair.
An example is: key=“Name”, value=“Palak”
These are stored as strings but can be converted, if required, by using JavaScript functions like parseInt() and parseFloat().
Given below is the syntax for using Web storage objects:
Storing a Value:
• localStorage.setItem(“key1”, “value1”);
• localStorage[“key1”] = “value1”;
Getting a Value:
• alert(localStorage.getItem(“key1”));
• alert(localStorage[“key1”]);
Remove a Value:
• removeItem(“key1”);
Remove All Values:
• localStorage.clear();
Application Cache (AppCache)
Using HTML5 Apache, we can make a Web application work offline without an Internet connection. All browsers, besides IE, can use AppCache (at this point in time).
The advantages of Application Cache are:
- Enables browsing Web pages offline
- Pages load faster
- Results in less load for servers
The cache manifest file is a simple text file that lists the resources the browser should cache for offline access. The manifest attribute can be included on the document’s HTML tag, as follows:
<html manifest=”test.appcache”>
...
</html>
It should be on all the pages that you want to cache.
The application pages that are cached will remain unless:
1. The user clears them out.
2. The manifest has been modified.
3. The cache is updated.
Video
Until HTML5 was launched, there was no uniform standard for showing video on Web pages. Most of the videos were shown through different plugins like Flash. But HTML5 specifies a standard way to show the video on a Web page by using a video element.
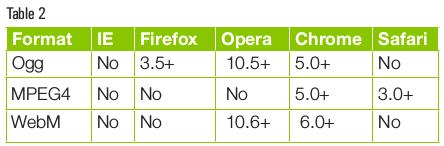
Currently, it supports three video formats for the video element, as shown in Table 2.
The example given below shows the use of this video element:
<! DOCTYPE HTML>
<html>
<body>

<video src=” vdeo.ogg” width=”320” height=”240” controls=”controls”>

This browser does not support the video element.

</video>

</body>
</html>
This example uses an Ogg file, and will work in Firefox, Opera and Chrome. To make the video work in Safari and future versions of Chrome, we must add an MPEG4 and WebM file.
The video element allows multiple source elements. Source elements can link to different video files. The browser will use the first recognised format, as follows:
<video width=”320” height=”240” controls=”controls”>
<source src=”vdeo.ogg” type=”video/ogg” />
<source src=” vdeo.mp4” type=”video/mp4” />
<source src=” vdeo.webm” type=”video/webm” />
This browser does not support the video element.
</video>

Audio
With audio, the case is similar to video. Until HTML5 was launched, there wasn’t any uniform standard for playing audio on Web pages. Most of the audio was also played through different plugins like Flash. But HTML5 specifies a standard way to play audio on a Web page by using an audio element. The audio element is used to play sound files and to stream audio.
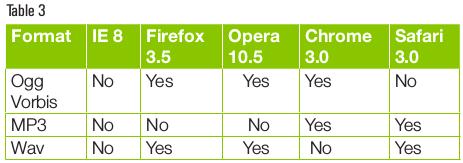
Currently, HTML5 supports three audio formats for the audio element, as shown in Table 3.
The use of the audio element is demonstrated below:
<! DOCTYPE HTML>
<html>
<body>

<audio src=” song.ogg” controls=”controls”>

This browser does not support the audio element.

</video>

</body>
</html>
This example uses an Ogg file and will work in Firefox, Opera and Chrome. To make the audio work in Safari and future versions of Chrome, we must add an MP3 and Wav file.
The audio element allows multiple source elements, which can link to different audio files. The browser will use the first recognised format, as follows:
<audio controls=”controls”>
<source src=”song.ogg” type=”audio/ogg” />
<source src=”song.mp3” type=”audio/mpeg” />

This browser does not support the audio element.

</audio>
Canvas
To create graphics on a Web page, HTML5 uses the Canvas API. We can draw anything with it and it uses JavaScript. This can improve the performance of our website by avoiding the need to download images off the network. With Canvas, we can draw shapes and lines, arcs and text, gradients and patterns. In addition, Canvas gives us the power to manipulate pixels in the images and even in video. You can add the Canvas element to an HTML page as shown below:
<canvas id=”myCanvas” width=”200” height=”100”></canvas>
The Canvas element doesn’t have capabilities to draw elements. We can achieve this by using JavaScript. All drawings should be inside JavaScript.
<script type=”text/javascript”>
var c=document.getElementById(“myCanvas”);
var cxt=c.getContext(“2d”);
cxt.fillStyle=”blue”;
cxt.storkeStyle = “red”;
cxt.fillRect(10,10,100,100);
cxt.storkeRect(10,10,100,100);
</script>
The output of the above script is seen in Figure 6.
You can draw many objects like arcs, circles, linear/vertical gradients, etc.
HTML5 tools
To operate effectively, all skilled or amateur Web developers/designers should use HTML5 tools, which are a great help when one needs to set up workflows/websites or perform repetitive tasks. They improve the usability of Web designs.
Featured below are some essential tools which help in creating amazing websites.
HTML5 Maker: This is used to interact with content in websites with the help of HTML, JavaScript and CSS. It is very easy to use. It also allows us to develop slide shows, sliders, HTML5 animation and more.
Liveweave: This is used to test the code. It cuts down on the time spent on saving the code and loading it on screen. Pasting the code in the editor gives instant results. It is very easy to use and also provides the auto-complete feature for some of the code, which makes development and testing faster and easier.
Font dragr: This previews the custom Web fonts in a browser. It loads the font instantly, so you get to know whether it looks good or not. It also offers a drag-and-drop interface, allowing you to drop your typefaces, Web open fonts and vector graphics to test all of them immediately.
HTML5 Please: This allows us to find anything related to HTML5. If you want to know how to use any feature, you can search for it on HTML Please. It provides lists of useful resources about supporting browsers and devices, syntax, general recommendations of how to use the element, etc.
Modernizr: This is an open source tool which is used to provide the best experience possible, given the visitor’s browser. With this tool, you can detect whether the visitor’s browser supports HTML5 features, and load the scripts accordingly.
Adobe Edge Animate: This is a useful tool for HTML5 developers who have to deal with interactive HTML animations. It is used in digital publishing, the Web and in the advertising fields. This tool allows users to create flawless animations, which run across multiple devices.
Video.js: This is a HTML5 video player based on JavaScript. If you want to add videos to your website, you should use this tool. It makes videos look good and a part of the website.
The W3 Validator: The W3 Validator tests the validity of the markup of websites in HTML, XHTML, SMIL, MathML, etc. To test the markup validity of any website, you have to choose the document type as HTML5 and enter your Web page’s URL. By doing this, your code will get checked, and all errors and warnings will be mentioned.
HTML5 Reset: This tool allows developers to rewrite the code of their old websites in HTML5.
You can use these tools to provide a great Web experience for visitors to your website.


