


Disk partitioning facilitates better utilisation and management of disk space. This article goes into the basics of disk management. It also is a guide to logical volume management.
Disk partitioning allows a hard drive to be divided into multiple logical storage units that are referred to as partitions. By dividing the disk into partitions, systems administrators can use different partitions to perform different functions.
The MBR partitioning scheme
This scheme supports a maximum of four primary partitions. On Linux systems, with the use of extended and logical partitions, administrators can create a maximum of 15 partitions. Since the data in the partitions is stored as 32-bit values, disks partitioned with the MBR (Master Boot Record) scheme have a maximum disk and partition size limit of 2TiB.
Creating MBR disk partitions
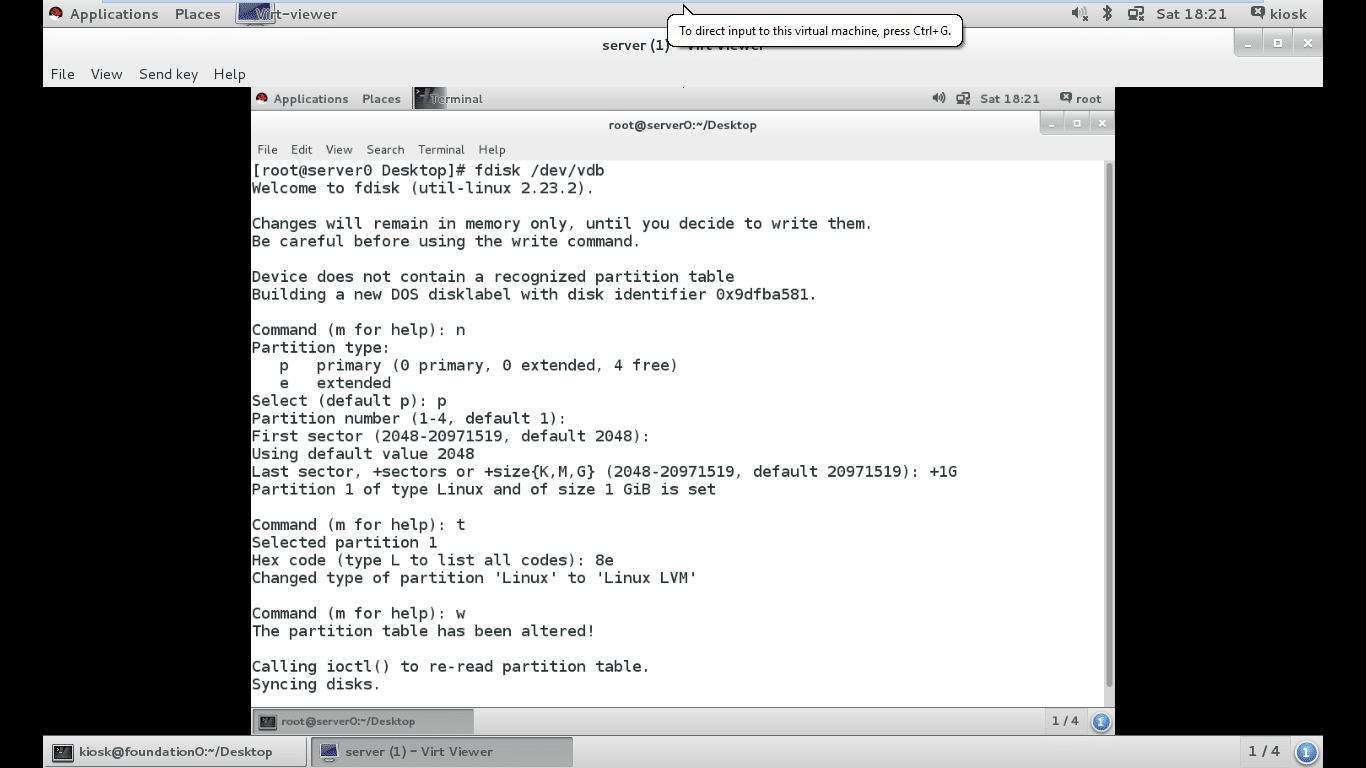
For disks with the MBR partitioning scheme, the fdisk partition editor can be used to create disk partitions. Creating an MBR style disk partition involves the following steps.
Specify the disk device to create the partition on
As the root user, execute the fdisk command and specify the disk device’s name as an argument. This will start the fdisk command in interactive mode, and will present a command prompt:
# fdisk /dev/vdb
Request a new primary or extended partition
Enter n to request a new partition, and specify whether the partition should be created as a primary or extended partition. The default selection is the primary type.
Note: For situations in which more than four partitions are needed on a disk, this limit can be bypassed by creating three primary partitions and one extended partition. This extended partition serves as a container within which multiple logical partitions can be created.
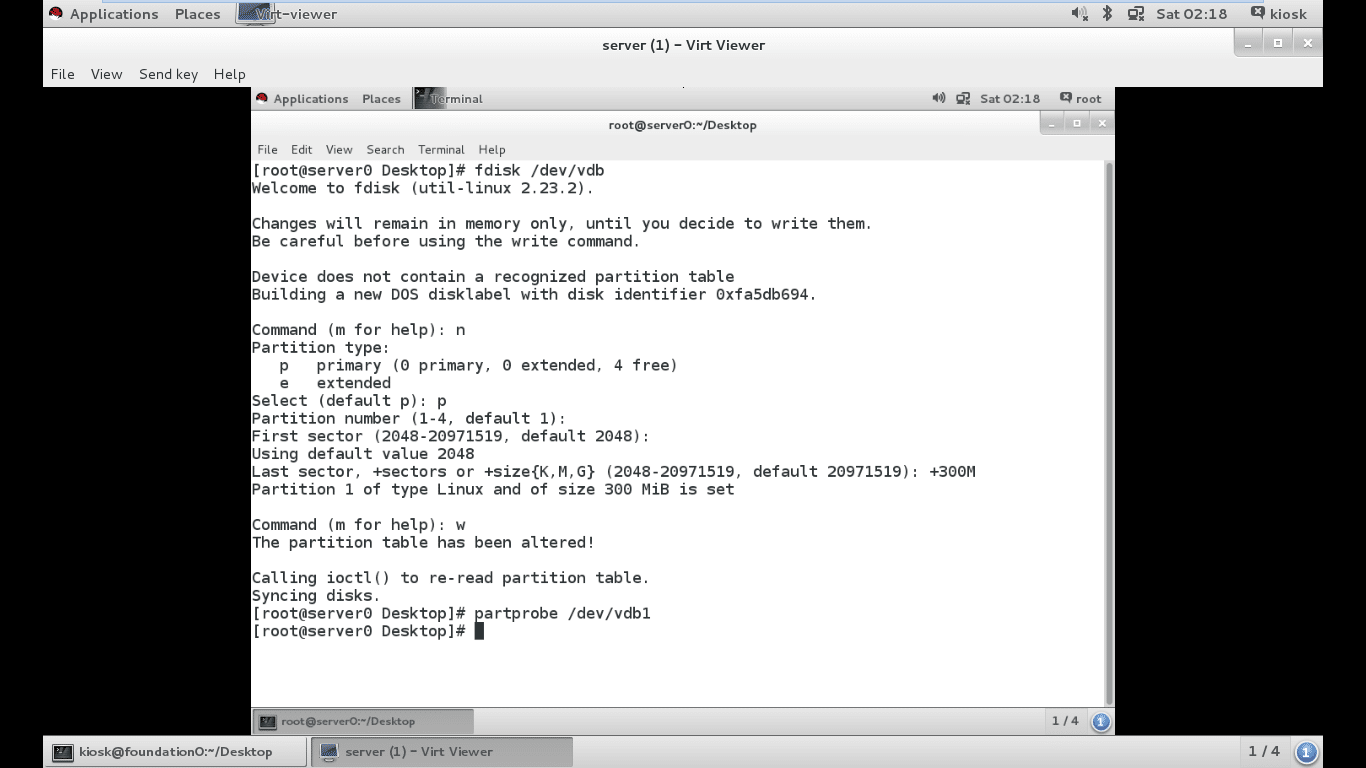
Specify the partition number
This serves as the identification number of the new partition on the disk for use in future partition operations. The default value is the lowest unused partition number.
Specify the first sector on the disk that the new partition will start on
The default value is the first sector available on the disk.
Specify the last sector on the disk that the new partition will end on
The default value is the last of the available, unallocated sectors contiguous to the new partition’s first sector.
In addition to the ending sector number, fdisk also accepts a number representing the desired size of the partition expressed in sectors. We can also express size in units of KiB, MiB or GiB.
Once the partition boundary is entered, fdisk will display a confirmation that the partition has been created.
Define the partition type
If the newly created partition should have a type other than Linux, enter the t command to change the type of the partition. Enter the hex code for the new partition type. If needed, a table of hex codes for all partition types can be displayed with the L command. Setting this partition type correctly is crucial, since some tools rely on it to function properly.
Save the partition table changes
Issue the w command to finalise the partition-creation request by writing the changes to the disk partitions table and exiting the fdisk program.
Initiate a kernel read of the new partition table
Run the partprobe command with the disk device’s name as an argument to force a re-read of its partition table.
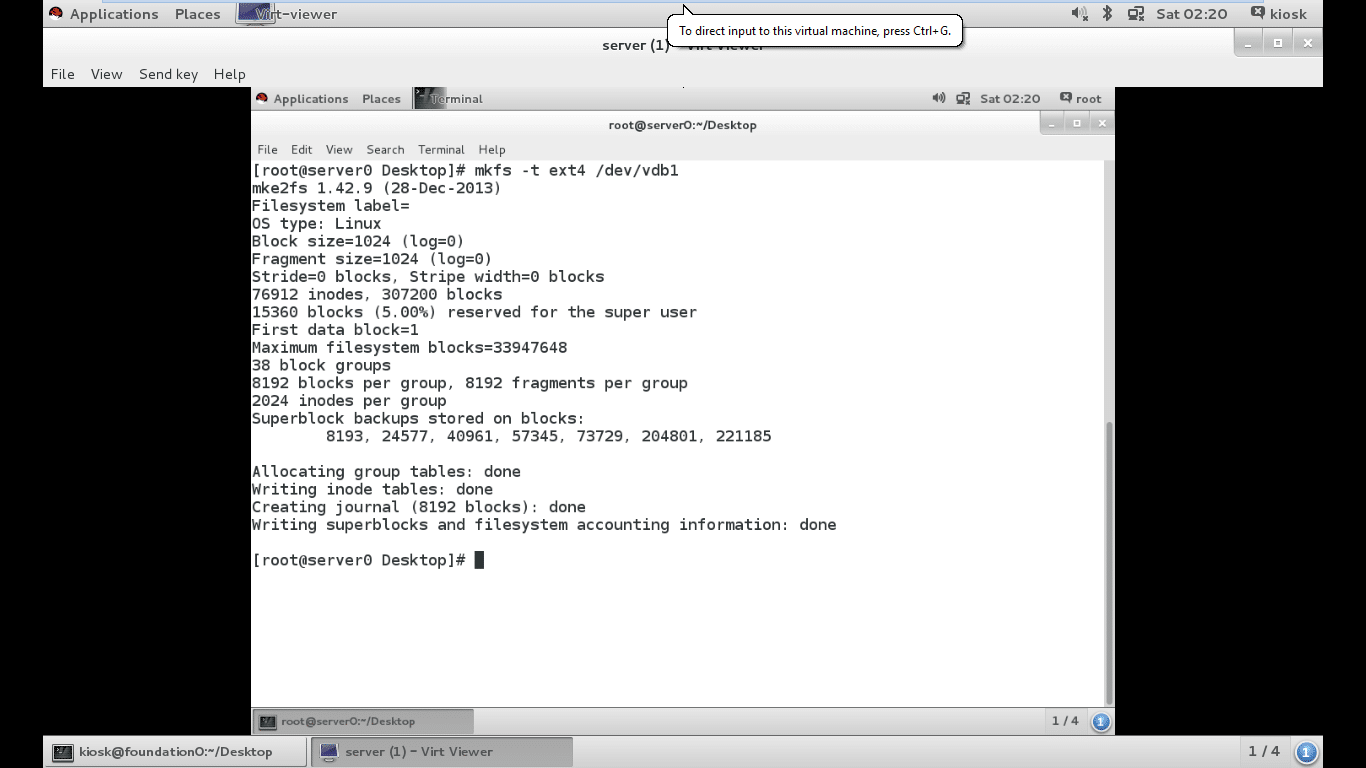
Creating a file system
After a block device has been created, the next step is to apply a file system format to it. A file system applies a structure to the block device so that data can be stored and retrieved from it. Red Hat Linux supports many file systems, two of the most common being xfs and ext4.
The mkfs command can be used to apply a file system to a block device. If no type is specified and extended, the type two (ext2) file system will be used, which is not desirable in many cases. To specify the file system type, the command -t should be used.
# mkfs -t ext4 /dev/vdb1
Mounting file systems
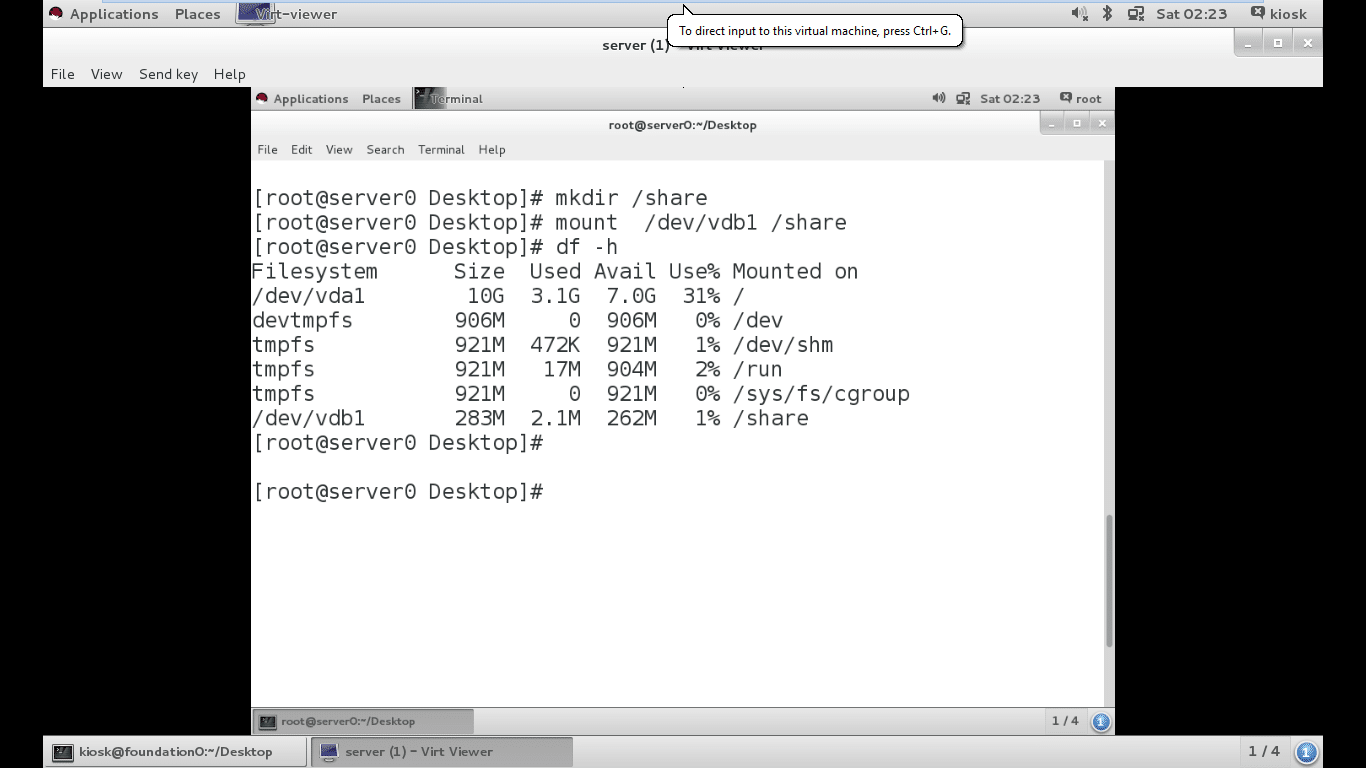
Once the file system format has been applied, the last step to adding a new file system is to attach a file system into a new directory structure. When the file system is attached into the directory’s hierarchy, user space utilities can access or write files on the device.
Manually mounting file systems
Systems administrators can use the mount command to manually attach the device into the directory’s location, or mount point, by specifying the device and the mount point, as well as any options that may be desired, to customise the behaviour of the device. We can see the mounted file system by using the command df -h.
# mount /dev/vdb1 /share
Directory (any name) should be created manually before running the mount command. The name of the created directory will be specified with mount command. In Figure 3, a directory with the name/share has been created. The mount command can also be used to view currently mounted file systems, the mount point and the options.
Manually mounting a file system is an excellent way to verify that a formatted device is accessible or working in the way desired. However, once the system is rebooted, the file system (while it still exists and has intact data) will not be mounted into the directory tree again. If an administrator wants the file system to be permanently mounted, a listing of the file system needs to be added to /etc/fstab.
Persistently mounting file systems
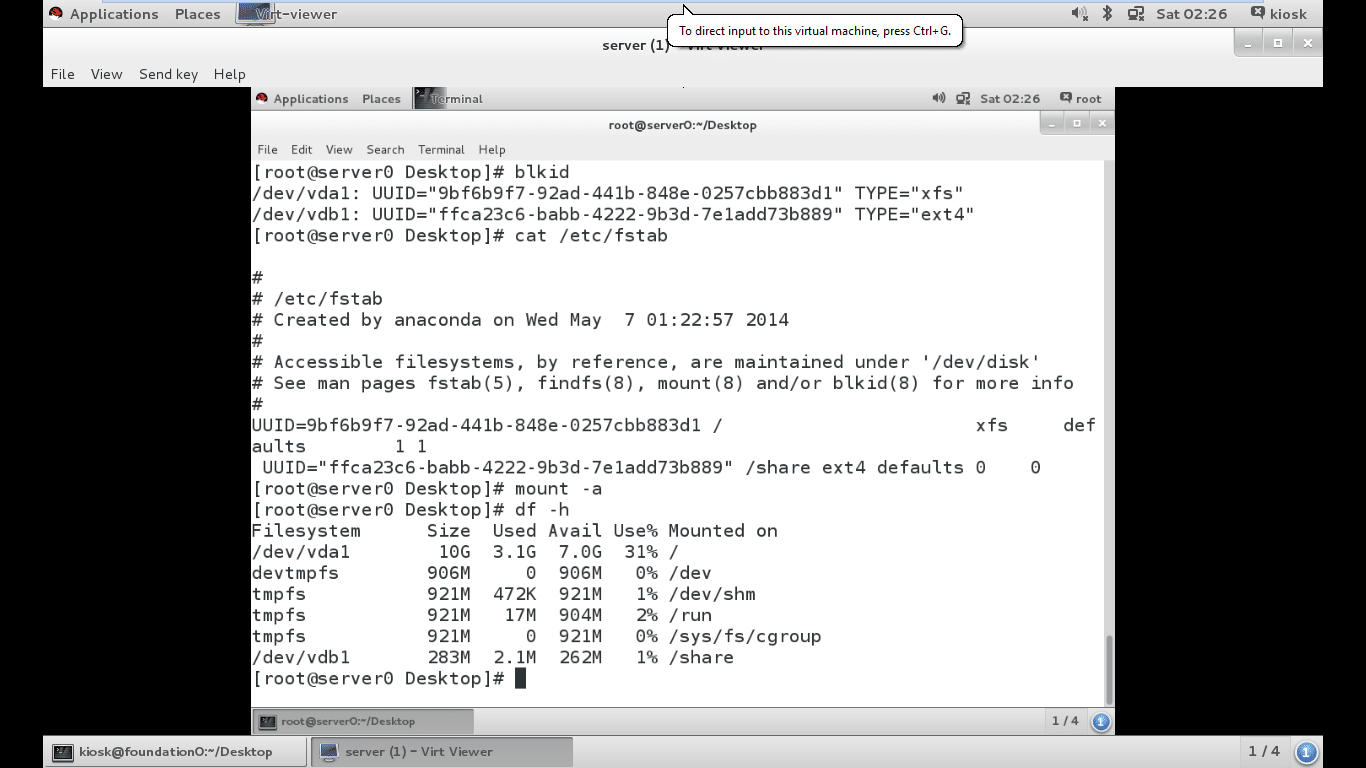
By adding a listing for a device into the /etc/fstab file, the administrator can configure a device to be mounted to a mount point at system boot.
/etc/fstab has six fields per line. The first field specifies the device to be used. The UUID can be used to specify the device or, alternatively, the device file could be used. The UUID is stored in the file system superblock and created when the file system is created.
The second field is the mount point where the device should be attached into the directory’s hierarchy. The mount point should already exist, and if it does not, it can be created by using the mkdir command.
The third field contains the file system’s type that has been applied to the block device.
The fourth field is the list of options that should be applied to the device when mounted to customise the behaviour. This field is required, and there is a set of commonly used options called defaults.
The last two fields are the dump flag and fsck order. The dump flag is used with the dump command to take a backup of the contents of the device. The fsck order field determines if the fsck should be run at the boot time, in the event that the file system was not unmounted cleanly. The value of the fsck order indicates the order in which file systems should have fsck run on them if multiple file systems are required to be checked.
Having an incorrect entry in /etc/fstab may render the machine unbootable. To avoid that situation, an administrator should verify that an entry is valid by unmounting the file system back into place. If the mount –a command returns an error, it should be corrected before rebooting the machine.
Managing swap space
A swap space is an area of the disk that can be used with the Linux kernel’s memory management sub-system. Swap systems are used to supplement RAM by holding inactive pages of memory. The combined RAM plus swap spaces is called virtual memory.
When the memory usage on a system exceeds a defined limit, the kernel will comb through the RAM looking for idle memory pages assigned to processes. The kernel writes the idle pages to the swap area, and will reassign the RAM page to be used by another process. If a program requires access to a page that has been written to disk, the kernel will locate another idle page of memory, write it to disk, and then recall the needed page from the swap area.
Since the swap areas reside on disk, swap is incredibly slow compared to RAM. When it is used to augment system RAM, usage of swap space should be kept to a minimum, whenever possible.
Creating a swap space
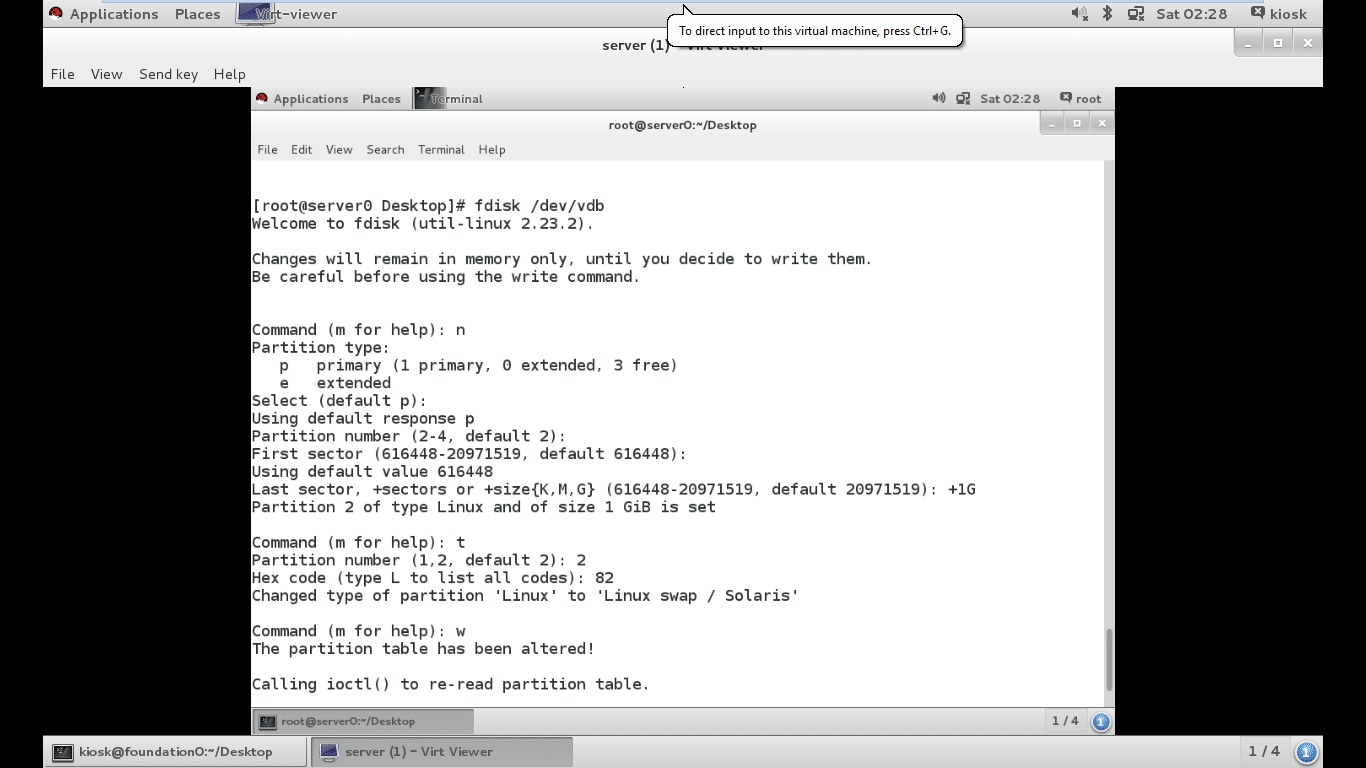
To create a swap space, an admin needs to do the following three things:
- Create a partition
- Set the type of the partition as 82 Linux Swap
- Format a swap signature on the device
The creation of a partition and setting the type of the partition is shown in Figure 5.
Formatting the device
The mkswap command applies a swap signature to the device. Unlike other formatting utilities, mkswap writes a single block at the beginning of the device, leaving the rest of the device unformatted so that it can be used for storing memory pages.
# mkswap /dev/vdb2
Activating a swap space
An admin can use the swapon command to activate a formatted swap space. swapon can be called on a device, or swapon -a will activate all swap spaces available.
Logical volume management concepts
Logical volume and its effective management make it easier to handle disk space. If an LVM hosted file system needs space, it can be allocated to its logical volume from the free space in its volume group and the file system can be resized. If a disk starts to fail, a replacement disk can be registered as a physical volume with the volume group, and the logical volume extents can be migrated to the new disk.
LVM definitions
Physical storage devices preserve data in logical volume. These block devices can be either disk partitions or whole disks. They must be initialised as LVM devices in order to be used as an LVM.
Physical volume: These are used for underlying physical devices in volume groups. LVM automatically converts physical volumes into physical extents. Physical extents are the smallest chunks of data — the smallest storage block on a physical volume.
Volume group: This consists of one or more physical volumes. A particular physical volume can be allocated to only one volume group. A volume group can consist of unused space and it can have more than one LVM.
Logical volumes: Logical volumes are created from free physical extents in volume group, and provide the storage device that can be used by users and operating systems. Logical volumes are a collection of logical extents that map to physical extents (a physical extent is the smallest storage chunk of a physical volume). By default, each logical extent maps to one PE. But this mapping can be changed by using specific options.
Implementing LVM storage
Preparing the physical device
We have to create a partition of any size but remember to change the type of partition to the Linux LVM by using code 8e.
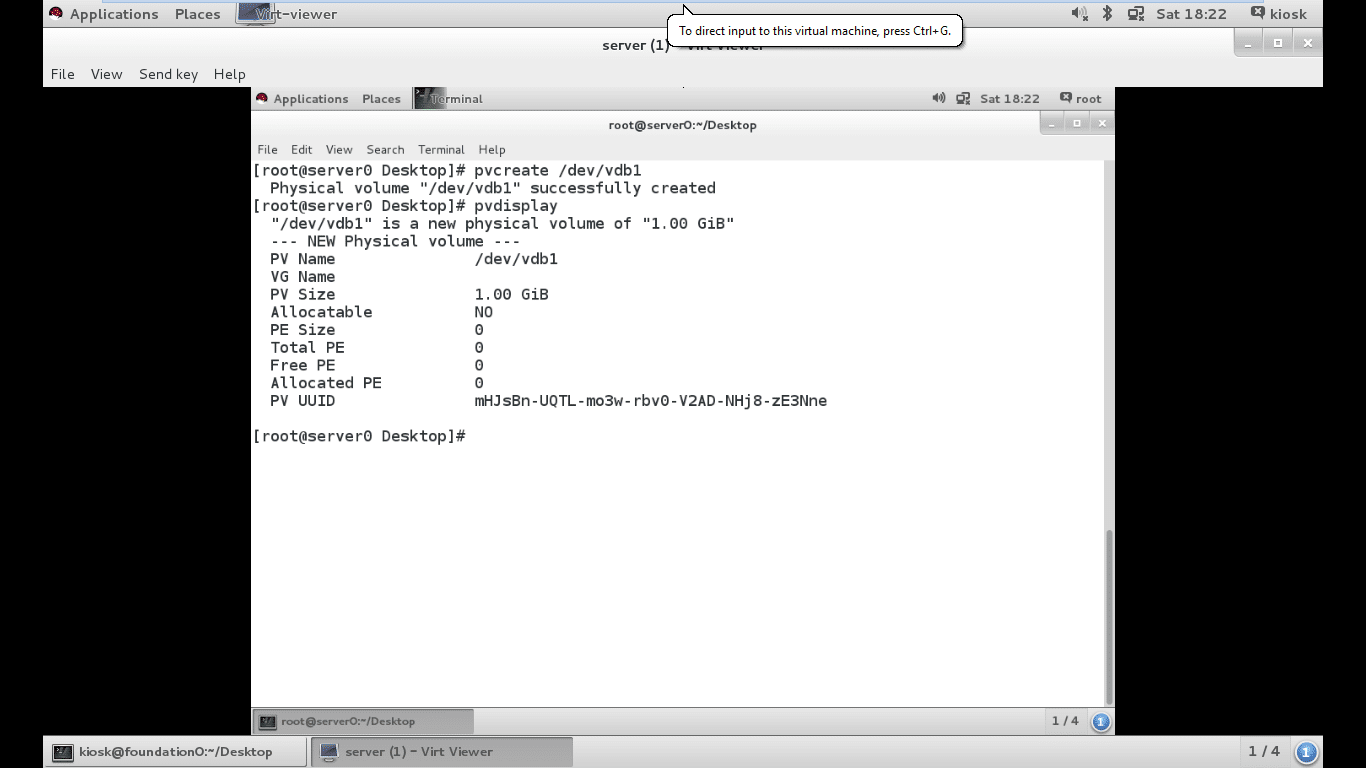
Creating a physical volume
Physical volume can be created by the pvcreate command as shown in Figure 7. pvdisplay is used to verify the created physical volume.
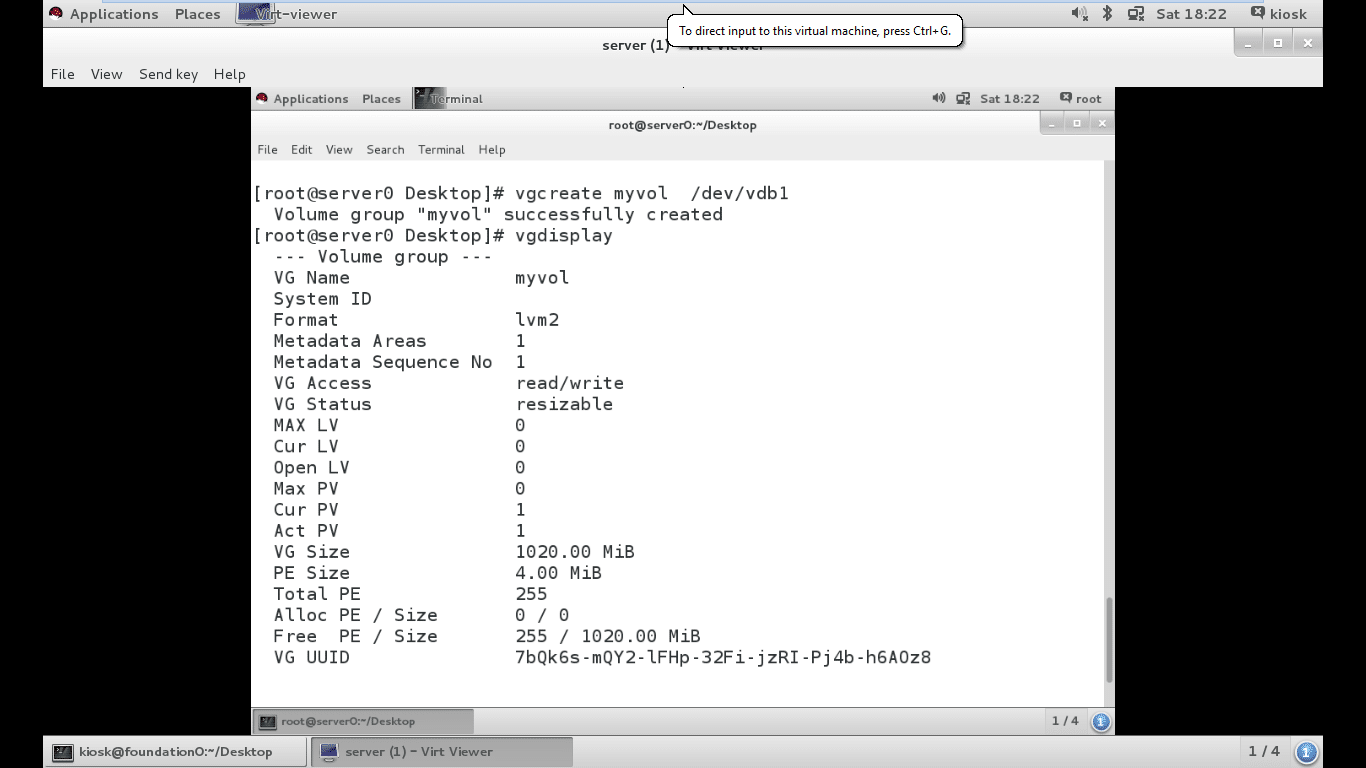
Creating a volume group
A volume group can be created by vgcreate and then by providing the name of the volume group. vgdisplay is used to verify volume group.
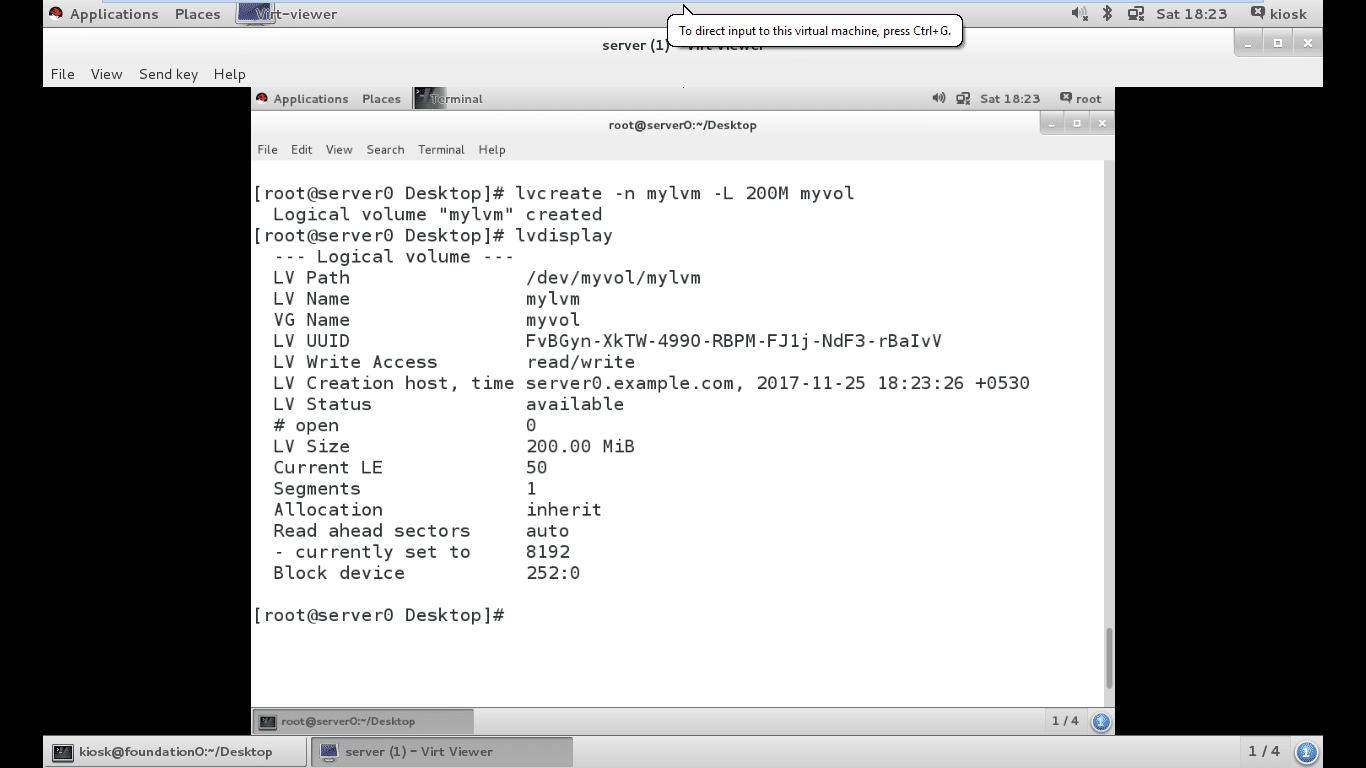
Creating a logical volume
An LVM can be created by using the lvcreate command, whereby we specify the size of the LVM using the -L option and the name of the LVM with the -n option, after which the volume group’s name needs to be provided.
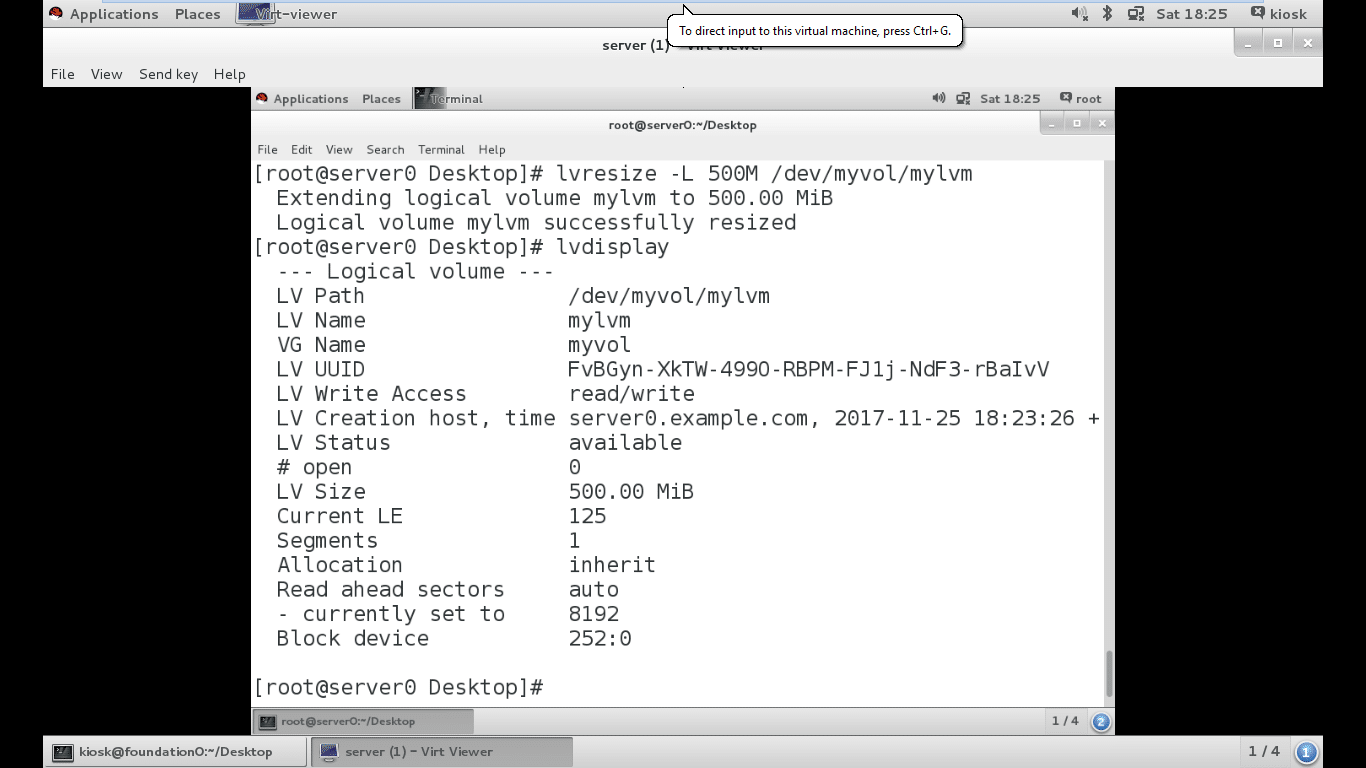
The logical volume size can be extended, provided space is available in the associated volume group. If so, then the lvresize command can be used to extend the LVM. You can verify the size of the extended LVM by using the lvdisplay command.
To conclude, here are some reasons why disk partitioning is necessary or beneficial:
- Allows multi-booting of different operating systems from the same disk.
- Separates the operating system and program files from the user files.
- Creates separate areas for OS virtual memory swapping.
- Limits disk usage to improve performance of diagnostic tools and backup imaging.


