


This tutorial tells readers how to scrape using Cheerio, develop with Glitch, deploy Web app manifests, command service workers and get certified by Lighthouse.
Let’s start at the beginning. How many times have you been spammed by an email in your inbox that you for some reason found interesting? You then click the link behind it, only to be disappointed by things like slow site loading, the website asking you for a login, or you not being shown what was promised in your email. If you are like most users on the Internet, you will close the Web page and go on to do something else more useful, like check another page or link that hopefully is more responsive! In Internet marketing terms, you have just ‘bounced’ from that site. If I am the marketing head of that site, I would be annoyed at my technical team, because after all the promotion I have done to get you onto my site, you bounced out because the site itself was not fast enough.
This is where Progressive Web Apps (PWAs) enter the picture. They attempt to solve this problem by defining a set of specific technologies and standard patterns to take advantage of both Web and native app features. PWAs have been very popular with lots of success stories primarily because of advantages like an increased conversion rate, reduced bounce rate, increased user engagement rates, a reduction in website loading time and reduced data usage, to name a few. Even though some of the technology, like the manifest, is still categorised as experimental, and many browsers still do not support PWAs or use all the features of a phone, a PWA still costs almost 10 times less to develop compared to a mobile app.
So how exactly do PWAs get their magic done? Basically, PWAs make your content discoverable, installable, linkable, network independent, progressive, re-engageable, responsive and safe. The context of all these is a lot easier to understand if you get your hands dirty using a small Web application as an example. In this article, I try to demonstrate this using a small app to scrape latest coronavirus statistics and display them as a latest statistics dump. Much of the surrounding code is mostly boilerplate JavaScript. So you should be able to make use of the latter and enhance your own application if you have one, or get inspired enough to write your first app as I was, just to get some experience with PWAs.
| Note: I took lots of help and some boilerplate code from a Google Code Labs article that, though good for a start, is still incomplete with regard to many instructions, which I have tried to improve upon in this article. |
Setting up a coronavirus data scraper in Glitch
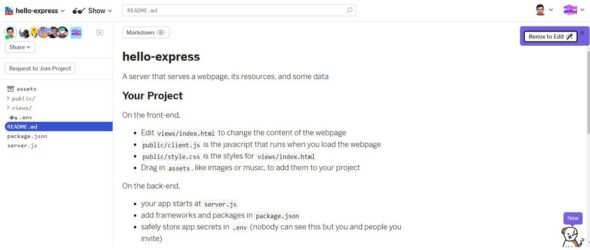
A quick introduction to Glitch and hello-express: Glitch is an all-in-one tool to create and deploy Web apps from the ground up. It has lots of collaborative features that allow multiple people to work on a project, and it also provides different startup projects with which you can mix and create your own version to progress faster. For our purposes, let’s start with the hello-express project that has a simple Web app, which serves a list of dreams and allows you to add your own dreams to the list. For this article, we will replace dreams with corona statistics, basically showing the total worldwide cases and deaths.
| Note: 1. Due to the immediate deployment of code into your server, Glitch facilitates CI/CD (continuous integration/continuous deployment) such that any changes in your code can be tested continuously.
2. As a corollary to the above, it makes lots of sense to keep your code running all the time, so you know if you have broken something and can fix it immediately. Also, Glitch has some more great features like live bug reporting in code and some neat code beautification tools too. 3. Before you start really mixing and coding, you need to register yourself in Glitch to create your account, activate it, etc. Setting up is standard and you can use your Google sign-in to get started. |
Package.json
Let us start with package.json, which instructs Glitch about what packages are needed for our project and indicates our dependencies. As you can see in the code below, it is indicated in the dependencies section that the Express framework is needed. As we will need to do some Web scraping, let us add the Cheerio and Request packages also. Do note that in the Start section, the node is started with the Server.js script file.
{
“//1”: “describes your app and its dependencies”,
“//2”: “https://docs.npmjs.com/files/package.json”,
“//3”: “updating this file will download and update your packages”,
“name”: “hello-express”,
“version”: “0.0.1”,
“description”: “A simple Node app built on Express, instantly up and running.”,
“main”: “server.js”,
“scripts”: {
“start”: “node server.js”
},
“dependencies”: {
“express”: “^4.17.1”,
},
“engines”: {
“node”: “12.x”
},
“repository”: {
“url”: “https://glitch.com/edit/#!/hello-express”
},
“license”: “MIT”,
“keywords”: [
“node”,
“glitch”,
“express”
]
}
Add the packages given below to the dependencies section, add Cheerio and Request to manage our scraping, and express-http-to-https to manage redirection of http:// requests to https://.
“cheerio”: “^0.22.0”,
“request”: “^2.88.2”,
“express-http-to-https”: “^1.1.4”
Now we need to decide the source for our data to be shown. Ideally, this should have been a Web API that we can invoke to get the coronavirus data dynamically. Unfortunately, no such Web API seems to exist and creating one will be a project on its own. So, we must get by with existing Web pages that are doing a reasonably good job of keeping the overall coronavirus statistics up to date with latest inputs coming from all countries. Three such sites I could find were nCoV2019.live by Avi Schiffmann, the COVID-19 map by CNA, and the Coronavirus Update by Worldometers.info. After checking the information and the way it is presented, the Worldometers site seems ideal, as the information about the number of cases and deaths is updated in the title of the Web page itself, reducing the complexity of the scraping process.
Server.js and startServer
First, we express in Server.js that we need the Cheerio and Request libraries also to be supported, as shown in the code below. We then add dependencies to the express-http-to-https library.
// we’ve started you off with Express (https://expressjs.com/)
// but feel free to use whatever libraries or frameworks you’d like through `package.json`.
const express = require(“express”);
const cheerio = require(“cheerio”);
const request = require(“request”);
const redirectToHTTPS = require(‘express-http-to-https’).redirectToHTTPS;
The server processing starts with a startServer(); call. The sections below explain the non-trivial code we added, namely, to instantiate the express() instance, and make the HTTP to HTTPS redirection a part of PWA solutions that work only with HTTPS requests. There is more about this in the latter part of the article. The most important thing is to register our function getCounts as the method which will serve data when we get a Get request for /counts or /counts/. There is some more boilerplate code for standard logging and serving public files, which we will not go into right now. The core of our processing is in the getCounts function, which we will see in the next section.
Make an Express app instance. Register for HTTP to HTTPS redirection. This can be ignored for now but is needed for PWA purposes.
const app = express(); // express app instance
// Redirect HTTP to HTTPS,
app.use(redirectToHTTPS([/localhost:(\d{4})/], [], 301));
Type the standard logging code, followed by code that registers /counts or /counts/ to getCounts() function.
// Logging for each request
app.use((req, resp, next) => {
const now = new Date();
const time = `${now.toLocaleDateString()} - ${now.toLocaleTimeString()}`;
const path = `”${req.method} ${req.path}”`;
const m = `${req.ip} - ${time} - ${path}`;

// eslint-disable-next-line no-console
console.log(m);
next();
});

// Handle requests for the data
app.get(“/counts/”, getCounts);
app.get(“/counts”, getCounts);
Make public files available and send back index.html as response. Then log the listener port.
// make all the files in ‘public’ available
// https://expressjs.com/en/starter/static-files.html
app.use(express.static(“public”));
// https://expressjs.com/en/starter/basic-routing.html
app.get(“/”, (request, response) => {
response.sendFile(__dirname + “/views/index.html”);
});
// listen for requests :)
const listener = app.listen(process.env.PORT, () => {
console.log(“Your app is listening on port “ + listener.address().port);
});
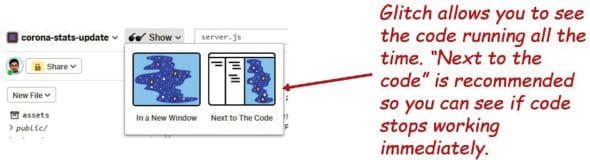
| Note: The client code and the server code need to be in sync for the data delivered by our server to be interpreted and displayed correctly by our client. Currently, our unstated agreement is to serve a list of strings out of the /counts call from the server. By continuously testing the code during development, you can find out whether something you changed is breaking the client as soon as it happens. It is strongly recommended to use the ‘Show -> Next to the Code’ option to have the code running side by side with the coding window and keep the code running all the time. Options are shown in Figure 2. |
To make PWA related auditing and to check Chrome-> developer tools, it may be easier to use Show -> In a New Window so that you have more real estate to see your app and the dev tools options side by side, without code panes taking up screen space.
The getCounts method
Now let us flesh out the getCounts method. As explained in the code sections below, we basically initiate a GET request using the Request library, process the response using Cheerio, read the title from the body of the response, do some string manipulation to reduce the string to ‘<nCases> <nDeaths>’ , split it, and then process and return the cases and deaths back to the client using the response.json() method.
1. We get a reference to both the request and response in the getCounts method:
// now make function to get new counts
function getCounts(req, resp) {
2. Use the requests library to place a GET request to our stats Web page:
request(
{
method: “GET”,
url: “https://www.worldometers.info/coronavirus/”
},
3. Log errors and use Cheerio to load the response body into variable $:
(err, res, body) => {
if (err) return console.error(err);
let $ = cheerio.load(body);
4. Reduce ‘Coronavirus Update (Live): <nCases> Cases and <nDeaths> Deaths from COVID-19 Virus Outbreak – Worldometer’ to ‘<nCases> <nDeaths>’:
let title = $(“title”);
console.log(title.text());
let coronaupdate = title.text();
let mnstr = coronaupdate
.replace(“Coronavirus Update (Live):”, “”)
.replace(
“Deaths from COVID-19 Wuhan China Virus Outbreak - Worldometer”,
“”
)
.replace(“Cases and”, “”);
5. Use the string split() to array and process the first and third splits.
| Note: split() gives a second element for the space even if <space> is the separator. |
const numbers = mnstr.trim().split(“ “);
const infections = numbers[0];
const deaths = numbers[2];
6. In a Web API we can return the values as JSON formatted elements; however, for simplicity, we simply return the cases and deaths in a list. Respons.json() handles the conversion.
oldcounts[0] = “cases “ + infections;
oldcounts[1] = “deaths “ + deaths;
resp.json(oldcounts);
| Note: Cheerio allows many more options using selectors in a syntax like jQuery. Feel free to experiment with using better selectors and attributes that can avoid replacing multiple strings, as done in the above code. |
Client side processing
Let us now shift our focus to the client side where we have simple index.html in which we process the list of items sent by the server. As explained in Figure 7, the client basically uses a simple unordered list <ul> which is populated with the coronavirus statistics. The code below instructs index.html to use the client-side script.js, about which we will learn more in the next section.
<!-- import the webpage’s client-side javascript file -->
<script src=”/script.js” defer></script>
| Note: Glitch gives a very cool option to automatically format/beautify the file by doing some auto-aligning. You can select ‘Format this file’ from the GUI to enable this feature. Even a particular part of the code can be formatted with the same option, which changes to ‘Format this selection’ once a portion of the code is selected. |
A Simple <ul> list names counts where our client side script can now populate the values returned by the server:
:
<main>
<h2>The latest COVID-19 stats</h2>

<section class=”counts”>
<ul id=”counts”>
<em>loading counts…</em>
</ul>
</section>
</main>
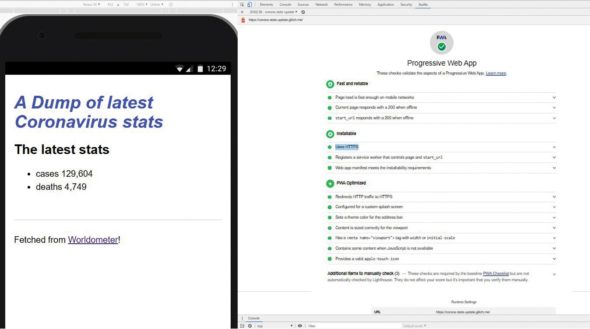
Script.js is present in the public folder, as shown in the code listings below. It runs every time the HTML page is refreshed, and makes a server side query by invoking a GET request to the URL /counts from the server. It then processes the response of the counts list sent by the server and populates the <ul> in the client HTML page. The resultant Web page will look like what’s shown in Figure 3 – a dump of coronavirus statistics.

Fetch /counts from our Web server and use an iterator to pass each count into our appendNewCount() method:
// fetch the initial list of dreams
fetch(“/counts”)
.then(response => response.json()) // parse the JSON from the server
.then(counts => {
// remove the loading text
countsList.firstElementChild.remove();

// iterate through every dream and add it to our page
counts.forEach(appendNewCount);

});
countsList references our <ul> counts in our index.html. Our appendNewCount() method creates a new list item, sets innerText to counts passed, and appends the same into our countsList reference:
// client-side js, loaded by index.html
// run by the browser each time the page is loaded
// define variables that reference elements on our page
const countsList = document.getElementById(“counts”);
// a helper function that creates a list item for a given dream
function appendNewCount(count) {
const newListItem = document.createElement(“li”);
newListItem.innerText = count;
countsList.appendChild(newListItem);
}
The resultant HTML gets displayed, as shown in Figure 3. This basically completes the client part of a coronavirus data scraper using Glitch. What we will see in subsequent sections is how to use the dev tools available in Chrome or browsers based on the Chrome OS like Edge, to build PWA auditing and make our Web page PWA compliant.
Fulfilling the progressive Web app mandate
In the following sections, we look at adding more files and content to our project to make it PWA compliant. We will be able to certify our app as compliant by the Lighthouse audit tool. The Web app manifest does not meet the installation requirements, which basically states that to be a PWA and be able to tick off the advantages mentioned earlier, we need to register a manifest file for our Web app. In the following code segments, we see the manifest.json file added under the public folder with some explanations.
Chrome uses this to make an automatic splash screen, along with background_color, apart from also making the PWA SEO-friendly and searchable.
{
“short_name”: “COVID-19 stats”,
“name”: “novelCoronaVirus COVID-19: latest stats on infection and death”,
“description”: “novelCoronavirus COVID-19 information”
Chrome needs a minimum of two icon files of sizes 192×192 and 512×512, which are used for showing the PWA and are also shown in the splash screen and as the installed icon.
“icons”: [
{
“src”: “https://cdn.glitch.com/a812b85a-f21e-4582-a22f-7d2a24581d91%2F192.png?v=1583926151789”,
“type”: “image/png”,
“sizes”: “192x193”
},
{
“src”: “https://cdn.glitch.com/a812b85a-f21e-4582-a22f-7d2a24581d91%2F512.png?v=1583924262338”,
“type”: “image/png”,
“sizes”: “512x512”
}
],
display can be standalone/ fullscreen / minimal-ui. scope defines from what page the PWA manifest will be active. It should cover start_url also. theme_color sets the colour of the toolbar and should match the same value set in the meta of the index.html page.
“start_url”: “/?source=pwa”,
“background_color”: “#3367D6”,
“display”: “standalone”,
“scope”: “/”,
“theme_color”: “#3367D6”
}
Also, our index.html needs to add the references given below to link to the manifest.json and add the theme-color, as shown below:
<link rel=”manifest” href=”/manifest.json” />
<meta name=”theme-color” content=”#3367D6” />
<meta name=”viewport” content=”width=device-width, initial-scale=1” />
| Note: One of the interesting things in the above manifest.json file is the use of the long links for the icon’s src property, like ‘src’: https://cdn.glitch.com/a812b85a-f21e-4582-a22f-7d2a24581d91%2F512.png?v=1583924262338. This is unique to Glitch projects. In other typical projects you are expected to upload your appropriately sized icon files into the /icons folder under the /public folder. However, Glitch treats every resource that you upload as an asset and stores it in a Content Delivery Network (CDN) path that is accessible from everywhere. Hence the src which normally would be /public/icons/img192.png is now replaced by the icon file’s equivalent CDN path, which you can get from the object’s property when you click and select the item that you have uploaded into Assets. |
Showing a custom offline page
One of the basic requirements for a PWA is to be able to show a custom offline page when the user is not connected to the network, so that the offline page of Chrome does not show. This is achieved in steps, first by adding a custom offline page to our project’s public files and then by setting up service workers to cache and use those files for a good offline experience.
So, we start our work by adding an offline.html to our public folder which has only the following changes to start with from the working index.html. Change the item under <ul> counts to display something like in the code section below.
<section class=”counts”>
<ul id=”counts”>
<em>counts unavailable as you are offline</em>
</ul>
</section>
</main>
Now we put in some boilerplate code in public/ service-worker.js to perform the following tasks, as explained in the code of service-worker.js below, namely:
1. Create a local cache and add offline.html to the list of FILES_TO_CACHE.
2. Handle the install event to pre-cache the files in FILES_TO_CACHE.
3. On activation, check and remove the old cached files in case our cache files and cache name have changed to include newer content.
4. Register yourself as the controller for all pages already created in this scope.
5. Handle the fetch event so that non-navigate events can be given back to the browser.
6. Check for failed navigate events and ensure the cached file can be served out of the local cache, in this case, local offline.html content.
// CODELAB: Update cache names any time any of the cached files change.
const CACHE_NAME = “static-cache-v2”;

// CODELAB: Add list of files to cache here.
const FILES_TO_CACHE = [“/offline.html”];

self.addEventListener(“install”, evt => {
console.log(“[ServiceWorker] Install”);

// CODELAB: Precache static resources here.
evt.waitUntil(
caches.open(CACHE_NAME).then(cache => {
console.log(“[ServiceWorker] Pre-caching offline page”);
return cache.addAll(FILES_TO_CACHE);
})
);
self.skipWaiting();
});

self.addEventListener(“activate”, evt => {
console.log(“[ServiceWorker] Activate”);

// CODELAB: Remove previous cached data from disk.
evt.waitUntil(
caches.keys().then(keyList => {
return Promise.all(
keyList.map(key => {
if (key !== CACHE_NAME) {
console.log(“[ServiceWorker] Removing old cache”, key);
return caches.delete(key);
}
})
);
})
);

self.clients.claim();
});

self.addEventListener(“fetch”, evt => {
console.log(“[ServiceWorker] Fetch”, evt.request.url);

// CODELAB: Add fetch event handler here.
if (evt.request.mode !== “navigate”) {

// Not a page navigation, bail.
return;
}
evt.respondWith(
fetch(evt.request).catch(() => {
return caches.open(CACHE_NAME).then(cache => {
return cache.match(“offline.html”);
});
})
);
});
| Note: Currently, we are doing basic offline handling within our PWA. To improve the experience however, we can add the fetched content into another DATA_CACHE and serve that instead of our offline.html. This is beyond the scope of this article, though readers are encouraged to check out relevant resources. |
To complete the coding for service workers, we now need to add boilerplate code into index.html so that service workers are registered, installed and activated by the browser, as shown below:
<script>
// CODELAB: Register service worker.
if (“serviceWorker” in navigator) {
window.addEventListener(“load”, () => {
navigator.serviceWorker.register(“/service-worker.js”).then(reg => {
console.log(“Service worker registered.”, reg);
});
});
}
</script>
More than installable:
Putting in place a custom install experience
Strictly speaking, this task is not a PWA audit error, but more an expected industry standard experience where the PWA audit already shows the Web app as installable. To complete this we add some more boilerplate JavaScript code in install.js as shown in the code explanations below, and reference the same from index.html with the <script> tags the way we already did for service-worker.js.
Create an Install button, register for a click, listen for beforeinstallprompt and also for the app installed events:
let deferredInstallPrompt = null;
const installButton = document.getElementById(“butInstall”);
installButton.addEventListener(“click”, installPWA);

// CODELAB: Add event listener for beforeinstallprompt event
window.addEventListener(“beforeinstallprompt”, saveBeforeInstallPromptEvent);

// CODELAB: Add event listener for appinstalled event
window.addEventListener(“appinstalled”, logAppInstalled);
Save the beforeinstall event and show the Install button:
/**
* Event handler for beforeinstallprompt event.
* Saves the event & shows install button.
*
* @param {Event} evt
*/
function saveBeforeInstallPromptEvent(evt) {
// CODELAB: Add code to save event & show the install button.
deferredInstallPrompt = evt;
installButton.removeAttribute(“hidden”);
}
Show the install prompt and hide the Install button:
/**
* Event handler for butInstall - Does the PWA installation.
*
* @param {Event} evt
*/
function installPWA(evt) {
// CODELAB: Add code show install prompt & hide the install button.
// CODELAB: Log user response to prompt.
deferredInstallPrompt.prompt();
// Hide the install button, it can’t be called twice.
evt.srcElement.setAttribute(“hidden”, true);
Log the selection and reset variables:
// CODELAB: Log user response to prompt.
deferredInstallPrompt.userChoice.then(choice => {
if (choice.outcome === “accepted”) {
console.log(“User accepted the A2HS prompt”, choice);
} else {
console.log(“User dismissed the A2HS prompt”, choice);
}
deferredInstallPrompt = null;
});
}
Make a log that our Web app was installed:
/**
* Event handler for appinstalled event.
* Log the installation to analytics or save the event somehow.
*
* @param {Event} evt
*/
function logAppInstalled(evt) {
// CODELAB: Add code to log the event
console.log(“CoronaVirus Stats Dump App was installed.”, evt);
}
Index.html changes for theme-colour, apple-touch-icon and Install.js are all shown in the code segment below:
<meta name=”viewport” content=”width=device-width, initial-scale=1” />
<meta name=”theme-color” content=”#3367D6” />
<link rel=”apple-touch-icon” href=”https://cdn.glitch.com/a812b85a-f21e-4582-a22f-7d2a24581d91%2F192.png?v=1583926151789”>
<!-- CODELAB: Add the install script here -->
<script src=”/scripts/install.js”></script>
Successful Lighthouse audit
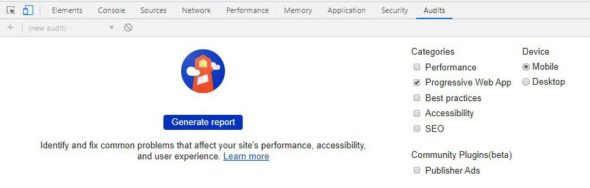
After all the above changes, launch dev tools through the ‘…’ menu in the context menu of the Web page. Then, choose More Tools -> Developer Tools -> Audits and generate a report as shown in Figure 4.
If all goes well, you should get a successful report, as shown in Figure 5.
You can also try installing your PWA in your Web browser and your mobile phone. You can launch the app in the mobile phone and install it too. The code for this project is also available in Glitch. Feel free to mix and edit the same.
In this article we looked at how to make a progressive Web app by getting hands-on to develop a coronavirus statistics dump with a Web scraping app built with Cheerio in Glitch. We then made various changes, as required, with boilerplate JavaScript code in order to pass a Lighthouse audit. Now you are all set to take control of your Web apps and make them all-powerful and universal with many more tools and strategies to explore. All the best in your PWA journey!


