This article presents a simple tutorial on how to set up your own cloud storage on your Windows machine using Nextcloud, along with a comparison between ownCloud and Nextcloud.
Why waste valuable storage space on your PC or phone when you can store documents and media in the cloud? Computer systems have been steadily moving away from local storage to remote, server based storage and processing – which is also known as the cloud.
Is cloud storage really needed?
Cloud storage is ideal when you want to access your personal files, documents, videos or images quickly. With the cloud, your data is stored on hardware that is in a remote physical location, which can then be accessed from any device over the Internet. Cloud storage delivers a cost-effective, scalable alternative to storing files in on-premise hard drives or storage networks.
If you don’t yet have a service for storing and syncing your data in the cloud, you should seriously consider using one.
Nowadays we are highly dependent on Google Drive or Dropbox to backup important data, but these share one major drawback – they are third-party choices that you have to trust with your data. So rather than trusting third party software, you can build your own cloud storage using Nextcloud.
Nextcloud is a suite of client-server software for creating and using file hosting services. It is one of the most popular free and open source cloud storage services available right now. It has been growing fast, and has gained a lot of popularity in recent years.
An interesting fact about Nextcloud is that it was originally a fork of the ownCloud project, NextCloud Hub. It’s a content collaboration platform, offering chat, office, shared calendar and many more – all of it in the same place.
Nextcloud vs ownCloud
- ownCloud offers a set of exclusive features only to its premium subscribers, whereas Nextcloud offers a complete set of features to both community and enterprise editions. The premium subscription for Nextcloud includes support for only enterprise deployments.
- ownCloud users can only use some of the features in the commercially-licensed enterprise edition. On the other hand, Nextcloud components are available under the free AGPLv3 license.
- Nextcloud is one step ahead with security features like brute force protection, password handling, rate limiting and much more.
- ownCloud has a scalability of only up to 20,000 users whereas in the case of Nextcloud this is unlimited.

This is why Nextcloud is a better option than ownCloud. If you’ve ever thought about creating a DIY personal cloud storage, you are at the right place.
The 20 easy steps
You can deploy your own Nextcloud server on your Windows machine in 20 easy steps:
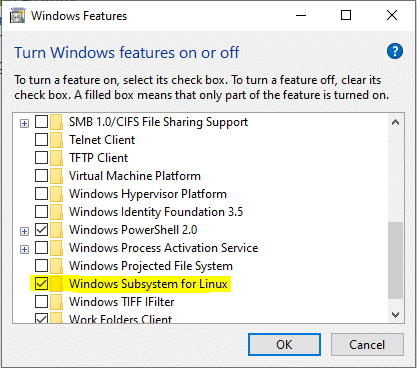
- Enable WSL (Windows sub-system for Linux).
- Go to Control Panel -> Programs -> Turn Windows features on or off -> Check Windows Subsystem for Linux
- Install Ubuntu 18.04 LTS from Microsoft Store, and after installation click on Launch.
- Create your UNIX user name and password.
- Update the packages using the command:
sudo apt update && sudo apt upgrade –y
5. Install Apache, PHP, MySQL for Nextcloud using the command:
sudo apt install apache2 mysql-server php7.2 libapache2-mod-php7.2 php7.2-gd php7.2-json php7.2-mysql php7.2-curl php7.2-mbstring php7.2-intl php-imagick php7.2-xml php7.2-zip php7.2-dom
6. Download and install the Nextcloud server.
Go to the official Nextcloud page and get the download link: Wget https://download.nextcloud.com/server/releases/nextcloud-19.0.1.zip
7. Extract the Nextcloud server files using the command:
sudo apt install unzip nextcloud-19.0.1.zip
8. Copy the Nextcloud files to Apache Web directory:
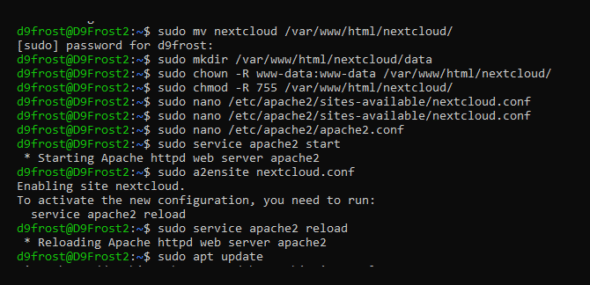
sudo mv nextcloud /var/www/html/nextcloud/
9. Create a data folder inside the copied folder:
sudo mkdir /var/www/html/nextcloud/data
10. Set the permissions for Nextcloud directory:
sudo chown -R www-data:www-data /var/www/html/nextcloud/
sudo chmod -R 755 /var/www/html/nextcloud/
11. Create a new configuration file called nextcloud.conf:
sudo nano /etc/apache2/sites-available/nextcloud.conf
12. Paste the code mentioned below, and save and close using (ctrl + o and ctrl + x):
<VirtualHost *:80>
DocumentRoot /var/www/html/nextcloud/
Alias /nextcloud “/var/www/html/nextcloud/”
<Directory /var/www/html/nextcloud/>
Options +FollowSymlinks
AllowOverride All
Require all granted
<IfModule mod_dav.c>
Dav off
</IfModule>
SetEnv HOME /var/www/html/nextcloud
SetEnv HTTP_HOME /var/www/html/nextcloud
</Directory>

ErrorLog ${APACHE_LOG_DIR}/error.log
CustomLog ${APACHE_LOG_DIR}/access.log combined

</VirtualHost>


13. Open the apache2.conf file and add these lines to the configuration file:
AcceptFilter http none
AcceptFilter https none
sudo nano /etc/apache2/apache2.conf
14. Enable the newly created site:
sudo service apache2 start
sudo a2ensite nextcloud.conf
sudo service apache2 reload
sudo apt update
15. Additional Apache configuration is:
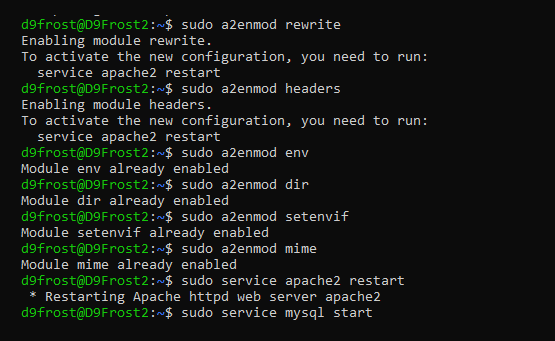
sudo a2enmod rewrite
sudo a2enmod headers
sudo a2enmod env sudo a2enmod dir
sudo a2enmod setenvif
sudo a2enmod mime
sudo service apache2 restart
16. Create a MySQL database for Nextcloud:
sudo service mysql start
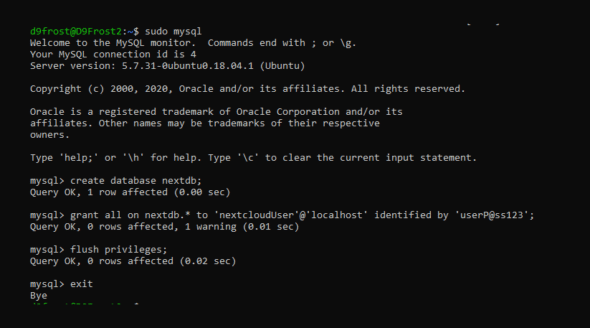
sudo mysql
MySQL queries:

CREATE DATABASE gamer;
GRANT ALL ON gamer.* to 'D9Frost'@'localhost' IDENTIFIED BY 'D9Fr0st123';
FLUSH PRIVILEGES;
Exit
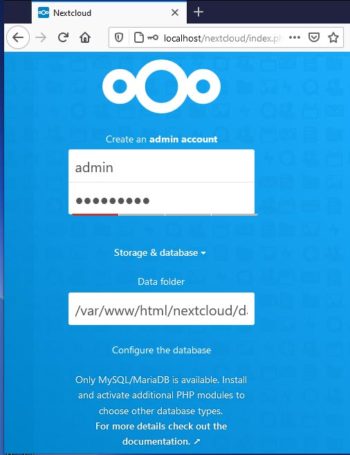
17. Setup Nextcloud and Go to your browser and type: http://localhost/nextcloud
18. Set up your admin account for Nextcloud, and below that enter all the database details as mentioned in point 16. For the database I created:
Database Name: Gamer
Username: D9Frost
Password: D9Fr0st123
Localhost
Click on Finish Setup; it will take a few minutes to set up the account.
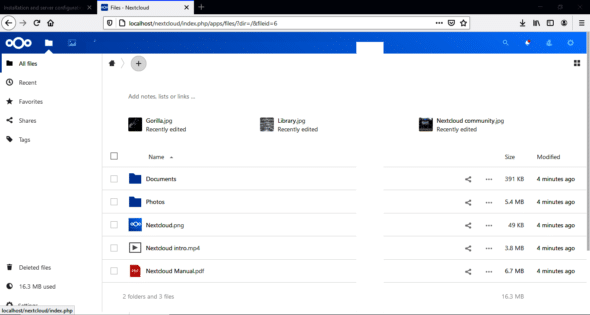
20. You have successfully installed your Nextcloud server on your own local machine.
Nextcloud is the way forward in terms of the future of data storage on the cloud. It is reliable and trustworthy due to its growing open source community.


