


This article is a beginner-friendly guide to Git and can be used as a starting point. It introduces newbies to Git concepts, its terminologies, and a few basic operations with concise examples. After referring to this guide, users will be able to use Git confidently in their projects.
Git is a distributed version control system. It is used for tracking changes in source code during the software development process. It was initially designed and developed by Linus Torvalds for Linux kernel development. It is free software distributed under the terms of the GPLv2 license. It mainly focuses on speed, data integrity, distributed development, and non-linear workflows.
Git is the de facto standard in version control systems. It became popular because of its speed and distributed development model. One might want to know what a distributed version control system is and how it is different from other version control systems.
A centralised version control system uses a central server to store all files and enable collaboration. In this model, every operation requires communication with the central server. However, this design imposes a major limitation. The central server is a single point of failure. If it fails, all collaborators who depend on the server will be affected. This is where distributed version control systems come into the picture. A distributed version control system does not rely on the availability of the central server. Every user gets the entire copy of the repository. Hence, it is possible to work on the repository even when the Git server is unavailable. The connectivity to the server is required only while syncing the changes.
A few salient features of Git are:
- Free and open source
- Inexpensive branching and merging
- Distributed in nature
- Implicit backup
- Small, fast and less resource hungry
Basic terminology
This section discusses the terminology and operations of Git.
Working tree: This is a directory on the local file system where the source code resides.
Repository: Repository is the workspace that contains source code and metadata of its versions. The local repository resides on the local file system, whereas the remote repository resides on the remote Git server.
Commit: This is a Git object that represents the change set within the repository. A unique SHA-1 hash is assigned to each commit.
Clone: This is a Git operation that downloads the entire remote repository to the local file system.
Pull: This syncs the local repository with the remote repository by downloading new files.
Push: This Git operation uploads files (one or more commits) from a local repository to the remote repository.
Installation and configuration
Git is free and open source software. One can download and use it without any restrictions. Follow the steps given below to install Git on a Windows server:
1. Go to https://gitforwindows.org/ and download the latest version of Git.
2. Double click on the installer and follow on-screen instructions.
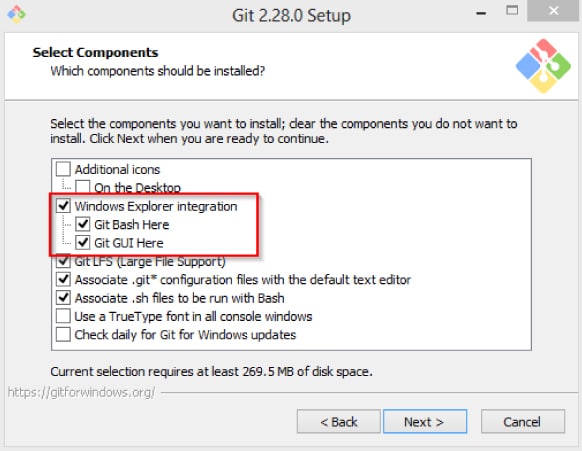
3. Don’t forget to select the ‘Windows Explorer Integration’ option during setup. Please refer to Figure 1.
4. Go to the Start menu and launch ‘Git Bash’. You should see a command prompt, as shown in Figure 2.
We have successfully installed Git on a Windows machine. Let us configure it using CLI. Configure the user name and email by executing the commands given below in a terminal:
$ git config --global user.name “Jarvis”
$ git config --global user.email “jarvis@acme.com”
| Note: Use your user name and e-mail address while configuring Git. This information will appear in each commit you perform. |
Now, execute the command given below to validate the configuration:
$ git config –list
This command will generate the following output:
diff.astextplain.textconv=astextplain
filter.lfs.clean=git-lfs clean -- %f
filter.lfs.smudge=git-lfs smudge -- %f
filter.lfs.process=git-lfs filter-process
filter.lfs.required=true
http.sslbackend=openssl
http.sslcainfo=C:/Program Files/Git/mingw64/ssl/certs/ca-bundle.crt
core.autocrlf=true
core.fscache=true
core.symlinks=false
pull.rebase=false
user.name=Jarvis
user.email=jarvis@acme.com
Here, we can see the user name and email address, which we configured earlier. Congrats! You have successfully configured Git on your machine.
Basic Git workflow
Most of the times, you will be using the existing repository hosted in your organisation’s network. Hence, we will use a public repository for demonstration. We will walk through the basic Git workflow. As part of this workflow, we will perform the following steps in the order they are listed:
1. Download source code from the remote repository
2. Inspect the repository
3. Modify the repository and check the status of the repository
4. Upload files to the repository
5. Sync local repository to the remote repository
Download source code
Clone is a Git operation that downloads the remote repository to the local file system. For our demonstration, we will use the Redis repository hosted on GitHub. This repository is publicly accessible. To clone this repository, execute the command given below in the terminal:
$ git clone https://github.com/redis/redis.git
In the above command, the clone is Git’s sub-command, and the next argument is the unique URL of the repository. After successful completion, you should see an output similar to this:
Cloning into ‘redis’...
remote: Enumerating objects: 11, done.
remote: Counting objects: 100% (11/11), done.
remote: Compressing objects: 100% (11/11), done.
remote: Total 69075 (delta 1), reused 2 (delta 0), pack-reused 69064
Receiving objects: 100% (69075/69075), 92.93 MiB | 1.65 MiB/s, done.
Resolving deltas: 100% (48902/48902), done.
Updating files: 100% (837/837), done.
Execute the ls command as follows to verify the download of the repository:
$ ls redis/
This command should generate the following output:
00-RELEASENOTES deps/ README.md runtest-moduleapi* tests/
BUGS INSTALL redis.conf runtest-sentinel* TLS.md
CONTRIBUTING Makefile runtest* sentinel.conf utils/
COPYING MANIFESTO runtest-cluster* src/
Inspect the repository
Now that we have a copy of the remote repository on a local file system, let us inspect the repository. First, cd to redis as follows:
$ cd redis
To list all commits from the repository, execute the command:
$ git log
This command will show details of the commit. The output will appear in the UNIX pager (e.g., less). One can use the up and down arrow keys to scroll through the commits. Press q to quit the pager.
The git log command generates a verbose output. Execute the command given below to generate the non-verbose output:
$ git log –oneline
This command should generate the following output:
57b8e0069 support sentinel myid subcommand (#7858)
bea40e6a4 memory reporting of clients argv (#7874)
f87a47dc9 fix new build warning about getGenericCommand (#7882)
6418d767e redis-cli add control on raw format line delimiter (#7841)
66ee45b65 Add GET parameter to SET command (#7852)
In the above command, the first column is a unique SHA-1 hash of the commit. This value is generated and assigned to each commit automatically. In Git terminology, it is called a commit id. The second column is the commit message, which was provided by the user. We can use the commit id to check commit contents. For example, the command given below shows the contents of the ‘57b8e0069’ commit:
$ git show 57b8e0069
This command will show details of commit like SHA-1 hash, the author’s name and e-mail, date and time, commit message, and the actual code changes made. One can use the up and down arrow keys to scroll through the commit and q to quit the UNIX pager.
To see files belonging to the particular commit, use the –name-only option as follows:
$ git show 57b8e0069 --name-only
This command will generate the following output:
commit 57b8e00695d037971 342cbcc43734a990bfaf081
Author: Wen Hui <wen.hui.ware@gmail.com>
Date: Mon Oct 5 06:37:20 2020 -0400
support sentinel myid subcommand (#7858)

src/sentinel.c
The above output shows that the src/sentinel.c file belongs to the 57b8e0069’ commit id.

Modify the repository
We can modify the repository by adding, removing, or editing files from the repository. Each operation will change the status of the repository. Let us verify the status by executing the command:
$ git status -s
This command will not generate any output, as the repository status is clean.
Let us add, remove, and edit a file from the repository, and verify the status:
$ echo “This is sample file” > sample-file.txt
$ echo “Jarvis” >> CONTRIBUTING
$ rm COPYING
$ git status -s
Now the repository status has been changed. The status command will show the following output:
M CONTRIBUTING
D COPYING
?? sample-file.txt
In the above output, the letter ‘M’ in the first column indicates that there has been a modification to the ‘CONTRIBUTING’ file. The letter ‘D’ indicates that the ‘COPYING’ file has been deleted. The ‘??’ indicates that sample-file.txt is the new file and Git doesn’t know anything about it.
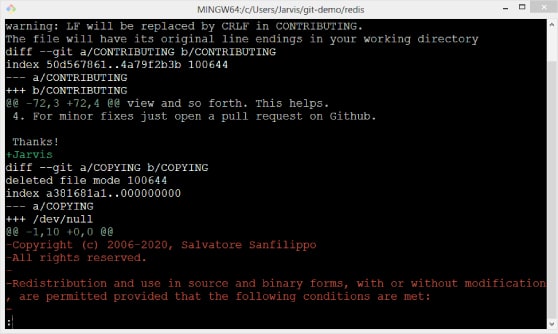
To verify the changes made in the repository, execute the git diff command as follows:
$ git diff
This command will show output in the UNIX pager. The lines in green with the ‘+’ symbol at the beginning represent the new addition to the repository. The lines in red with the ‘-’ symbol at the beginning represent deletion from the repository. Figure 3 is the screenshot of the same.
Upload files to the repository
In the previous section, we made a few changes to the repository. However, those changes are still on the local file system. Let us upload them to the remote repository.
First, create a changeset. We will include all the three files in the changeset as follows:
$ git add CONTRIBUTING COPYING sample-file.txt
$ git status -s
The above command will generate the following output:
M CONTRIBUTING
D COPYING
A sample-file.txt
If you see carefully, there is the letter ‘A’ before the sample-file.txt file, which indicates that it’s a new file in the repository and part of the current changeset. Now, let us create a commit:
$ git commit -m “Sample commit”
This command will generate the following output:
[unstable be159ed3d] Sample commit
3 files changed, 2 insertions(+), 10 deletions(-)
delete mode 100644 COPYING
create mode 100644 sample-file.txt
Let us verify the commit using the log command as follows:
$ git log --oneline
be159ed3d (HEAD -> unstable) Sample commit
Wonderful! Our commit appears in the repository. Also, a unique SHA-1 hash is generated and assigned to it.
However, our changes are still present on the local file system. To send this commit to the remote repository, execute a push command as follows:
$ git push
Note: Connectivity to the remote Git server is needed to perform this operation.
Syncing the repository
In the previous section, we uploaded our changes to the remote repository. Similarly, other developers will upload their changes to the remote repository too. Hence, we should sync our local repository periodically. We can use the pull command for this:
$ git pull
| Note: Connectivity to the remote Git server is needed to perform this operation too. |


