


Heroku is one of the most popular PaaS platforms in the market, specifically targeted towards developers who are about to start their journey in cloud computing. Flask is an open source Web application framework written in Python that is known for its simplicity and ease of deployment. This article is a quick tutorial to help you get started with cloud computing using the best and most easy-to-use technologies.
If you are just getting started with cloud computing and can’t wait to deploy your first app with as little jargon as possible, then this article is a good place to start. There are many benefits of using Flask with Heroku, but the primary benefit is the speed with which you can deploy your projects on the cloud.
Why use Heroku for deployment
Heroku is a Platform as a Service (PaaS) provider, which is ideal for developers who are just getting started with cloud computing. It offers a basic package that is free for cloud enthusiasts who just want to poke around a bit with the platform. It takes care of most of the installation jargon for you, and you can get your app up and running in no time. The major benefits of using Heroku are:
- It is user-friendly
- There is no infrastructure needed
- It supports multiple languages and frameworks
- It offers a good analytics and reports module
- It uses the Git version control system by default
Why use the Flask Web application framework
When it comes to Python based Web development frameworks, you might be tempted to go with something standardised such as Django. But if it’s the speed of deployment that is your major concern, as is the case in this article, then Flask should be your go-to framework.
The major benefits of using Flask are:
- Extremely flexible
- Simple to use
- Small core and easily extensible
- Fast in deployment
- Built-in encryption for user sessions
Now let’s use a simple example to show how to deploy a Flask app on Heroku.
The requirements are:
- Python
- Pip
- Heroku CLI
- Git
Basic knowledge of Git is important as we use a lot of its command lines. Nevertheless, just follow the instructions given below.
Step 1: Download Heroku CLI
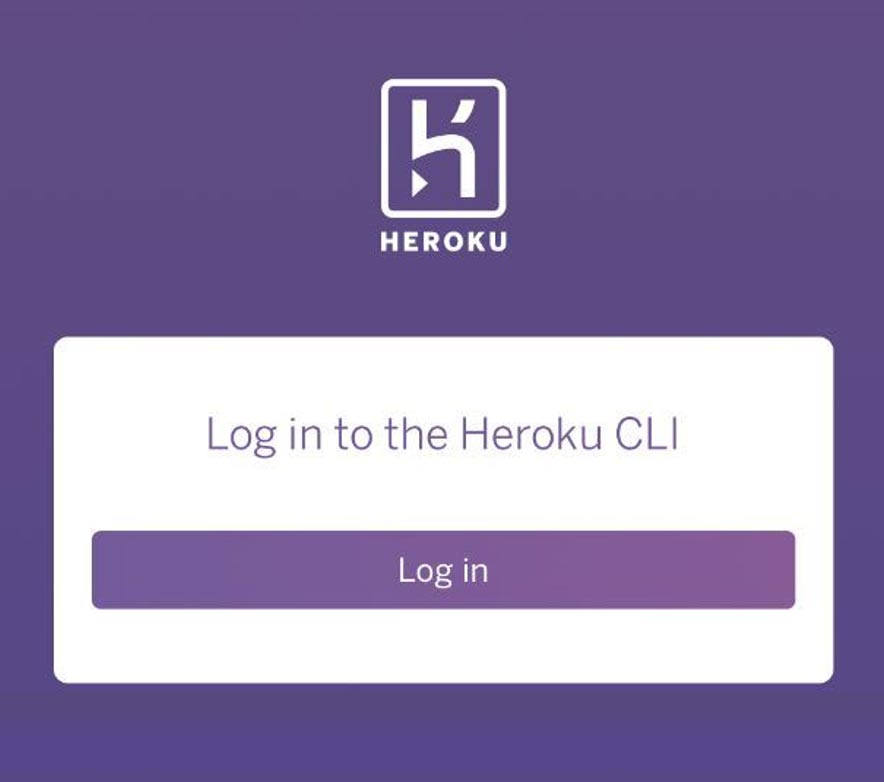
The Heroku CLI is used for managing the application after deployment. After downloading the CLI, run the following command in the terminal to log in:
heroku login
Make sure you use the credentials that you entered while signing up on the Heroku platform, i.e., email id and password.
Step 2: Creating the app
Create a folder and give it a name, e.g., firstflask. Inside the folder, open a command window and start on the creation of a simple Flask application.
i. Create a virtual environment with pipenv and then install Flask and Gunicorn. Type and run the following command:
$ pipenv install flask gunicorn
ii. Create a Procfile. It is used to hold commands that will run on startup. Then write the following code in it:
$ touch Procfile

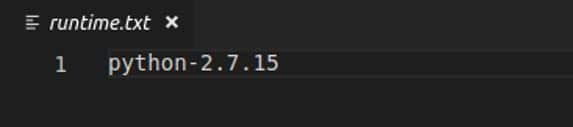
iii. Next, create runtime.txt and then write the following code:
$ touch runtime.txt
iv. Create a folder and give it a name of your choice, e.g., app. Then access the folder:
$ mkdir app
$ cd app
v. Next, create a Python file, i.e., main.py:
touch main.py
vi. Write the following code in main.py:
from flask import Flask
app = Flask(__name__)
@app.route(“/”)
def home_view():
return “<h1>Welcome to Your first App on Heroku</h1>”
vii. In the already created firstflask directory, create a wsgi.py file and write the following code in it:
$ cd ../
$ touch wsgi.py
viii. Write the following code in the wsgi.py file:
filter_none
brightness_4
from app.main import app
if __name__ == “__main__”:
app.run()
ix. Run the created virtual environment:
$ pipenv shell
Step 3: Deploying the app
i. In Git, initialise an empty repo and add files in it, and then commit the changes.
$ git init
$ git add .
$ git commit -m “Initial Commit”
ii. Log in to Heroku CLI:
heroku login
iii. Create a preferred name for your Web application, say, firstflask:
$ heroku create eflask-app
iv. Run the code:
$ git push heroku master
And that’s it. You have just uploaded your first app to the Heroku cloud using Flask. Congratulations! Needless to say, you are just getting started here. There is much more that can be done using the Heroku platform. I hope this article motivates you to get started with writing your apps to the Heroku platform and joining the cloud revolution.


