


Docker is a Platform as a Service (PaaS) product, using which developers can build, ship and run their applications inside Docker containers. Now used everywhere, it is the new way of application deployment. The Docker Toolbox, Docker Desktop and the Windows Subsystem for Linux (WSL) are all designed to expand its reach and make life easier for developers.
Docker has revolutionised the DevOps pipeline. A Docker image, as most of us know, is a static representation of the application, as well as its configuration and dependencies. These images are stored in a remote public registry, called Docker Hub. Thus, to run an application stored as an image, we must pull the image and run it in a container. For those who do not have any background knowledge about Docker, a container is a live instantiation of an image. As Docker has become a huge success, one might want to learn about this technology without having a separate Linux installation. This is where Docker for Windows comes in. It not only allows you to run Docker service on Windows but also provides a nice GUI for those who are not very comfortable with the command line interface (CLI). Let us see what Docker for Windows can offer to its users.
Docker Toolbox
If your Windows is older than 16299 and does not satisfy the requirements of the new Docker Desktop, then Docker Toolbox can help you. Docker Toolbox is not managed by Docker but is available for use on GitHub. It provides you with a Docker Quickstart Terminal, Kitematic, and Oracle VirtualBox. Docker Quickstart Terminal is a preconfigured Docker CLI, while Kitematic provides a GUI for Docker. Docker engine commands like docker-machine and docker-compose are also included.
The questions that arise are: how is Docker Toolbox enabling us to use Docker on Windows? What is the technology underlying it? As stated earlier, Docker Toolbox includes Oracle VirtualBox as well. What could be the purpose of a virtual machine in using Docker on Windows? Let’s answer these questions.
Linux-specific kernel features namespace and Cgroup, which are used by the Docker Engine Daemon. Thus, running Docker inherently on Windows is not possible. So, the Windows system hosts the Docker Engine on a compact Linux virtual machine, which is created by Docker Toolbox using the Docker machine command for creating and attaching this machine. Also, this machine is very small and may not run many commands. Let us look at the installation process and how the toolbox can be used.
Installing Docker Toolbox
Before installing Docker Toolbox, ensure that your system has 64-bit Windows 7 or higher, and virtualisation is enabled.
The installation steps are as follows:
- Docker Toolbox is no longer maintained by Docker, so download it from the GitHub URL at https://github.com/docker/toolbox/releases. Download the .exe file.
- Double click the installer for installing Docker Toolbox.
- If your system already has VirtualBox installed, uncheck it. Also, if VirtualBox is running, stop it before installing Docker Toolbox.
- Accept all other default settings and install Docker Toolbox. Once it has been successfully installed, it can be verified by the three new icons on your desktop, namely, Docker Quickstart Terminal, Oracle VirtualBox, and Kitematic (Alpha).
Docker Quickstart Terminal
To start using Docker on Windows, click on Docker Quickstart Terminal. This launches the pre-configured Docker Toolbox terminal, which sets up everything on its own. Choose ‘Yes’ each time it prompts for permission. This terminal runs the bash shell instead of the Windows command prompt, as Docker needs it for running.
Once the setup is completed, a Docker shell will show up, and you can verify by executing the command docker —version.
This terminal supports all Docker commands like pulling an image from the Docker Hub and running a container from the pulled image. We can also commit and push an image to Docker Hub.
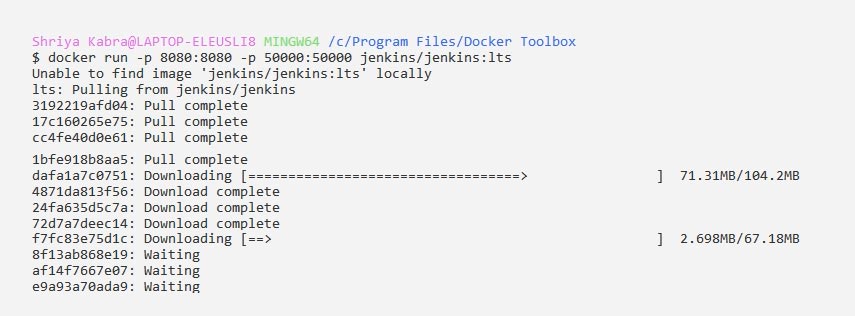
Let us create a container using Docker Quickstart Terminal with a Jenkins image running in it. The command for this is docker run -p 8080:8080 -p 50000:50000 jenkins/jenkins:lts. Figure 1 shows the above Docker command in execution.
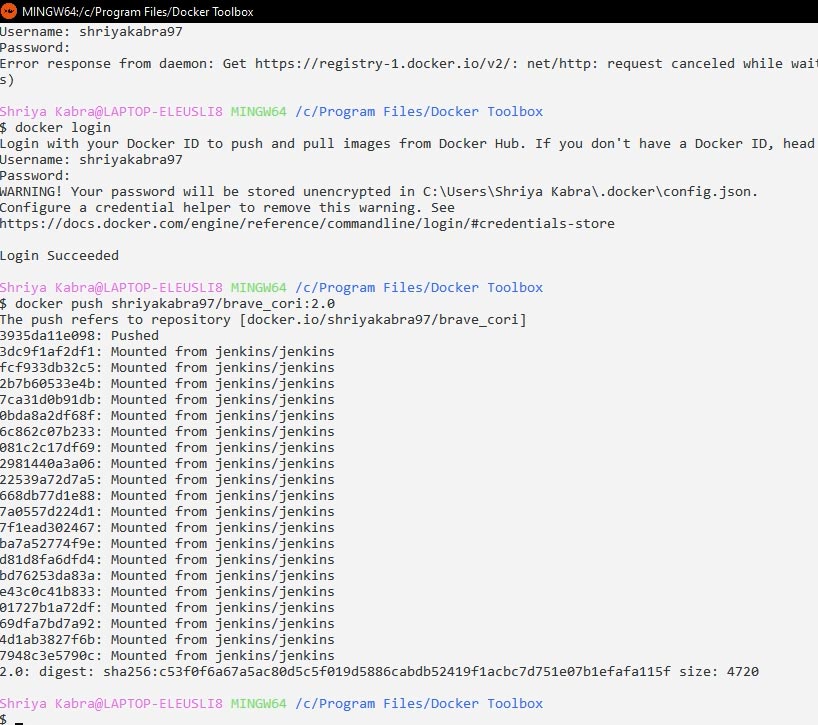
Now, let us see how we can publish an image to the Docker Hub Registry. For this, run the following commands:
$docker commit <container_name> <docker_hub_repository>/<new_image_name>:<image_tag>
$docker login
$docker push <image-name>:<tag>
Note that these commands can be used to publish the image to any Docker Registry.
Figure 2 shows how an image can be published to the Docker Hub Registry.
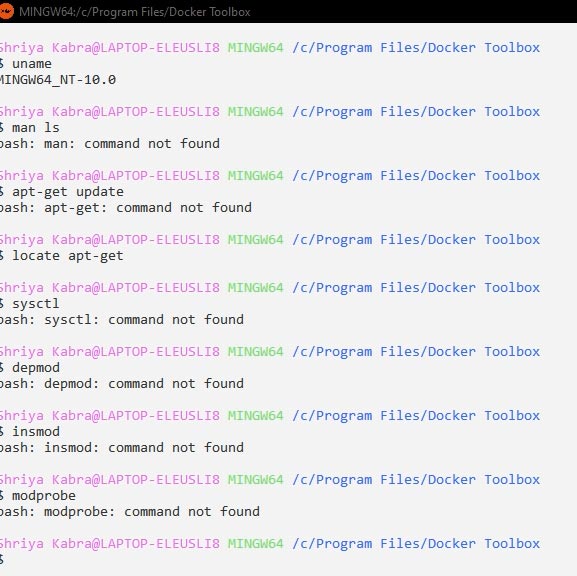
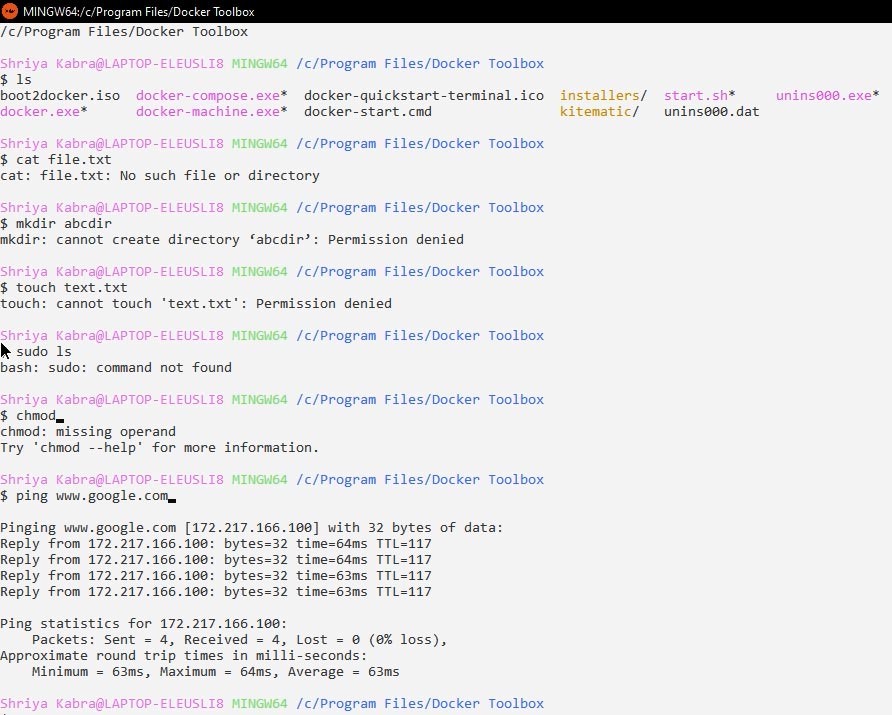
Let us explore this terminal by trying some other commands. Figures 3 and 4 show some basic Linux commands that do not run on Docker Quickstart Terminal and those that run on the terminal, respectively.
Kitematic (Alpha)
This is for software engineers who are not at ease with the CLI and Docker commands. Kitematic offers a GUI for working with Docker images and containers. Most of the basic functions can be executed with it. For using it, you must create a virtual machine when asked, and login with your Docker Hub ID.
In the left panel of Kitematic GUI, you will find the list of all stopped and running containers. The main panel lists all the recommended images from Docker Hub and the images in your own repository too. We can search for images and create new containers by clicking on Create. We can also specify port numbers, version, and tag of the image that we wish to pull.
On selecting a particular container in the left panel, a new view shows up. As we have run a Jenkins image on port number 8080, we can see the container logs in the main panel and Web Preview on the top right panel. Volumes are shown in the lower right panel. Output of container logs is shown in Figure 5.

We can also view and update container properties from the Settings panel. Settings shows all the container properties like container name, environment variables, exposed ports, networks, etc. We can always go to this panel and change the settings as required. Thus, with the Kitematic GUI, it has become easier to create and manage containers. Figure 6 shows the Settings of the Jenkins container.
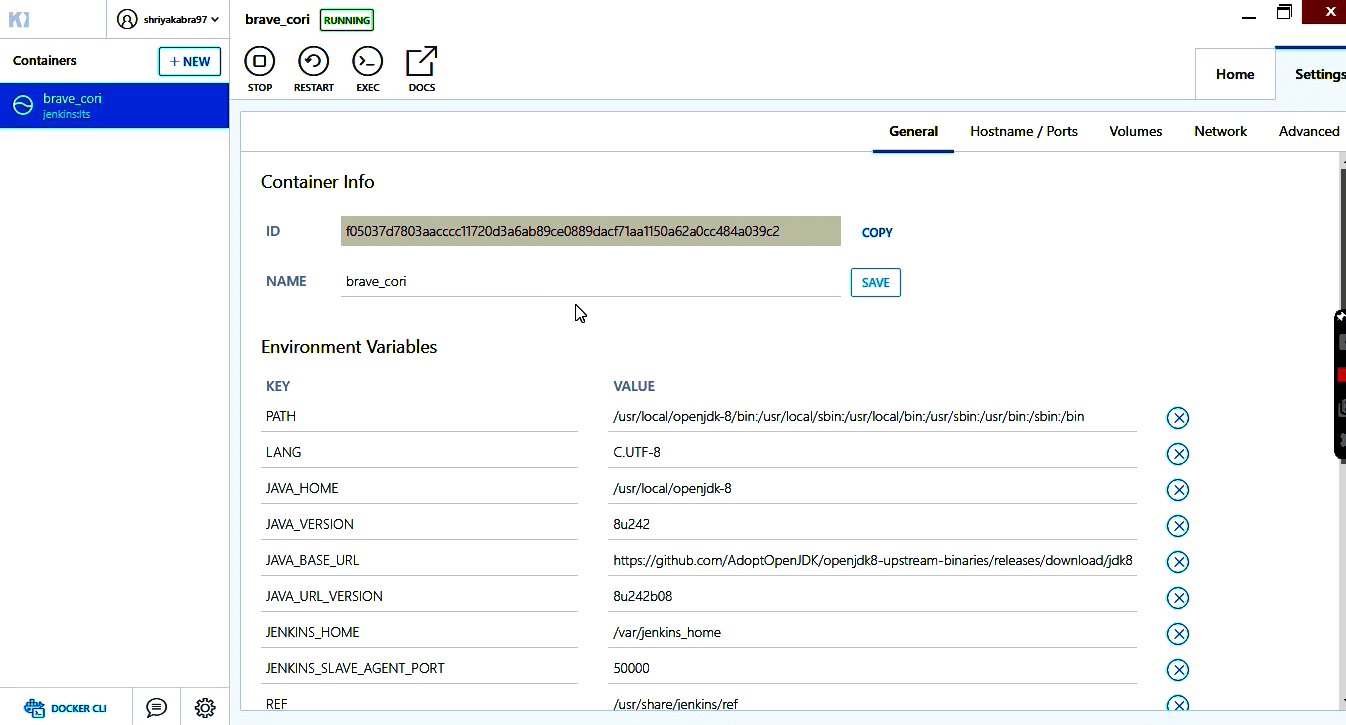
Image migration
Migration of Docker images from Docker Toolbox to Docker Desktop can be easily done by saving the image as a tar file by following these steps:
1. Create a separate directory for Docker images and give it all the permissions as in the commands given below:
$mkdir ~/docker-images
$cd ~/docker-images
$chmod 777 ./
2. Use the docker save command for creating a tar file:
$docker save <image_id> -o ./<image_name>.tar
3. The tar file can be found in the docker-images directory.
This tar file will be loaded on to the Docker Desktop using the docker load command, details of which will be covered later in the article.
If Docker Toolbox is great, why Docker Desktop?
Docker Toolbox has certain issues that Docker Desktop solves. A virtual machine is no longer a good option for Docker installation as new and better technology such as ‘Windows Subsystem for Linux’ is available and Docker Desktop uses this. also, not all operations are possible with Kitematic. The option of pushing images is missing, and many tabs do not work as expected. Based on our experience, we recommend Docker Desktop rather than Docker Toolbox. If your system cannot support Docker Desktop, then Docker Toolbox is a good option for using Docker on Windows. The uninstallation procedure for Docker Toolbox is available at https://docs.docker.com/toolbox/toolbox_install_windows.
What is WSL?
Consider the task of running Linux distros on Windows machines. The obvious solution that comes to mind is running it in a virtual machine. Software like Oracle VirtualBox and VMware Workstation can help us with that. The software allocates some fixed computing resources to the virtual machine. Using a virtual machine puts heavy load on the host machine. This is because virtual machines use a static allocation of resources. Hence, when it is running, a chunk of the host machine’s resources get blocked, which deteriorates its performance. Also software like Oracle VirtualBox and VMware Workstation are type-2 hypervisors, which means they access the host machine hardware indirectly through the host OS. This slows down the virtual machine too. Life would be much simpler if we could directly run our Linux distros without the involvement of such software.
If there were ways using which we could use basic Linux tools and applications directly on Windows, all our worries would have gone away. Windows Subsystem for Linux (WSL) does exactly this. WSL allows us to run distros available on Microsoft Store on Windows machines. It allows processes running in Windows and Linux to communicate with one another. A client-server application stored on a Windows file system may have its GUI (client-side) running on Windows and its server-side running on Linux. Thus, WSL makes it possible to develop applications that can run on both Windows and Linux simultaneously.
WSL uses a hyper-optimised lightweight virtual machine, which is different from traditional virtual machines. It boots up in very little time and is completely managed by Windows itself. Thus, external software (like VirtualBox) is not needed.
WSL 1 vs WSL 2
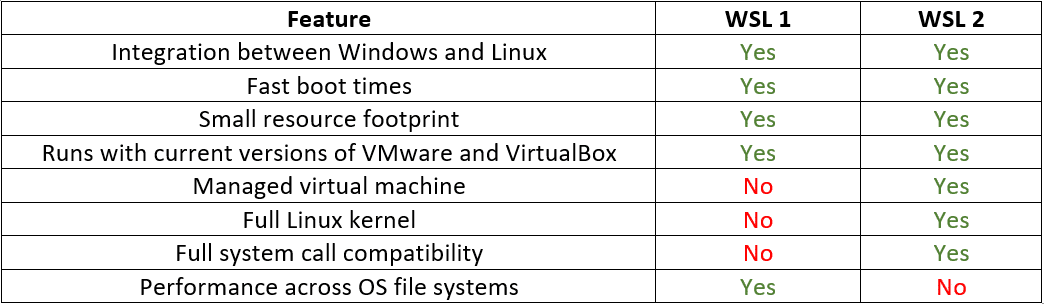
WSL 2, released after WSL 1, is an improvement over the latter. The file system performance is much better in the second version. Also, it supports all the system calls supported by the Linux kernel. A detailed comparison between WSL 1 and WSL 2 is shown in Figure 7. WSL 2 enables virtualisation through the native virtualisation technology of Windows OS and Hyper-V. It does create a virtual machine behind the scenes, but the creation is done by WSL 2 in a highly optimised manner. It ensures less resource utilisation by allocating resources dynamically as and when required by the virtual machine. Also, Windows automatically switches off inactive virtual machines. This contributes to reducing the time to start the virtual machine.
Currently, WSL 2 is available by default in Windows 10 Version 2004. However, users of Windows 10 Version 1903 (build number 18362.1049+) and Windows 10 Version 1909 (build number 18363.1049+) can manually upgrade to WSL 2. Follow the steps given in the next section to do so. Windows also allows both versions of WSL to run in parallel. We can run Ubuntu distro on a Windows machine with WSL 2 and Kali Linux with WSL 1.
Install WSL 2
To install WSL 2 on Windows 10 Version 1903 or Windows 10 Version 1909, follow the steps given below.
- Before installing WSL 2, you need to make sure that your OS build number is appropriate. To check this, do the following:
a. Press the Windows key + R and enter winver.
b. Click on OK. This shows the OS build information in a new window. - If your OS build number conforms to the above-stated requirements, then skip this step. Otherwise, you need to update your OS to the latest version. This can be done by checking for available Windows updates and installing them. The steps for the same are given below:
a. Click on the Start button and open Settings. Then go to Update and Security.
b. Click on Check for updates and install all the available updates. - Now, we need to enable the WSL and virtual machine platform features of Windows. For this, run the following commands in Windows PowerShell with administrative privileges:
$dism.exe /online /enable-feature /featurename:Microsoft-Windows-Subsystem-Linux /all /norestart

$dism.exe /online /enable-feature /featurename:VirtualMachinePlatform /all /norestart
4. Download the latest Linux kernel update package from https://wslstorestorage.blob.core.windows.net/wslblob/wsl_update_x64.msi for x64 machines and from https://wslstorestorage.blob.core.windows.net/wslblob/wsl_update_arm64.msi for ARM64 machines. The command systeminfo | find ‘System Type’ shows the architecture used in your system. This will help you select the appropriate package.
5. Run the package downloaded in the previous step.
6. Restart the machine to finish WSL 2 installation.
To know more about the nuances of each step or about troubleshooting errors, visit https://docs.microsoft.com/en-us/windows/wsl/install-win10.
Docker Desktop for Windows
Docker Desktop is an application that can be used on Windows for the development of containerised applications. It includes Docker Engine, Docker CLI client, Docker Compose, Notary, Kubernetes and Credential Helper. Using Docker Desktop, we can build and publish Docker images, run them in Docker containers, get information about the resource utilisation of containers, and much more, all through a user-friendly GUI. For experienced users, it also provides a CLI client. Docker Desktop also allows us to access the Docker Hub repository from its interface. Thus, we can download images from public repositories and private repositories.
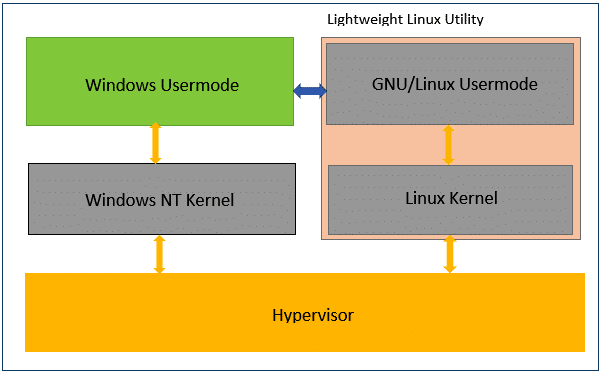
But why is using Docker on a Windows machine difficult and not as seamless as in the case of Linux machines? What are the mechanisms that make this possible? The limitation of Docker is that it can only run on the Linux kernel since type-1 and type-2 hypervisors use hardware-level virtualisation, whereas containers use kernel-based virtualisation. To run Docker on Windows, we need virtualisation software that can emulate a Linux kernel. Docker Desktop utilises Microsoft’s Hyper-V hypervisor, which is a native hypervisor capable of creating virtual machines on x86-64 machines running the Windows operating system. Figure 8 shows how any Linux distribution can run on a full Linux kernel made available by WSL 2.
Docker Desktop integrates easily with WSL 2 and can be run with the WSL 2 backend, as it takes advantage of the full Linux kernel and Linux system call support provided by WSL 2. WSL 2 allows users to use Linux workspaces, and hence developers do not have to write different build scripts for Windows and Linux machines. The WSL 2 backend greatly reduces the resource requirements of running a container. This is because WSL 2 makes sure that Docker Desktop uses up memory and CPU only in the required amounts. The direct advantage of this fact is that the current version of Docker Desktop brings down the Docker daemon startup time to less than 10 seconds. Adding to this, when WSL 2 is running in a Windows machine, Docker commands can even be executed directly from Windows PowerShell.
It is very easy to install and run Docker Desktop with the WSL 2 backend. First, enable WSL 2 in your machine if it is not already enabled. Then, follow the given steps.
- Download the latest stable release of Docker Desktop for Windows from https://hub.docker.com/editions/community/docker-ce-desktop-windows.
- Run the downloaded installer by double-clicking it and following the instructions. Turn on the WSL 2 feature if prompted during installation.
- A Start menu entry of Docker Desktop gets created. Launch Docker Desktop from there.
- Go to the General tab on the Settings page.
- Select the ‘Use WSL 2 based engine’ checkbox if it is not selected by default, and then click on the Apply & Restart button.
Now, let us learn how to perform some basic operations using Docker Desktop GUI.
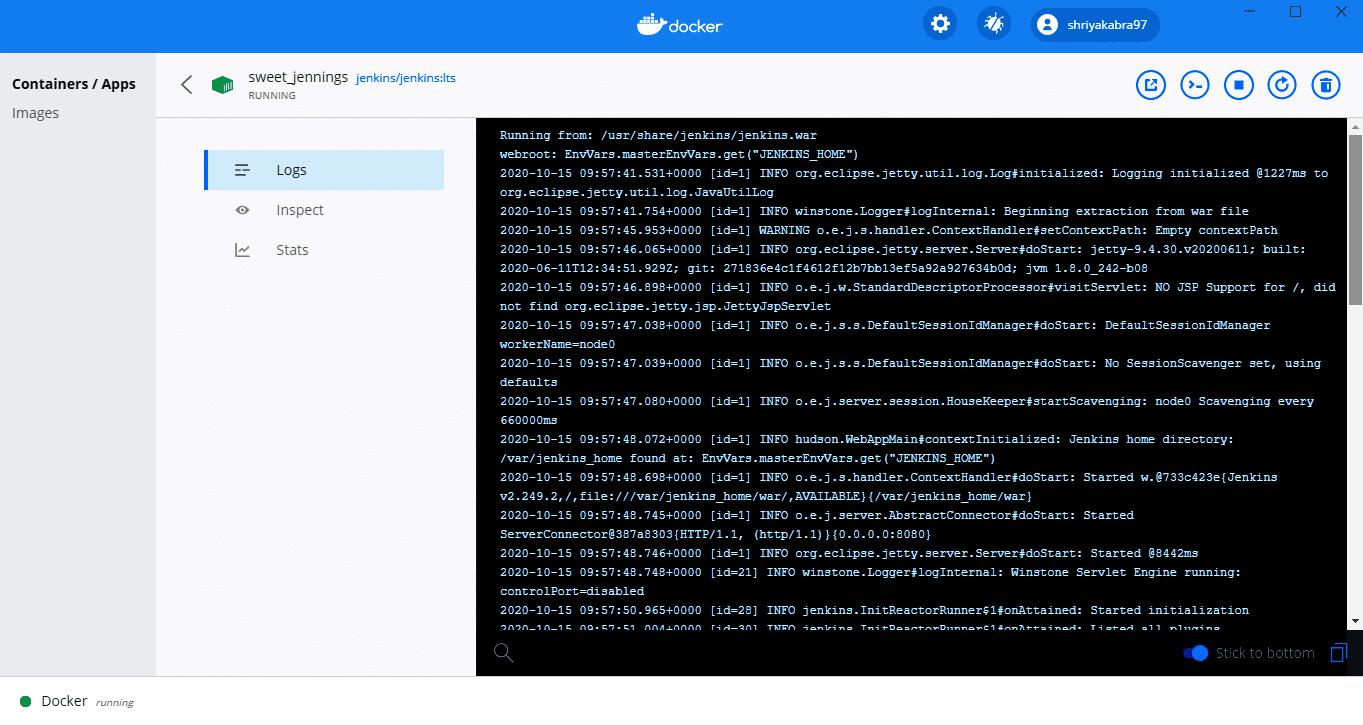
In the bottom-left corner, we can see the status of the Docker service. The left panel lists two tabs – Images and Containers/Apps. The Images tab shows various images created locally as well as in the private repository on Docker Hub. We can pull images from the Docker Hub repository by clicking on the Pull button that appears when we hover the mouse pointer over an image. The pulled image will then get listed in the local images tab. To run an image in a container, click on the Run button beside each local image. The new container window will open. Enter details like container name, port mappings, and volume mappings, and then click the Run button. This creates a container shown in the Containers/Apps tab, along with other containers created by us. Clicking on any container name shows the Details page of the container. This page has three options:
Logs: This shows the container output and logs generated during container execution, as shown in Figure 9.
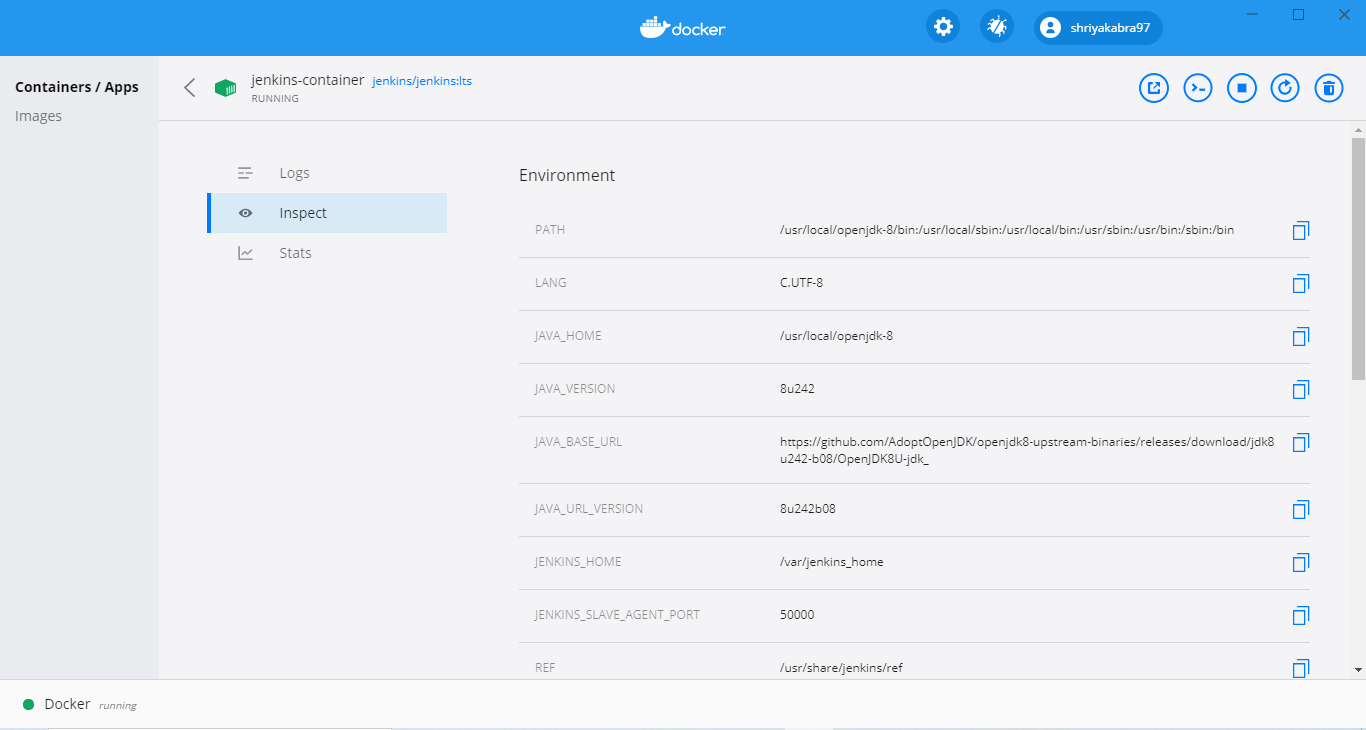
Inspect: This shows various properties of the environment setup in the container. This includes properties like environment variables, ports, and volumes bound to the container, as shown in Figure 10.
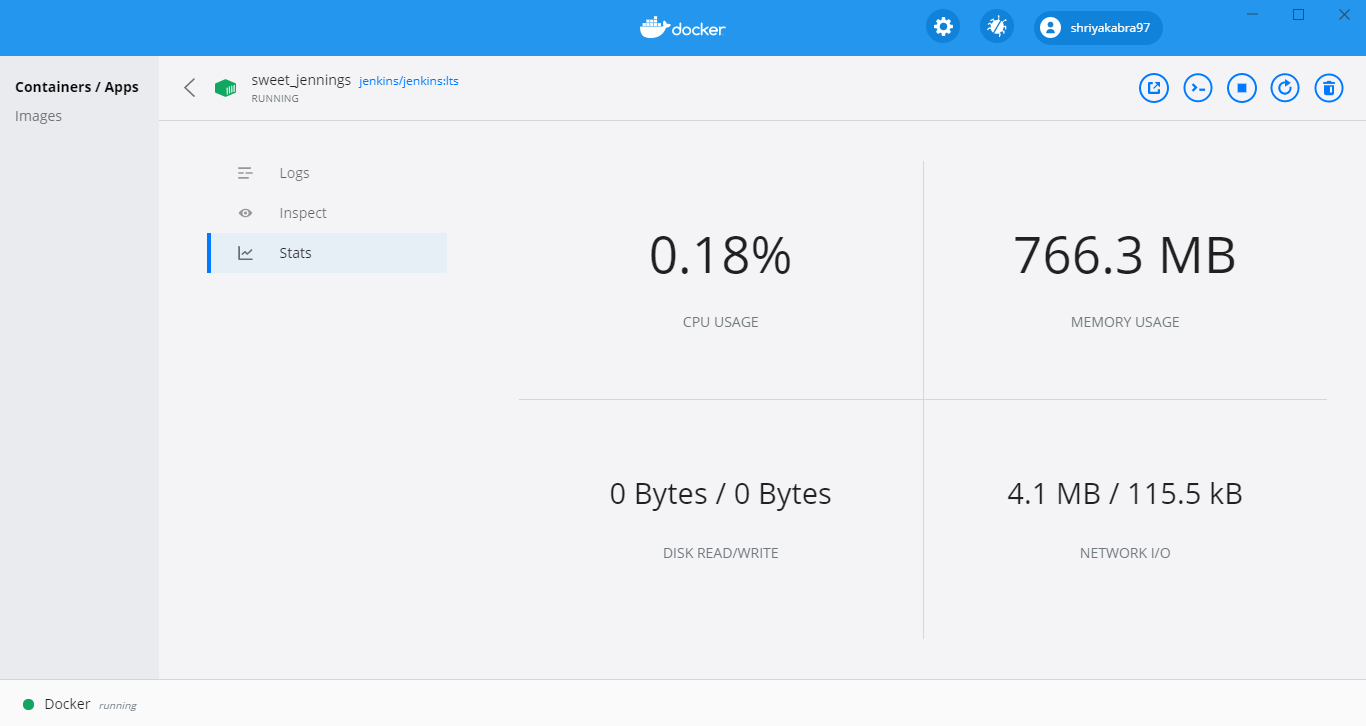
Stats: This shows various container statistics like memory usage, CPU usage, data read from and written to the disk, and data sent and received over the network, as shown in Figure 11.
One of the main advantages of using Docker Desktop on top of WSL 2 is that it allows us to execute Docker commands directly from the Windows PowerShell. The following command pulls the Jenkins image from Docker Hub (if not available locally) and runs it in a container:
$docker run -p 8080:8080 -p 50000:50000 jenkins/jenkins:lts
You can save the container as an image by running the following command:
$docker commit <container_name>

<docker_hub_repository>/<new_image_name>:<image_tag>
Remember the image we saved as a tar file for migrating it from Docker Toolbox to Docker Desktop? It is now time to load that image. Run the following command to do so:
$docker load --input <image_name>.tar
Today, Docker has become an integral part of all DevOps (including DevSecOps, GitOps, AIOps, MLOps, etc) pipelines. It makes developing, building, and shipping containerised applications very easy. By using Docker containers, developers have to worry less about project dependencies as well as differences between development and deployment environments. Docker for Windows is another step towards this, as now different developers in a development team may use different operating systems and still collaborate seamlessly. WSL 2 makes it even easier to run Docker on Windows. For developers using older Windows systems, Docker Toolbox makes it possible for them to use Docker. All in all, it just helps developers to focus more on development and less on maintaining the environment.


