


Have you ever struggled to test SaltStack states or formulas before rolling them out into production, or wondered how to validate SaltStack code changes without breaking the existing SaltStack environment? This tutorial shows how to design a seamless testing and validating workflow using KitchenSalt, Docker and TestInfra to test the SaltStack environment independently.
SaltStack or Salt is one of the most potent configuration management tools to automate infrastructure at scale. It facilitates users to efficiently manage the end-to-end life cycle of the servers, starting from bootstrapping a new node to deploying a live application on it. Despite being a robust automation engine, there is no easy way to test and validate the Salt code changes other than running them on individual servers and checking the results manually. Doesn’t sound like an ideal practice, especially when dealing with a massive infrastructure and considering a bunch of developers working simultaneously on the same Salt code. Moreover, making such changes in production without independent testing could lead to a non-functioning Salt infrastructure.
But KitchenSalt and TestInfra reduce that risk. They allow users to replicate an independent infrastructure that is similar to the production environment locally and execute end-to-end validations against it.
What follows in this article assumes that you have the following knowledge:
- Understanding of SaltStack and its basic building blocks
- Understanding of Docker and its core commands
- Basics of Python & Ruby (Gem) for installing dependent libraries
You will
need the following in order to design the workflow:

Latest and stable version of Docker
Ruby version >=2.6, along with Test-Kitchen, Kitchen-Docker and Kitchen-Salt libraries
Python version 3.x, along with PyTest and TestInfra modules

[root@ip-172-31-31-154 kitchen-salt]# docker --version
Docker version 1.13.1, build 7d71120/1.13.1
[root@ip-172-31-31-154 kitchen-salt]# ruby --version
ruby 2.7.6p219 (2022-04-12 revision c9c2245c0a) [x86_64-linux]
[root@ip-172-31-31-154 kitchen-salt]#gem --version
3.0.3.1
[root@ip-172-31-31-154 kitchen-salt]#bundle --version
Bundler version 2.3.24
[root@ip-172-31-31-154 kitchen-salt]# python3 --version Python 3.6.8
[root@ip-172-31-31-154 kitchen-salt]# pip3.6 install -r requirements.txt
.....................................................Successfully installed attrs-22.1.0 certifi-2022.9.24 charset-normalizer-2.0.12 idna-3.4 importlib-metadata-4.8.3 iniconfig-1.1.1 packaging-21.3 pluggy-1.0.0 py-1.11.0 pyparsing-3.0.9 pytest-7.0.1 pytest-testinfra-6.8.0 requests-2.27.1 testinfra-6.0.0 tomli-1.2.3 typing-extensions-4.1.1 urllib3-1.26.12 zipp-3.6.0
How does it work?
To design a seamless testing workflow, we will use KitchenSalt in conjunction with TestInfra to improve the quality of states and reduce errors while deploying Salt code in a production environment.
KitchenSalt is built on top of Test Kitchen, which was initially developed to test and validate Chef workflows. It is a provisioner for SaltStack, which permits users to leverage Test Kitchen to validate the SaltStack environment locally without a Salt master or minions. On the other hand, TestInfra is a Python testing module written on top of the popular Pytest testing framework. With the help of TestInfra, users can run integration or unit tests to validate the actual state of the servers configured by SaltStack.
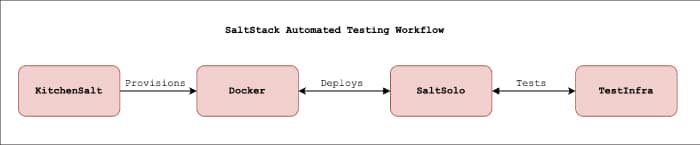
Figure 1 illustrates the logical representation of the entire workflow, where we will spin up a Docker container using KitchenSalt and apply Salt states or formulas to it. Once the provisioning is completed, a few integration tests will be run with the help of TestInfra to validate the state of the provisioned container.
Prepare Webserver formula
For this demonstration, we will need a working Salt formula. So, let’s create a basic one to install and configure a Webserver instance. The formula consists of the following three essential states.
- install.sls: To install Webserver (Apache) packages on the instance
- configure.sls: To set up Webserver conf and index.html page
- service.sls: To start Webserver service once setup is completed
[root@ip-172-31-31-154 kitchen-salt]# cat webserver/install.sls
{% from “webserver/map.jinja” import vars with context %}
{{ sls }}.pkg:
pkg.installed:
- name: {{ vars[‘package’] }}
{{ sls }}.group:
group.present:
- name: {{ pillar[‘app_user’] }}
- gid: {{ pillar[‘gid’] }}
- require:
- pkg: {{ sls }}.pkg
{{ sls }}.user:
user.present:
- name: {{ pillar[‘app_user’] }}
- uid: {{ pillar[‘uid’] }}
- gid: {{ pillar[‘gid’] }}
- home: {{ pillar[‘doc_root’] }}
- shell: /bin/nologin
- allow_uid_change: true
- require:
- group: {{ sls }}.group
Now let us set up the webserver configuration file config.sls as below:
[root@ip-172-31-31-154 kitchen-salt]# cat webserver/config.sls
{% from “webserver/map.jinja” import vars with context %}
include:
- webserver.install
{{ sls }}.index.html:
file.managed:
- name: {{ pillar[‘doc_root’] }}/index.html
- source: salt://webserver/files/index.html
- require:
- sls: webserver.install
{{ sls }}.server.conf:
file.managed:
- name: {{ pillar[‘server_conf’] }}
- source: salt://webserver/templates/httpd.conf.j2
- template: jinja
- require:
- sls: webserver.install
Next, configure the service.sls to start webserver service once setup is completed.
[root@ip-172-31-31-154 kitchen-salt]# cat webserver/service.sls
{% from “webserver/map.jinja” import vars with context %}
include:
- webserver.install
- webserver.config
{{ sls }}.service:
service.running:
- name: {{ vars[‘service’] }}
- watch:
- sls: webserver.install
- sls: webserver.config
Installing Kitchen
Once the formula is ready, let’s install the Kitchen-specific dependencies using Gemfile, which requires kitchen-salt, kitchen-docker, and kitchen-sync libraries.
[root@ip-172-31-31-154 kitchen-salt]# cat Gemfile
#Gemfile
source ‘https://rubygems.org’
gem ‘kitchen-salt’
gem ‘kitchen-docker’
gem ‘kitchen-sync’
Next, run the installer which installs all the required dependencies using Gem bundler:
[root@ip-172-31-31-154 kitchen-salt]# gem install bundler
Fetching bundler-0.0.1.gem
Successfully installed bundler-0.0.1
Parsing documentation for bundler-0.0.1
Installing ri documentation for bundler-0.0.1
Done installing documentation for bundler after 0 seconds
1 gem installed
[root@ip-172-31-31-154 kitchen-salt]# bundler install | grep kitchen
Using test-kitchen 3.3.2
Using kitchen-docker 2.13.0
Using kitchen-salt 0.7.2
Using kitchen-sync 2.2.1
Configuring Kitchen
Once the Kitchen dependencies are sorted, let’s create a .kitchen.yml file consisting of Test Kitchen configurations. This is the main file responsible for spinning up a Docker container and deploying the Salt formula.
The file includes the following major components.
- driver: Defines which driver needs to be configured and how to control it. In our example, we will use Docker as a default driver.
- platforms: Defines the platforms or distributions against which it tests Salt states or formulas. We will use CentOS7 as a default platform for this demonstration.
- provisioner: Defines what plugins to use to converge the system and how to apply the changes. The provisioner we use is salt-solo.
- suites: Defines the software suite to be used to test Kitchen against. In this context, Kitchen will test against 3004.2 release of Salt.
- verifier: Defines what tests need to be performed against the newly provisioned infrastructure. We will use TestInfra as a default testing framework to run our tests.
The next step is to put all the configs together:
[root@ip-172-31-31-154 kitchen-salt]# cat .kitchen.yml
driver:
name: docker
use_sudo: false
privileged: true
run_command: /usr/sbin/init
forward:
- 80
provisioner:
name: salt_solo
salt_install: bootstrap
salt_version: latest
salt_bootstrap_url: https://bootstrap.saltstack.com
is_file_root: true
require_chef: false
salt_copy_filter:
- .git
- .kitchen
- Gemfile.lock
- pytests_cache
state_top:
base:
“*”:
- webserver
pillars_from_directories:
- source: pillars/
dest: srv/pillar/
pillars:
top.sls:
base:
‘*’:
- webserver
platforms:
- name: centos-7
- name: ubuntu
suites:
- name: webserver
provisioner:
salt_bootstrap_options: -qX -p git -p curl -p sudo git 3004.2
verifier:
name: shell
remote_exec: false
command: python3 -m pytest -v tests/
Using Kitchen
Now that we have learnt how to set up Test Kitchen, let’s start testing the webserver formula and verify the same using Kitchen. Here are some helpful Kitchen commands that we will be using in this context.
- List: To show the current state of each configured environment
- Login: To log into the built environment
- Converge: To run the provision command, in this case salt_solo, and the specified states
Verify: To run the verifier - Destroy: To remove the created environment
- Test: Consists of creating, converging, verifying, and then destroying states mentioned above
With all this in place, we can now run Kitchen and see it in action.
- First, get a list of the available environments configured in kitchen. yml:
[root@ip-172-31-31-154 kitchen-salt]# bundle exec kitchen listInstance Driver Provisioner Verifier Transport Last Action Last Errorwebserver-centos-7 Docker SaltSolo Shell Ssh <Not Created> <None>webserver-ubuntu Docker SaltSolo Shell Ssh <Not Created> <None>
- Next, run the converge command, which launches a new CentOS7 container, connects to it, and then deploys the webserver formula on top of it.
[root@ip-172-31-31-154 kitchen-salt]# bundle exec kitchen converge webserver-centos-7-----> Starting Test Kitchen (v3.3.2)-----> Creating <webserver-centos-7>..............................................Summary for local------------Succeeded: 6 (changed=6) Failed: 0 ------------ Total states run: 6Total run time: 14.220 s Downloading files from <webserver-centos-7>Finished
converging <webserver-centos-7> (2m3.93s). —–> Test Kitchen is finished. (2m7.80s)
- Then, run some tests against the newly built environment to ensure everything is as it should be:
[root@ip-172-31-31-154 kitchen-salt]# bundle exec kitchen verify webserver-centos-7-----> Starting Test Kitchen (v3.3.2)-----> Verifying <webserver-centos-7>... [Shell] Verify on instance webserver-centos-7 with state={:username=>”kitchen”, :ssh_key=>”/root/kitchen-salt/.kitchen/docker_id_rsa”, :image_id=>”2879404546a1”, :container_id=>”db77fdc81097f502e38ad830cfa61e30d1bd0629df44c550435f0a4ee87e2024”, :hostname=>”localhost”, :port=>32779, :last_action=>”setup”, :last_error=>”Errno::ENOENT”}============================= test session starts ==============================platform linux -- Python 3.6.8, pytest-7.0.1, pluggy-1.0.0 -- /bin/python3 cachedir: .pytest_cache rootdir: /root/kitchen-salt plugins: testinfra-6.8.0, testinfra-6.0.0 collecting ... collected 4 itemstests/integration/test_webserver.py::test_apache_service PASSED [ 25%] tests/integration/test_webserver.py::test_index_file PASSED [ 50%] tests/integration/test_webserver.py::test_website_200 PASSED [ 75%] tests/integration/test_webserver.py::test_website_content PASSED [100%] ============================== 4 passed in 0.66s =============================== /usr/local/lib/python3.6/site-packages/_testinfra_renamed.py:10: DeprecationWarning: testinfra package has been renamed to pytest-testinfra. Please `pip install pytest-testinfra` and `pip uninstall testinfra` and update your package requirements to avoid this message ), DeprecationWarning) Finished verifying <webserver-centos-7> (0m1.08s). -----> Test Kitchen is finished. (0m1.27s) - Finally, destroy the entire setup if everything looks good:
[root@ip-172-31-31-154 kitchen-salt]# bundle exec kitchen destroy webserver-centos-7
-----> Starting Test Kitchen (v3.3.2)
-----> Destroying <webserver-centos-7>...
[Docker] Destroying Docker container db77fdc81097f502e 38ad830cfa61e30d1bd0629df44c550435f0a4ee87e2024
UID PID PPID C STIME TTY TIME CMD
root 1207 32513 0 14:13 ? 00:00:00 /usr/sbin/httpd -DFOREGROUND
1001 1208 1207 0 14:13 ? 00:00:00 /usr/sbin/httpd -DFOREGROUND
1001 1209 1207 0 14:13 ? 00:00:00 /usr/sbin/httpd -DFOREGROUND
1001 1210 1207 0 14:13 ? 00:00:00 /usr/sbin/httpd -DFOREGROUND
1001 1211 1207 0 14:13 ? 00:00:00 /usr/sbin/httpd -DFOREGROUND 1001 1213 1207 0 14:13 ? 00:00:00 /usr/sbin/httpd -DFOREGROUND root 32513 32494 0 14:11 ? 00:00:00 /usr/sbin/init
root 32556 32513 0 14:11 ? 00:00:00 /usr/lib/systemd/systemd-journald
root 32571 32513 0 14:11 ? 00:00:00 /usr/lib/systemd/systemd-udevd
root 32618 32513 0 14:11 ? 00:00:00 /usr/lib/systemd/systemd-logind
dbus 32620 32513 0 14:11 ? 00:00:00 /usr/bin/dbus-daemon --system --address=systemd: --nofork --nopidfile --systemd-activation
root 32656 32513 0 14:11 ? 00:00:00 /usr/sbin/sshd -D
root 32685 32513 0 14:11 tty1 00:00:00 /sbin/agetty --noclear tty1 linux
db77fdc81097f502e38ad830cfa61e30d1bd 0629df44c550435f0a4ee87e2024
db77fdc81097f502e38ad830cfa61e30d1bd0629df 44c550435f0a4ee87e2024
Finished destroying <webserver-centos-7> (0m0.99s).
-----> Test Kitchen is finished. (0m1.17s)
This article has explored KitchenSalt and TestInfra at a surface level; however, it can be extended further by implementing a CI/CD pipeline in Jenkins to test Salt code changes before pushing them into production directly. Another example could be testing the Salt states or formulas against future OS releases of distributions before making a major upgrade in SaltStack. Or validate them against multiple versions of SaltStack to ensure there are no significant regressions.


