


Ansible AWX is an open source community project that provides a web based user interface and API to manage an organisation’s Ansible playbooks, inventories, vaults, and credentials. It is an open source version of Ansible Tower. Ansible AWX makes Ansible simpler for IT teams that are not comfortable with command lines by providing a GUI version of Ansible. This article is a tutorial on how to install and configure it.
Ansible AWX services are deployed inside containers; hence Docker and Docker Compose must be installed in order to run multiple container images. Version 18.x onwards AWX is supported by red hat team via awx operator and not using docker-compose. This installation procedure requires a Kubernetes cluster/minikube and the setup is pretty easy, as described below.
- Docker should be installed in the server machine where AWX is installed.
- Python 3 should be installed on the AWX server and all target machines.
- We are using awx-ee:21.11.0 version.
- Our target machines/hosts are localhost and container.
Installing AWX on Ubuntu using Kubernetes/minikube cluster
For installing AWX in minikube, we have followed the procedure given at https://github.com/ansible/awx-operator with some additional steps.
1. Update and upgrade your Debian system before you install Ansible AWX using the following command:
sudo apt update && sudo apt -y full-upgrade
2. To create a minikube cluster, first install the latest minikube stable release on x86-64 Linux using the command given below:
curl -LO https://storage.googleapis.com/minikube/releases/latest/minikube-linux-amd64.
sudo install minikube-linux-amd64 /usr/local/bin/minikube
3. From a terminal, run the following command with sudo privilege (but not logged in as root) to start Kubernetes/minikube with the required CPU number and RAM size:
minikube start --cpus=4 --memory=6g --addons=ingress
4. Once minikube is deployed, we can check if the node(s) and kube-apiserver communication are working as expected or not by executing the command:
minikube kubectl -- get nodes
5. By executing the following command we can verify whether Kubernetes has started some pods or not:
minikube kubectl -- get pods -A
We do not need to install kubectl separately since it is already wrapped inside a minikube.
6. Once Kubernetes starts making pods, let’s create an alias for easier usage using the following command:
alias kubectl=”minikube kubectl --”
7. When our Kubernetes cluster starts running, we can deploy AWX Operator in our cluster using Kustomize, which is a Kubernetes configuration transformation tool. To install Kustomize by downloading precompiled binaries use the command given below:
curl -s “https://raw.githubusercontent.com/kubernetes-sigs/kustomize/master/hack/install_kustomize.sh” | bash
8. Confirm the installation of Kustomize by checking the version using the following command:
kustomize version
9. Next, create a file called kustomization.yaml, which has the content shown in Figure 1.
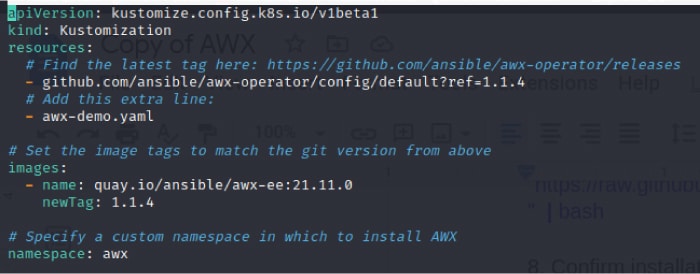
In place of newTag and ref we can pass the latest version of AWX Operator, which can be found at https://github.com/ansible/awx-operator/releases. Here, we are using AWX Operator version 1.1.4. We can also save the latest version from AWX Operator releases as RELEASE_TAG variable, and pass that variable instead of passing the hardcoded latest AWX Operator version.
The AWX Operator is used to manage one or more AWX instances in any name space within the cluster.
10. Now, we have to install the manifests by running the following command:
kustomize build . | kubectl apply -f -
11. Wait for a few minutes and check if the AWX operator is deployed or not by using the command:
kubectl get pods -n awx
If the status shows Running, it means our operator has been deployed successfully.
12. Since we would rather not keep repeating -n awx, we should set the current name space for kubectl using the command given below:
kubectl config set-context --current --namespace=awx
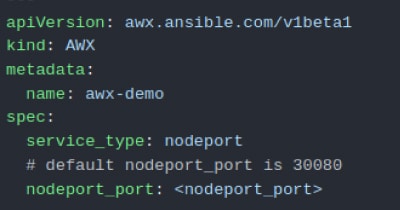
13. Now create another file named awx-demo.yaml in the same folder with the content shown in Figure 2. The name we mention in metadata will be the name of the resulting AWX deployment. The port number to run AWX can be mentioned in the file, or the system will assign the default port number.
14. This awx-demo.yaml file is to be added in the list of resources in the kustomization.yaml file, as shown in Figure 3.

15. Finally, we have to run Kustomize again to create the AWX instance in our cluster by executing the following command:
kustomize build . | kubectl apply -f -
16. After a few minutes, the new AWX instance will be deployed in a cluster and we can also monitor its installation logs using the command:
kubectl logs -f deployments/awx-operator-controller-manager -c awx-manager
17. After a few seconds, we should be able to see that the operator has begun to create new resources by using the command given below:
kubectl get pods -l “app.kubernetes.io/managed-by=awx-operator”
kubectl get svc -l “app.kubernetes.io/managed-by=awx-operator”
18. When AWX is deployed in a cluster, we can access the AWX instance by running the command given below:
minikube service -n awx awx-demo-service --url
19. The user name is admin by default and we can get the password using the following command:
kubectl get secret awx-demo-admin-password -o jsonpath=”{.data.password}” | base64 --decode ; echo
This completes the basic installation. Go to the URL and log in using admin as user name and password.
Running Ansible Playbook using AWX
- We can get the URL of the Ansible AWX dashboard by using the following command:
minikube service -n awx awx-demo-service --url
- The Ansible AWX web portal is now accessible on http://hostip_or_hostname:30080 (by default, the port number is 30080 if we have not set the port number of AWX in the awx-demo.yaml file).
- Launch your browser to access the dashboard and you will get a screen as shown in Figure 4.
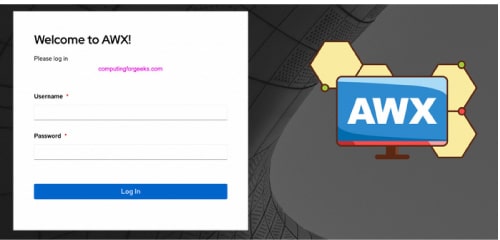
Figure 4: AWX login page - Use admin as user name and get the password by running the following command:
kubectl get secret awx-demo-admin-password -o jsonpath=”{.data.password}” | base64 --decode ; echo Sample password: LkyWUKDwKdnhiEcvFe0zRQ9jOJCz7eM
- Log in using the user name and password, and enter into the AWX Administration Dashboard, which is shown in Figure 5. Now we can start adding inventory, credentials, hosts, projects, templates and Ansible roles, and automate our infrastructure and application deployment.
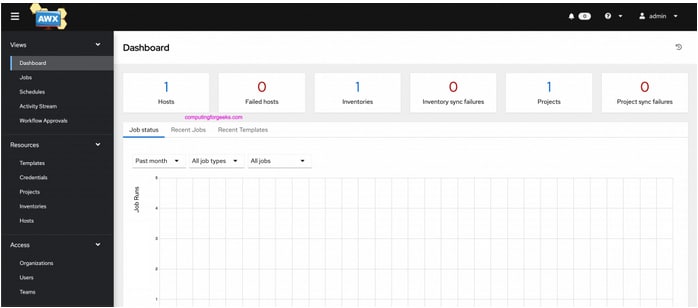
Figure 5: Dashboard
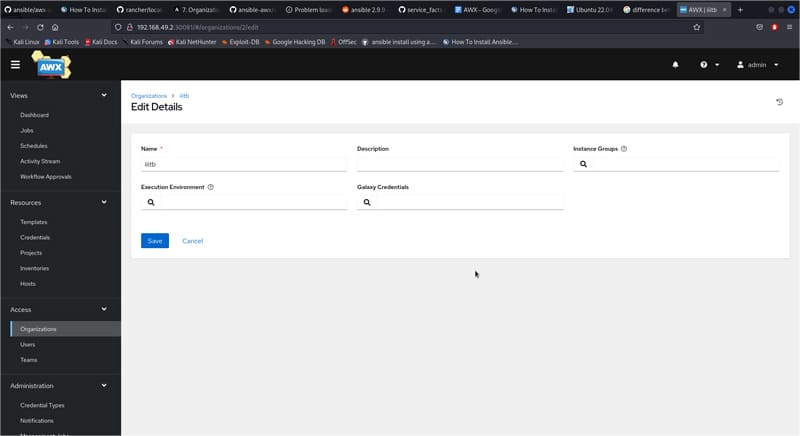
Next, select the organisation tab on the left side of the screen, click on the Add button to add a new organisation, add the name of the organisation and click on Save (Figure 6).
Inventory setup
- Now go to Inventory and click on the Add button to create inventory.
- Enter inventory name and if you want to create this inventory for a specific organisation, you can select the created organisation, or else choose Default and then save it.
- In variable, we pass those parameters that we want to apply to all hosts connected to that inventory. Here we want to connect with hosts/target machines using ssh. So we have to pass ansible_connection: ssh in variable.
- If you get an error related to the Python interpreter while executing the template, add ansible_python_interpreter: ‘{{ ansible_playbook_python }}’ in variables of that inventory, as shown in Figure 7.
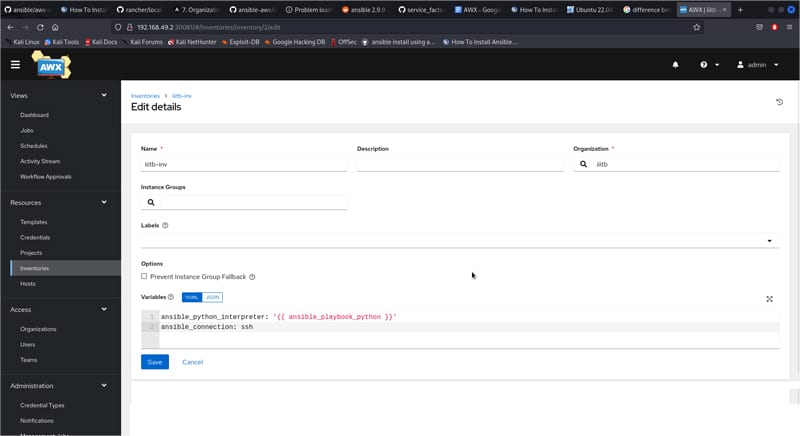
Figure 7: Screenshot to add inventory
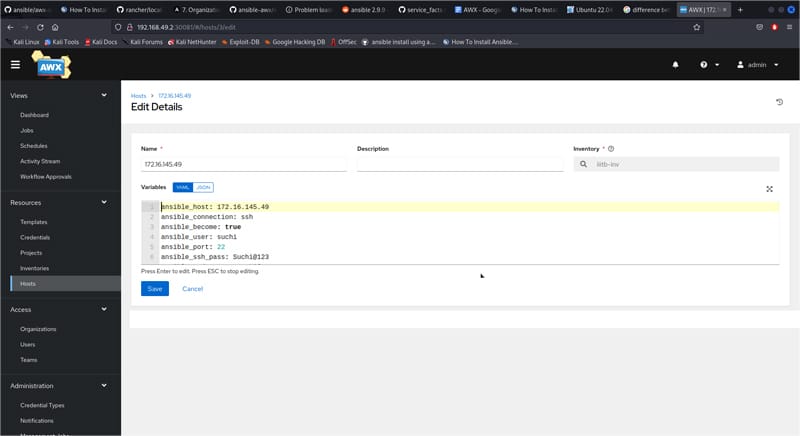
Configuration of hosts
ansible_host: 172.16.145.49 # ip address of host
ansible_user: suchi # enter username of host you are accessing
ansible_become: true # Ansible_become used for privilege escalation.
ansible_ssh_pass: Suchi@123 # password of ansible_user of host machine
ansible_sudo_pass: Suchi@123
If the ansible_user is root, then we don’t need to pass ansible_sudo_pass. If you want to connect with the target machine/hosts through ssh without password, it is not required to pass ansible_ssh_pass variables in the host configuration.
Adding credentials
- If you want to access the target machine/hosts using the password, we can directly select demo credentials and nothing needs to be configured.
- But if you want to access the target machine/hosts using ssh without password, we have to use the ssh key sharing mechanism.
- Go inside minikube where AWX is installed by using the command:
docker exec -it minikube_container_id /bin/bash
- Generate the public and private keys of minikube machine using the command:
ssh-keygen
- Now, copy the public key of minikube in all target machines/hosts using the command ssh-copy-id user@ip from the minikube terminal. It will copy the public key of minikube in targets.
- Here, user is the user of the host you are accessing and its IP that you have mentioned in this host configuration.
- Now, you have to add the private key of minikube in the AWX credential. This private key is available in cat ~/.ssh/id_rsa.
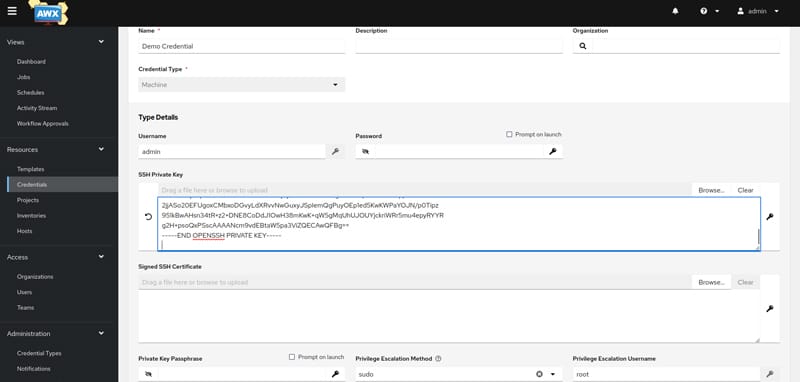
Next, go to the credential tab in AWX, click on the Add button, give credential name, and copy paste the private key.
In user name, add the login user of AWX who will execute templates. In our case, we are using admin. Select the name of the organisation with which the credential is associated.
Select sudo in Privilege Escalation and root in Privilege Escalation user name to give root permission to execute. Then save this, as shown in Figure 9.
Creation of projects
- Now select the Project tab and click the Add button. Basically, the project is the collection of playbooks you want to execute in your host machine using AWX.
- Give your project a name and select your organisation. Here, we are fetching playbooks from GitHub; so, select git in source control type and enter the URL of the GitHub playbook repository where all the playbooks are present.
- It is recommended to use GitHub to fetch playbooks instead of fetching from the machine, as there will be problems with maintaining version control in the local machine.
- Enable update revision on launch so that whenever we launch our project, i.e., run our template, it will always fetch the latest version of playbook. So even in case there are changes in playbook in GitHub, only the updated version will always be fetched.
- Then save this, as shown in Figure 10.
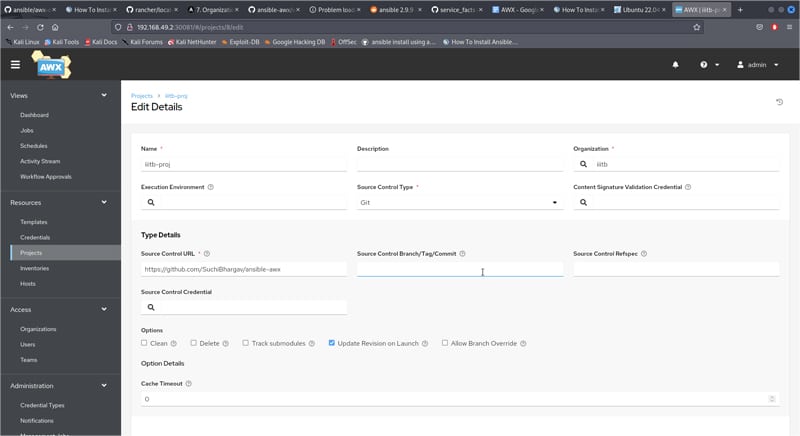
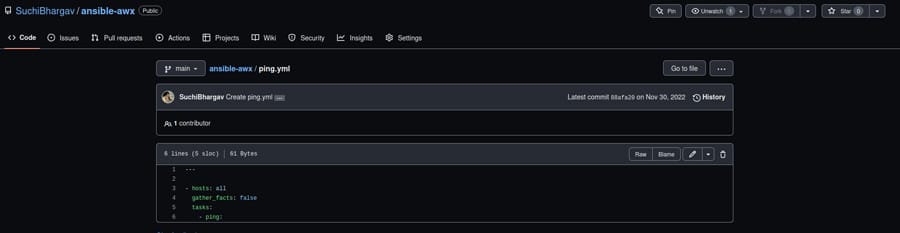
Figure 10: Screenshot to add project - Select the GitHub account from where we are fetching playbooks in AWX, which is shown in Figure 11. This URL has to be used in the source control URL in the project shown in Figure 10.

Figure 11: GitHub repository where all the playbooks are present
Creation of templates
- Now select the Template tab, click on Add button, enter template name and select the project, inventory and playbook present in your GitHub repo. Also enable the Privilege Escalation option at the bottom of the template and save it (Figure 12).
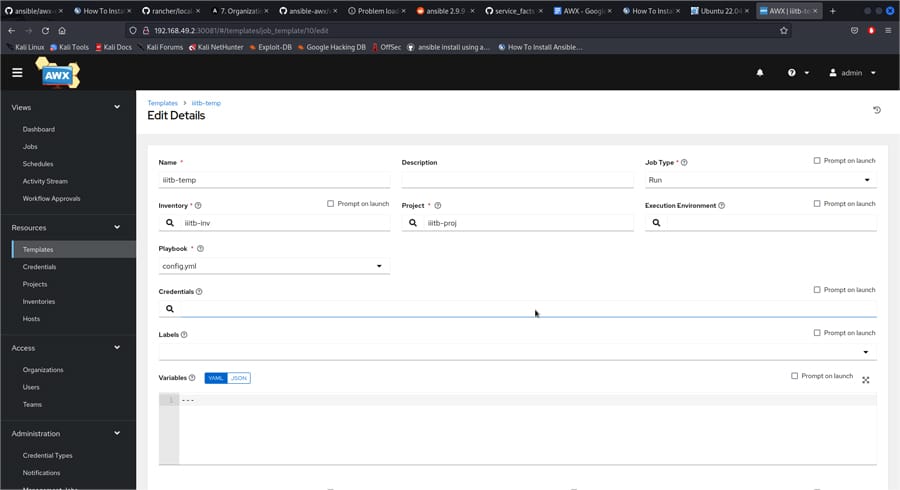
Figure 12: Screenshot to add templates - Templates are basically jobs where we define what playbook we want to run and what inventory source the hosts that we want to run against are in.
Our template is now ready to launch. Just click on the rocket icon or Launch button to run the playbook.
Some points to be noted when using Ansible AWX for accessing hosts
- If we want to access any container and deploy any package or application inside it using Ansible AWX, we must create a Docker network and connect both minikube and the container in the same network, so that they can communicate with each other.
- Note that minikube can directly access and be deployed inside localhost without the need to connect both in the same network.
- Commands to be used to create a network, and connect minikube and container in the same network, are shown below:
docker network create -d bridge network_name
docker network connect network_name container_id
docker network connect network_name container_id_of_minikube
- After execution of these commands, minikube and container can communicate with each other through the network.
- Then, we have to start ssh service (service ssh start) in both localhost and container so that minikube can communicate with both using ssh.
- We can also cross-check if ssh is working or not by going inside the minikube AWX container using the following command:
docker exec -it container_id /bin/bash
- Now connect to the hosts through ssh by executing the command ssh root@ip or ssh user@ip. Here ip is the IP address of the host with which AWX wants to communicate to check if it is able to ssh into that host or not. user is the user name of the host you want to communicate with.
- In case you are accessing the root user of the host/target machine using ssh by AWX, you have to configure the /etc/ssh/sshd_config file in the host and modify the parameters as shown below.
permitrootlogin yes PubkeyAuthentication yes PasswordAuthentication yes
Now restart ssh service using the command:
service ssh restart
You may get some errors during execution. Some of these are listed below.
- While doing ssh, if you get the error permission denied even after entering the correct password or get the error Host key verification failed, use the command ssh-keygen -R ip. Here, ip is the IP address of the client you want to ssh and execute the command ssh root@ip.
- When executing playbook, if you are getting the error The module fails to execute correctly, you probably need to set the interpreter.\nSee stdout/stderr for the exact error, then you have to check whether Python is installed and the command is available in /usr/bin. We have completed AWX installation, configured all the parameters, and enabled the network connection between hosts and targets. Now let us execute some example playbooks to configure infrastructure in the target systems.
Executing playbooks
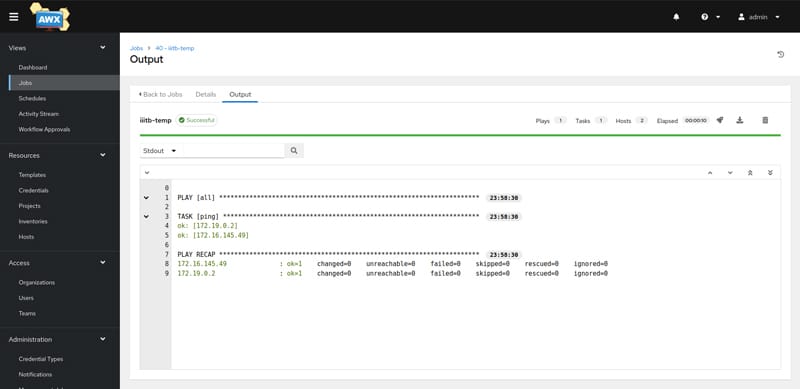
Playbook 1: Ping.yml
This playbook will ping all the hosts that are attached with inventory. Figure 13 shows the screenshot of the playbook.
After the template is launched to execute it, the output is shown in Figure 14.
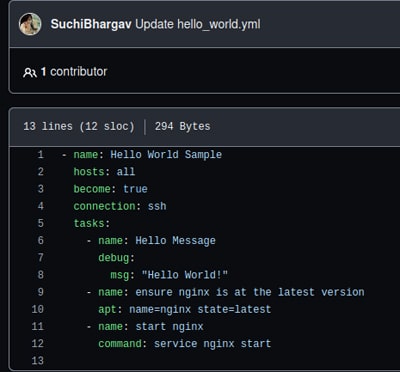
Playbook 2: hello_world.yml
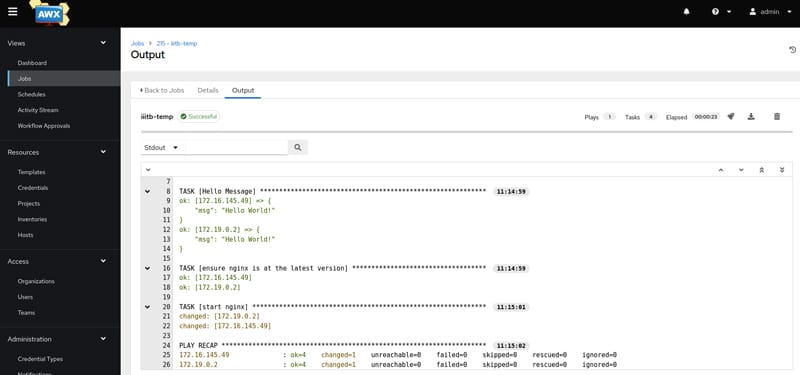
This playbook (Figure 15) will print ‘hello world’ and then install NGINX server inside localhost and container. The execution of this playbook can be seen in Figure 16.
By using the command service –status-all, we can verify whether NGINX has started or not after execution of the above playbook.
We have seen only two playbook examples in this article but you can execute any playbook in this user-friendly graphical user interface called Ansible AWX.


