You can extend Drupal by developing your own modules to suit your applications’ needs. While extending Drupal, you can build upon Drupal Core, and many third party modules are also available.
Since this is a practical guide, we will not delve more into Drupal. This article assumes that the reader has some knowledge of Drupal terminology, Eclipse IDE, as well as basic PHP, including its syntax and the concept of PHP objects. It also assumes a basic understanding of databases (tables, fields, SQL statements, etc.), Drupal installation with Web server access, and Drupal administration access.
What is a module?
A module is a collection of files that provides some useful functionality; for example, send page/node by Email, show recent blogs, etc. Modules are the main mechanism for extending Drupal and are written in PHP. The Drupal core executes the module code through “hooks”, which are well-defined interfaces. These hooks are defined by the Drupal interface, and the module must adhere to it so that its code/functionality can be invoked through the Drupal Framework/Engine.
Let us develop a sample module to show recent blogs. To do so, let’s create a block and main page for this module.
Setting up the environment
Though there are good Linux editors (Emacs, Vim, etc.), I find it very convenient to use the Eclipse IDE — for PHP, you can use one from the project download page. Download and launch Eclipse, and install the Drupal plugin as follows: Help –> Install New Software and use the URL http://xtnd.us/downloads/eclipse (click OK if you get any warning message).
Create a New PHP project (in the wizard, provide a project name, and specify your Drupal installation folder using “Create project at existing location…”). See Figure 1 for the illustration.

Creating a module
Create a directory named recentblogs in <drupal_install_dir>/sites/all/modules/. This will be your module directory, and we will refer to this as module_dir hereafter. Create the main module file recentblogs.module in module_dir. Create a block to show recent blogs — add the function below to the recentblogs.module file.
Observe the naming convention used for the function: it has <module name> as a prefix, and the hook name as per the Drupal API as the suffix, separated by an underscore.
function recentblogs_block($op = 'list', $delta = 0, $edit = array()) {
    // Initialising block contents with empty array
    $block = array();
    if ($op == "list") {
        $block[0]["info"] = t('Recent Blogs');
    }
    else if ($op == 'view') {
    //PlaceHolder#1
    }

    return $block;
}
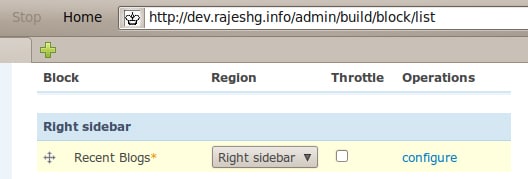
The meaning of $op == "list" is that when Drupal invokes the listoperation, it is requested to show all the block(s) listed down here, with their information. You can set the position of your block using the options given in the combo box, as shown in Figure 2.

Now, to show the recent blogs in the block, add the code below in place of PlaceHolder#1 in the code above, indenting it as required:
$block_content = '';
$today = getdate();
$start_time = mktime(0, 0, 0,$today['mon'],
$today['mday'], $today['year']);
$limitnum = variable_get("recentblogs_maxdisp", 3);
$query = "SELECT nid, title, created FROM " .
    "{node} WHERE created <= '%d'" .
    " order by created desc";

$query_result =  db_query_range($query, $start_time, 0, $limitnum);
while ($links = db_fetch_object($query_result)) {
    $block_content .= l($links->title, 'node/'.$links->nid) . '<br />';
}
$options = array( "attributes" => array("title" => t("More blogs...") ) );
$link = l( t("more"), "recentblogs", $options );
$block_content .= "<div class=\"more-link\">" . $link . "</div>";
$block['subject'] = 'Recent Blogs';

if ($block_content == '') {
    $block['content'] = 'Sorry No Content';
}
else {
    $block['content'] = $block_content;
}
The above snippet of code will fetch the node IDs and their titles for the period prior to today. The number of results fetched is limited by the parameter $limitnum, which is configurable; it can be modified using the Settings page for this module. If the number of results are more than this value, then a more link is shown below the list (see Figure 3). Clicking morewill take you to the main page of this module.

Creating a main page for the module
The following function contains the code for the main page. And since it is the main page, $limitnum is not used to limit results. See Figure 4 for an example of the output.
function recentblogs_all() {
    $page_content = '';
    $today = getdate();
    $start_time = mktime(0, 0, 0, $today['mon'], $today['mday'], $today['year']);
    $query = "SELECT nid, title, created FROM " .
        "{node} WHERE created <= '%d' " .
        " order by created desc";
    $queryResult =  db_query($query, $start_time);
    while ($links = db_fetch_object($queryResult)) {
        $page_content .= l($links->title, 'node/'.$links->nid) . '<br />';
    }
    return $page_content;
}

Creating a Settings page for the module
Here’s the code for it:
function recentblogs_admin() {
    $form = array();
    $form['recentblogs_maxdisp'] = array(
    '#type' => 'textfield',
    '#title' => t('Maximum number of links'),
    '#default_value' => variable_get('recentblogs_maxdisp', 3),
    '#size' => 2,
    '#maxlength' => 2,
    '#description' => t("The maximum number of links to display in the block."),
    '#required' => TRUE,
    );
    return system_settings_form($form);
}
The function code is self-explanatory. The resultant page looks like what’s shown in Figure 5.

Create menu links to the Settings and main pages
The piece of code below creates the menu links. Observe the page argument recentblogs_admin; this will let Drupal know that settings are defined using the function recentblogs_admin. The creation of a form with buttons is done using the call 'page callback' => 'drupal_get_form'.
function recentblogs_menu() {
    $items = array();

    $items['admin/settings/recentblogs'] = array(
    'title' => 'recentblogs module settings',
    'description' => 'settings page - recentblogs',
    'page callback' => 'drupal_get_form',
    'page arguments' => array('recentblogs_admin'),
    'access arguments' => array('access administration pages'),
    'type' => MENU_NORMAL_ITEM,
    );
    $items['recentblogs'] = array(
    'title' => 'Created Recently',
    'page callback' => 'recentblogs_all',
    'access arguments' => array('access recentblogs content'),
    'type' => MENU_CALLBACK
    );
    return $items;
}
The $items['recentblogs'] provides the link to the main page.
Let Drupal know about the module
In order for Drupal to list this module, create a recentblogs.info file with the following content, in module_dir:
name = Show Recent Blogs
description = Show few recent blogs in block and all in a page.
core = 6.x
package = "Testing"
The package field is used to group this module. When this file is saved, your module will appear in the list, as shown in Figure 6. You can enable the module by ticking the Enabled check box. Once you enable the module and save its configuration, you can see the module block in the list of blocks at <your site name>/admin/build/block/list.

References
- Using open source software to design, develop, and deploy a collaborative Web site
- Creating modules — a tutorial: Drupal 6.x


Adwait Neo Sharma here you go! :)
aaahhha was waiting for this one
Thanks for sharing.
We can use number of modules in our Drupal site and get access of multitudinous functionality. This will make our site look more affecting and charming.
Good guide for setting up drupal environment and setting module.
http://www.macrosoftinc.com/drupal-development.html
Still a trouble fixer for Drupal beginners like me.
Thanks.