Start Blender by double-clicking the Orange icon. You will observe a very plain-looking GUI, but behind this plainness lies the power of Blender. In the centre of the viewport you will find a cube that stands as the default geometry every time you fire up Blender. The first important thing to remember are the numeric keys 0, 1, 3 and 7 that switch you between the viewports of Camera, Front, Side and Top, respectively.
Loading the reference image
Shift to the side viewport by pressing 3 on the numeric pad. Go to the View menu on the lower part below the 3D viewport; select Background Image and click the button that says Use Background Images. Navigate to the folder where you have stored the profile of your goldfish. I selected a profile from the website pixmac.com. Once the picture is loaded, you could adjust the opacity to suit you.
Begin with a cube
It is always best to begin a complex geometry using a simple primitive shape like a cube. This method is popularly known as the box modelling method. Add a cube by pressing the space-bar and selecting Add-Mesh-Cube from the pop-up menu. Scale down the cube so that it appears like the one shown in Figure 1.

Extruding the body
Shift to the Edit mode by pressing Tab and start to create extrusions towards the front of the fish, culminating just before the beginning of the mouth. Now select the top and the bottom faces independently to create the upper and the lower part of the mouth of the fish. Then go back to the rear face, select it and start extruding to create the back body of the fish, stopping just before the tail begins (see Figure 2).

It is important to note here that you have to keep shifting between the side and the top view constantly, to make sure that the vertices fall in with the shape of the fish from the
top and the side. Cut sufficient loops to shape the body. If needed, loop-select the body from the top view, and adjust the loops, one by one, to shape the fish so it tapers at both the ends (see Figures 3 and 4).


Adjusting vertex positions
Go to the side view by pressing 3 on the keyboard, and adjust the vertices so as to align with the outline of the reference image we have loaded in the background, for modelling.
Mirroring the geometry
In Blender, it is always best to mirror the geometry at the initial stages itself, since it is a great time-saver. An artist need not model on both sides. Once the geometry you are working upon is mirrored, you need to model just on one side, and the other side is immediately taken care of by the mirror modifier, which keeps creating the replica of the model on the other axis on which the geometry is mirrored.
The process of mirroring for symmetry is simple. Click Ctrl+Tab and shift to the Face selection mode from the pop-up. Select the left half of the faces and delete them by pressing X on the keyboard (Figure 5).

Tail and fins
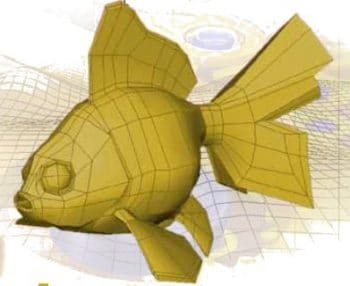
Now we need to model the tail and the fins of our goldfish. Select the faces at the back of the fish’s body. Scale them to make them appear thin from the top view. Start to extrude and shape up the tail in line with the reference image. Figures 6, 7 and 8 show the creation of the upper fin, tail and the side fins by extruding faces formed after cutting loops in the sides.


Now the fins have to be planned. We need to model the fins in such a way that they are very thin. The best way to model the fins would be by starting to extrude the faces that lie on the border in alignment with the image in the background. Extrude the faces, all in a parallel manner, as shown in Figures 6, 7
and 8. In a similar way, create the lower fins by extruding the appropriate faces, as seen in the figures.
The subdivision surfaces modifier and the eyes
We are done with modelling the fish. Now we need to delete the inner faces after hiding the mirrored half of the fish. Once you are done with deleting the inner faces, apply the subdivision surfaces modifier. Increase the subdivision level to 2. This gives our fish a smooth and neater appearance. This will also give us a chance to sculpt some finer details onto our fish if we want to.
Now what’s missing are the eye sockets and the eyeballs. Select the face that lies in line with the eye of the fish as you observe it in the image. Delete the face and shift to the edge selection mode pressing the combination of Ctrl+Tab. Loop-select the edge that forms the opening of the eye. (Shift+Alt
loop-selects the edge.) Extrude the loop to shape the opening of the eye. Figures 9 shows you the process of adding the subdivision surfaces modifier for a smooth look, and Figure 10 shows you the cutting out of the mouth and extruding the eye from an appropriate face selected for this purpose.


Figure 11 shows the rendered model, with subsurface scattering.

Wasn’t really that difficult, was it? Shall we continue to the next part?


[…] Learn to Animate with Blender, Part 1: Modelling the Goldfish – LINUX For You Apart from being a great 3D modeller and one of the best animation programs, Blender is also great for compositing. This article is an introduction to animation in Blender. Source: http://www.opensourceforu.com […]
[…] Blender is also great for compositing. This article is an introduction to animation in Blender. Via http://www.opensourceforu.com VN:F [1.9.11_1134]please wait…Rating: 0.0/5 (0 votes cast)VN:F [1.9.11_1134]Rating: 0 (from 0 […]
Hello sir, the software used … where to get it from, is software an freeware or shareware
please reply
Ankit! Blender is free! You could download it from http://www.blender.org
you might want to try out a couple of simpler tutorials to get used to the interface and operations first. this tutorial seems to assume a certain level of familiarity.