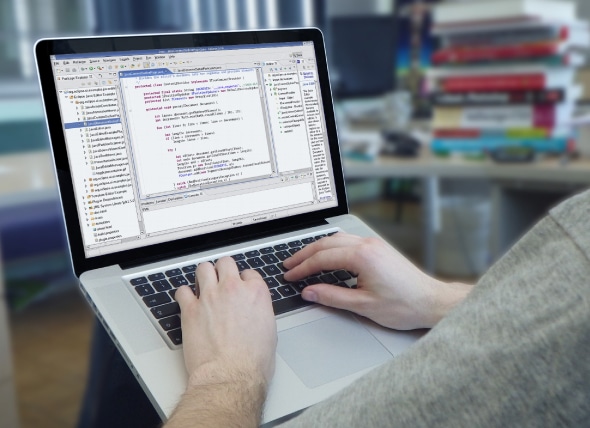
Eclipse is free and open source software that can be used to develop applications by means of various plugins. It may also be used to develop applications in other programming languages.
Eclipse is one of the most popularly used integrated development environments (IDE). It consists of a base workspace and an extensible plugin system for customising the environment. It is written in Java and can be used to develop applications. By using plugins, it can be used to develop applications in other programming languages also, such as C, C++, COBOL, PHP, Python, JavaScript, Ruby and so on. The plugin framework allows it to work with languages such as LaTeX, and network applications such as telnet and DBMS. Everything in Eclipse is a plugin except the small runtime kernel. Every plugin integrates with Eclipse and creates different features.
Eclipse can also be used to develop packages. Its development environments consist of Eclipse Java development tools for Java, Eclipse CDT for C/C++ and Eclipse PDT for PHP. Its runtime system is based on Equinox, which is an implementation of the OSGi framework specification.
The initial codebase originated from IBM VisualAge. The Eclipse SDK is free and open source software. It was the first IDE to run under the GNU Classpath, and it runs without problems under IcedTea.
Eclipse: Salient features
|
You can download Eclipse from https://eclipse.org/downloads/
The Eclipse UI and appearance
Uncompress the downloaded Eclipse file, and click on the Eclipse icon to open a workspace launcher.
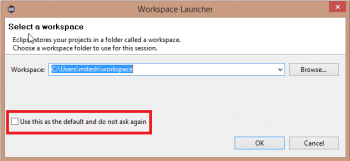
Eclipse stores your projects in a folder called a workspace, which is the location of the directory in which you save your projects, source files, images, jar files and other artifacts. Choose a workspace folder to use for this session. To avoid opening this workspace launcher all the time, you can select the checkbox Use this as the default and do not ask again.
Eclipse starts up and displays the Welcome page, where you can customise or personalise it based on your preferences.
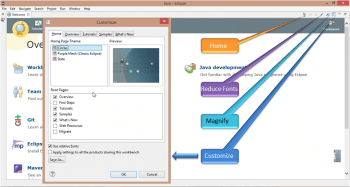
Click on the Customize icon as shown in Figure 3 and its dialogue box will open.
To change the home page theme, click on the Home tab to customise the dialogue box. In the Home Page Theme section, select one that you would like to replace the Welcome screen of Eclipse.
Close the Welcome screen.
To change the appearance, go to
Window?Preferences?General?Appearance?Select Theme (e.g., Classic, Dark, Windows 7, Windows 7 Classic) ? Select Colour and Font theme.
Then select the checkbox Enable animations.
To change the Web browser settings, go to
Window?Preferences?General?Web Browser ?Select Use Internal Web Browser or Use External Web Browser.
Perspective
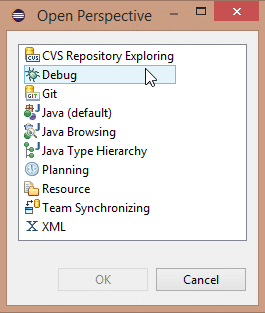
An Eclipse perspective is an initial collection and arrangement of views and visible actions in an editor section. The default perspective in Eclipse is Java. Users can select only one perspective at a time from the multiple options available. To change the perspective, go to
Window -> Open Perspective -> Select Specific Perspective.
To see the list of all perspectives, click on Others. Shown in Figure 4 is the perspective in Eclipse Luna and Eclipse JEE Helio.
To change the layout within a perspective, go to
Window->Show View->Select a View of your Choice, and that part will be added in the editor window.
You can rearrange the perspective with the use of Views and then save that perspective also from the Window menu.
The following list is a useful summary of some useful Views available in Eclipse.
- Package Explorer View: Allows you to browse projects and to open in an editor.
- Type Hierarchy View: Provides hierarchy for a type, its subtypes, or its supertypes.
- Call Hierarchy View: Gives details of callers and those called for a selected Java method.
- Java Outline View: Displays an outline of the active Java file structure.
- JUnit View: Displays the progress of the JUnit test run and its status.
- Javadoc View: Shows the Javadoc of the element selected in the Java editor.
- Declaration View: Shows the source of the element selected in the Java editor.
- Projects View: Shows Java projects, external and internal libraries, source folders, etc.
- Packages View: Shows the list of Java packages from the currently selected Java projects.
- Types View: This is a list of Java types from the currently selected packages.
- Members View: Displays the contents of a type, compilation unit or CLASS file.
- Debug View: This is to manage the debugging or running of a program.
- Breakpoints View: Lists all the breakpoints.
- Expressions View: This is to inspect data.
- Variables View: Displays information about the variables associated with the stack frame selected in the Debug View.
- Console View: Displays a variety of console types.
Creating a Java project
Go to File Menu->New->Java Project. Give the Project Name as FirstJavaProject in the dialogue box. Select Use default location in the checkbox. Then select Execution Environment JRE (if you want to configure JRE, then click on the link Configure JREs) and click on Next.
Verify the source folder. By default, it will be an src folder and the default output folder will be FirstJavaProject/bin, in our case.
Check the Library tab to verify the JRE system library available for FirstJavaProject. Add JARs or external JARs if you want to.
Click on Finish.
To create a package in a Java project, right-click on the src folder of FirstJavaProject in Package Explorer. Click on New->Package. Select Source Folder in the new dialogue box and provide the name of the package as com.igate.test. Click OK.
To create a class in a newly-created package, right-click on the package com.igate.test. Click on Class, and give the name of the new Java class as HelloWorld. Keep the modifier public, as it is, except if you want to make that class abstract or final. Select the checkbox Public static void main (String[] args) in the Which method stubs would you like to create? section.
It will create a class in the package com.igate.test with method public static void main(String[] args). Add the print statement in the main method.
To generate a comment for any method, keep the cursor on the name of the method and press Alt+Shift+j.
Normally, over time, we use a lot of import statements in our programs; so to arrange them in a proper way, press Ctrl+Shift+o.
package com.igate.test;

public class HelloWorld {

String name;

public String getName() {
return name;
}
public void setName(String name) {
this.name = name;
}
/**
* @param args
*/
public static void main(String[] args) {

}
}
To create an interface in a newly created package, right click on the package com.igate.test. Click on Interface.
To create a pair of getter and setter methods, right click on the class variable name. Go to Source->Generate getters and setters. Select the variable name to create methods from the dialogue box. Select Access Modifiers. Click on OK.
To give a proper indent to the code in a .java file, select all the content of the file and press Ctrl+i.
To format the code with proper spacing, press Ctrl+Shift+f.
Using code recommenders
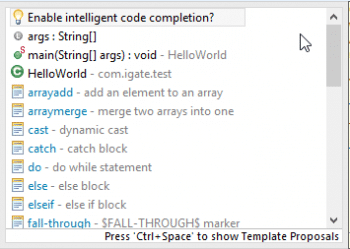
Code templates help programmers to reduce their typing efforts by inserting code into the Eclipse editor. Type the short code and press Ctrl + space to get a dialogue box to select a code template.
Running a Java application
To run the Java project, right click on the FirstJavaProject. Click on Run As->Java Application. Check the output in the console.
To change the run configurations, right click on the FirstJavaProject. Click on Run As. Select Run Configurations.
Here, you can give program and VM arguments, set the runtime JREs, as well as set the class path and environment variables, etc.
Creating a Java Web project
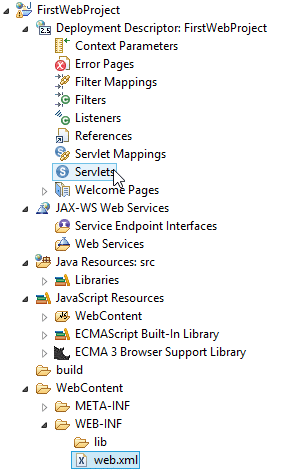
Go to File->New->Web->Dynamic Web Project. Give the project name FirstWebProject and click on Next. Select the source folder on build path, and then select the default output folder as Keep Context Root and the content directory as FirstWebProject and WebContent, respectively. Keep the Generate web.xml deployment descriptor checkbox selected.
It will create a deployment descriptor:
<?xml version=1.0 encoding=UTF-8?> <web-app xmlns:xsi=http://www.w3.org/2001/XMLSchema-instance xmlns=http://java.sun.com/xml/ns/javaee xmlns:web=http://java.sun.com/xml/ns/javaee/web-app_2_5.xsd xsi:schemaLocation=http://java.sun.com/xml/ns/javaee http://java.sun.com/xml/ns/javaee/web-app_2_5.xsd id=WebApp_ID version=2.5> <display-name>FirstWebProject</display-name> <welcome-file-list> <welcome-file>index.html</welcome-file> <welcome-file>index.htm</welcome-file> <welcome-file>index.jsp</welcome-file> <welcome-file>default.html</welcome-file> <welcome-file>default.htm</welcome-file> <welcome-file>default.jsp</welcome-file> </welcome-file-list> </web-app>
Create an HTML file in the WebContent directory:
<!DOCTYPE html PUBLIC -//W3C//DTD HTML 4.01 Transitional//EN http://www.w3.org/TR/html4/loose.dtd> <html> <head> <meta http-equiv=Content-Type content=text/html; charset=ISO-8859-1> <title>Insert title here</title> </head> <body> <h1>First Java Project in Eclipse</h1> </body> </html>
To export a Java Web project, right click on FirstWebProject, and go to Export ->WAR File.
Deploying a WAR File in Tomcat using Eclipse
Select the Web project, and then select the destination folder.
You can select the target runtime if you need to optimise for a specific server time.
If you need to keep source files in the WAR files, then check the Export source files checkbox.
Click on Finish. Now verify the webapps folder of the destination Tomcat server; it will contain WAR File of FirstWebProject.
Update Eclipse.
Go to Help->Check for updates.
Installing new software
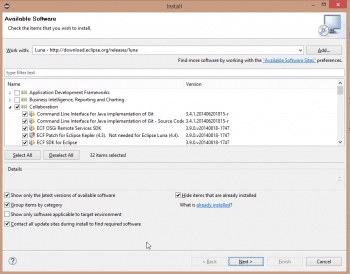
To install new software, go to Help->Install new software. Select available sites from Work with combo box.
In our case, lets select Luna – http://download.eclipse.org/releases/luna.
Select Collaboration from the available packages. Click on Next->Review ‘Install Details’. Then go to Next->Review licenses->I accept the terms of license agreements->Finish.
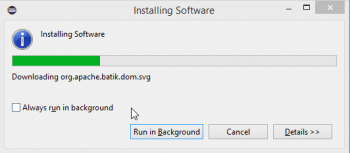
It will start downloading the required packages and installing them.
Eclipse and SVN integration
We have already installed the collaboration toolkit in the above section.
New repository in Eclipse
Go to File->New->Other->Select SVN from the Wizard ->Select the repository location; provide SVN URL and credentials.
IDE with cloud deployment
Cloud providers provide plugins to integrate within Eclipse so that programmers can use an IDE to deploy applications in the cloud environment. CloudBees is one such platform-as-a-service provider which supports Eclipse; at least, it did when we last explored it.
PaaS perspective in Eclipse
You can run an application in the local as well as in the cloud environment from the Eclipse IDE itself.
References
[1] http://en.wikipedia.org/wiki/Comparison_of_integrated_development_environments
[2] http://en.wikipedia.org/wiki/Integrated_development_environment
[3] http://en.wikipedia.org/wiki/Comparison_of_integrated_development_environments#Java
[4] http://en.wikipedia.org/wiki/Eclipse_%28software%29
[5] http://en.wikipedia.org/wiki/JCreator
[6] http://en.wikipedia.org/wiki/JBuilder


