Spacewalk is an open source Linux server management software, a version of Red Hat’s Satellite server. Red Hat is one of the big sponsors of Spacewalk and it is also community supported. It can support Red Hat, SUSE and Oracle Linux agents. Prior to version 2.3, Solaris agents were also supported. Spacewalk has been developed in a combination of Python, Perl and, in recent versions, Java too.
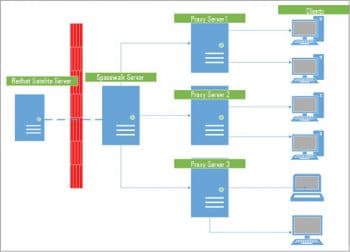
So how is it useful to you? I have 200 Linux servers in my office network, and I have to patch all of them twice in a year. Manually copying and deploying the patch in all the servers is a time consuming process and effort-intensive too. To meet this challenge, Spacewalk can be used to deploy packages on selected servers or to deploy a set of patches from the central repository to many servers at one go. We can see the high level architecture of Spacewalk server in Figure 1. Spacewalk can be used to:
- Apply patches on many servers at one go
- Install a package/RPM to a group of servers
- Do server inventory
- Work as a kickstart server for new server builds
- Manage virtual guests
The minimum requirements for the Spacewalk server are:
- X86 server with 2GB RAM
- CentOS/Fedora/RHEL/SUSE/Debian/OL Linux
- Either Oracle or PostgreSQL database
- Storage for DB: approximately 1GB per channel which has 5000 packages
- Storage for packages (for repos): approximately 6GB per channel
- An up-to-date OS – I tried the installation with Centos 6
- Ports 5222, 5269 and 443,80 should have a firewall
- Access to the Internet to install RPMs/packages from the Spacewalk repo
Firewall ports used in Spacewalk include:
- 69: TFTP (PXE provisioning)
- 80: Spacewalk Web interface
- 443: Spacewalk Web interface (SSL)
- 4545: Spacewalk monitoring
- 5222: If you plan to push actions to client systems
- 5269: If you push actions to a Spacewalk proxy server
- 9055: Oracle XE Web access
Installation
First, we need to install the RPM mentioned below to create repos which can point to Spacewalk RPMs. You can download the RPM from http://yum.spacewalkproject.org/2.3/RHEL/6/x86_64/ and install it with the following command:
#rpm ivh spacewalk-repo-2.3-4.el6.noarch.rpm
Or you can use download and install it at one shot by using the following command:
#rpm -Uvh http://yum.spacewalkproject.org/2.3/RHEL/6/x86_64/spacewalk-repo-2.3-4.el6.noarch.rpm
This RPM will create two repos. One for Spacewalk binaries and the other for source packages.
Apart from these, you will need a few more OS RPMs to install. Hence, we will create one more repo for EPEL (Extra Packages for Enterprise Linux), as follows:
In EPEL 6 (for RHEL 6 and CentOS 6)
rpm -Uvh https://dl.fedoraproject.org/pub/epel/epel-release-latest-6.noarch.rpm
In EPEL 7 (For RHEL 7 and CentOS 7)
rpm -Uvhhttps://dl.fedoraproject.org/pub/epel/epel-release-latest-7.noarch.rpm
This will create two more repos — epel and epel-testing repos. As one of the pre-requisites, we need a database to store data. Here, I used Oracle-XE for testing.
We can install the following packages to create Oracle related repos:
#rpm -Uhv http://spacewalk.redhat.com/yum/1.4/RHEL/6/x86_64/spacewalk-client-repo-1.4-1.el5.noarch.rpm
#rpm -Uhvhttp://spacewalk.redhat.com/yum/1.4/RHEL/6/x86_64/spacewalk-repo-1.4-1.el5.noarch.rpm
Once done, please ensure all repos are accessible by using the following command:
#yum clean all
#yum repolist

Oracle installation
We can download Oracle and the following few required RPMs from http://www.oracle.com/technology/software/products/database/xe/htdocs/102xelinsoft.html
- oracle-xe-univ
- oracle-instantclient11.2-basic
- oracle-instantclient11.2-sqlplus
During the download, create the following user and group:
#groupadd dba #useradd g dba oracle
While installing Oracle, it may prompt you for glibc and libaio packages as Oracle needs 32-bit versions even on a 64-bit platform. So just download them and keep them aside to use if needed. Now, we install Oracle:
#rpm -Uvh oracle-xe-univ
#rpm -Uvh oracle-instantclient
#rpm -Uvh oracle-instantclient
#yum install oracle-lib-compat
#yum install oracle-xe-selinux oracle-instantclient-selinux oracle-instantclient-sqlplus-selinux
Once done, start configuring the Oracle database, as follows:
#/etc/init.d/oracle-xe configure
Install Postgre-sql
If you are configuring the database and Spacewalk server on a single box, then its better that you opt for automatic install/configuration by using the following command:
#yum install spacewalk-setup-postgresql
To configure Postgre-sql on a dedicated server, it’s better to use a standalone server. To install on a standalone server, please follow the steps shown below:
#yum install postgresql-server
#yum install postgresql-pltcl
#chkconfigpostgresql on =>To make the service running while next reboot
#service postgresqlinitdb =>Toconfig DB
#service postgresql start => To start the service
To create the database, with the user named spaceuser on postgre-sql, use the code below:
#postgres -c PGPASSWORD=walker1; createdb -E UTF8 spaceschema ;createlangplpgsqlspaceschema ; createlangpltcluspaceschema ; yes $PGPASSWORD | createuser -P -sDRspaceuser
Restart the Postgre-sql DB, as follows:
#service postgresql restart
To test the Postgre-sql connection, type:
#PGPASSWORD=walker1 psql -h localhost -a -U spaceuserspaceschema
Configure Psotgresql
To install the Spacewalk-setup-PostgreSQL package, type:
# yum install spacewalk-setup-PostgreSQL
To configure the PostgreSQL server, we need the following data:
- Database name/user name/user password
- List of local addresses that the DB server will listen at
- List of remote addresses to allow the connection from (presumably the IP address of your Spacewalk server)
# DBNAME=yourdbname # DBUSER=yourdbuser # DBPASSWORD=userpassword # spacewalk-setup-postgresql create --db $DBNAME --user $DBUSER --password DBPASSWORD standalone
Now let’s continue with the Spacewalk installation, as follows:
#yum install spacewalk-oracle
We now need to configure Spacewalk. If you are using the default database as Postgre-sql from the local server, run the following command:
#spacewalk-setup --disconnected
If you want to use Oracle (either on the local server or another server), use the following command:
#spacewalk-setup --disconnected --external-oracle
If you want to use Postgre-sql from another server, use the command shown below:
#spacewalk-setup --disconnected --external-postgresql
While setting up, you will be asked a few questions like the ones below or you can create an answer file for this.
#spacewalk-setup --disconnected --answer-file=<answer file>
admin-email = root@localhost.com
ssl-set-org = spacewalk.org
ssl-set-org-unit = spacewalk
ssl-set-city = chennai
ssl-set-state = Tamilnadu
ssl-set-country = India
ssl-password = walker2
ssl-set-email = root@localhost
ssl-config-sslvhost = Y
db-backend=oracle
db-name=spaceschema
db-user=spaceuser
db-password=password1
db-host=localhost
db-port=1521
enable-tftp=Y
Restart the service by issuing the following command:
#/usr/sbin/spacewalk-service restart
That’s it. We have done the installation, so lets proceed to the configuration part.
1. Open Spacewalk from the URL http://<SpacewalkServer FQDN>/.
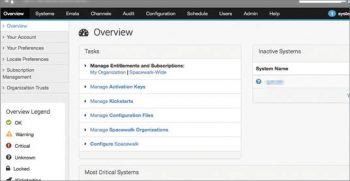
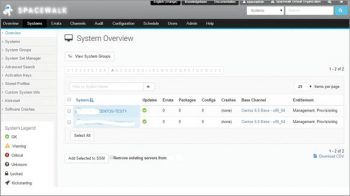
2. Once opened, you will get a screen to create the admin user. Once logged in, you will get an overview screen like what’s shown in Figure 2.
3. Now let’s look at preparing the Spacewalk server to install the OS on clients. For that, the first step is creating the channel, which holds the repository.
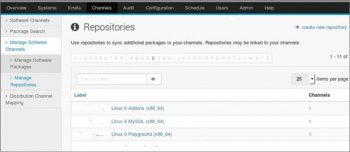
From the Web GUI, go to Channels==>Manage Software Channels ==> Create channel as in Figure 3. Fill all the text boxes and create a channel.
You can create a channel via the command line as follows:
#/usr/bin/spacewalk-common-channels -v -u admin -p password -a i386,x86_64 -k unlimited centos6* spacewalk-client
4. Next, we need to create a repo on this channel and sync it with the DVD or from existing repos. Let us create a repo as per Figure 4, by going to Channels -> Manage Software Channels -> Manage Repositories -> Create new repository. As shown in the figure, I used my DVD repo from file ///mnt1/.
5. Next, we need to create a link to a software channel as follows: Channels -> Manage Software Channels -> [channel name ]-> Repositories -> [Repository to be linked to the channel ] -> Update Repositories. Start/sync the repo by clicking on the Sync tab.
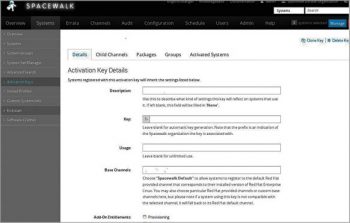
6. Create an activation key as shown in Figure 5 (Systems > Activation Keys > Create Key) with the new base channel. When creating a registration key for testing, always use a human readable format so that it will be easy while configuring agents. Of course, it is not recommended for a production environment. We need these keys to register clients with the Spacewalk server.
We now come to the end of the server configuration. We will now start configuring clients.
1. Create repos pointing to Spacewalk repos by installing the following RPMs:
# rpm -Uvh http://yum.spacewalkproject.org/2.3-client/RHEL/6/x86_64/spacewalk-client-repo-2.3-2.el6.noarch.rpm
# rpm -Uvh http://dl.fedoraproject.org/pub/epel/epel-release-latest-6.noarch.rpm
2. Install Spacewalk client packages, as follows:
#yum install rhn-client-tools rhn-check rhn-setup rhnsd m2crypto yum-rhn-plugin
3. Install the CA certificate from the Spacewalk site to enable SSL communication, as follows:
# rpm -Uvhhttp://YourSpacewalk.example.com/pub/rhn-org-trusted-ssl-cert-1.0-1.noarch.rpm
4. To register the client with Spacewalk, we will use the activation key which we created at the end of the installation:
# rhnreg_ks serverUrl=https://<myspacew alkserver>/XMLRPC --sslCACert=/usr/share/rhn/RHN-ORG-TRUSTED-SSL-CERT --activationkey=<key-with-channel>
Once all goes fine, your client will appear on the Spacewalk server Web UI and when you click the client, you will see something similar to Figure 6.
Assume we have configured one server and 100+ clients. To boost the performance of patching or deploying a package, we need the help of proxy servers. Shown below are the steps to create a proxy server.
1. Make sure the Spacewalk repos, as discussed earlier, have been set up and are available.
2. Install the following packages to enable the proxy server. This will install many dependency packages and, at the end, install the GPG key (answer y to the question).
# yum install spacewalk-proxy-selinux spacewalk-proxy-installer
3. Configure the Spacewalk-proxy, as follows:
# configure-proxy.sh

The handy info you needed here are
VERSION=
RHN_PARENT="spacewalk.example.com"
TRACEBACK_EMAIL="user@example.com"
USE_SSL
CA_CHAIN=<location of certification default path /usr/share/rhn/>
HTTP_PROXY=
SSL_CNAME_ASK=
SSL_ORG=
SSL_ORGUNIT="proxy1.example.com"
SSL_COMMON="proxy1.example.com"
SSL_CITY="Chennai"
SSL_STATE="TN"
SSL_COUNTRY="India"
SSL_EMAIL=user@example.com
POPULATE_CONFIG_CHANNEL="n"
4. If you are facing any issues regarding the proxy, always refer to the log files below for more information:
/var/log/httpd/* – Apache logs
/var/log/squid/* – Squid logs
/var/log/rhn/rhn_proxy_broker.log – Proxy Broker Server
/var/log/rhn/rhn_proxy_redirect.log – SSL Redirect Server
Pushing packages to clients
We can configure the Spacewalk server in such a way that it allows pushing the packages or runs a command on remote clients. This feature is serviced by OSA group services (osad, osa-dispatcher and jabberd). The osa-dispatcher will check the database periodically for any actions that are pending or available.
1. To set up OSA services on the server, follow the steps given below:
#yum install osa-dispatcher ==> install OSA dispatcher
#chkconfigosa-dispatcher on
#service osa-dispatcher start
2. To set up OSA services on the client, follow these steps:
d. Install osad:
#yum install osad
Download the trusted cert to the client:
#cd /usr/share/rhn/
#wget http://spacewalk.example.org/pub/RHN-ORG-TRUSTED-SSL-CERT
Modify the /etc/sysconfig/rhn/osad.conf file:
osa_ssl_cert = /usr/share/rhn/RHN-ORG-TRUSTED-SSL-CERT
Start osad:
#service osad start
Now you can start enjoying patching on multiple servers with a single click.


[…] OpenSource- Spacewalk https://www.opensourceforu.com/2016/03/patch-management-made-easy-with-spacewalk/ […]
how to get the CA password, i dont remember mine and i believe i have not set, but it is not accepting anything