This article presents a tutorial on how to build a simple app using the Ember.JS framework.
Ember.js is a popular, free and open source JavaScript Web framework, based on the model-view-view-model (MVVM) pattern. Although Ember.js is primarily considered a framework for the Web, it can also be used to build mobile and desktop applications. With over 17,000 stars and over 3400 forks at the time of writing this article, it is a very popular framework on GitHub. Moreover, it has some great features, which we will explore further in this article.
Ember.js is one of the front-end stack components built by the Ember core team. Here are some great features of the EmberJS framework.
Ember CLI
The Ember CLI (command line interface) allows the user to generate a new Ember app with the default stack. This utility provides:
- A standard directory and file structure.
- A server with live reload, which means it will automatically rebuild and reload apps whenever the files are changed.
- Support for ES6 modules.
- ES6/ES7 syntax support via Babel.
- Ember CLI testing framework.
- Dependencies managed via npm and Bower.
- Blueprints, which is a code generator for creating models and controller — components that are needed in an app.
- More features are available when using Ember CLI add-ons, of which there are over 2,000 available.
Ember Data
- Ember Data is a data-persistence library providing facilities for an object relational mapping to the Ember app.
Ember Inspector
This is a Web browser extension, available for Mozilla Firefox and Google Chrome. It makes debugging Ember applications easier, enabling users to watch template changes (in which views and components are currently rendered), and see the properties of Ember objects along with a UI, which also allows users to access the app’s objects in the console itself.
Fastboot
Fastboot is an Ember CLI extension, which allows users to run their Ember apps in Node.js. Currently, this is in the alpha stage — once available, this feature will allow users to render the UI much faster.
Liquid Fire
Liquid Fire is a toolkit which allows animated transitions in an Ember app.
Note: It is assumed that you have some basic knowledge of Web technologies like HTML, CSS and JavaScript. If you don’t, W3Schools is a good place to start. The site has some great tutorials for Web technologies that are easy to follow.
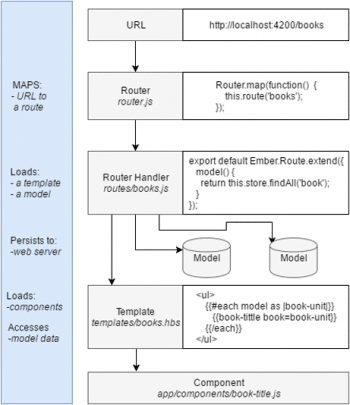
Before we start developing our sample app, let us have a look at the core concepts of the EmberJS framework, which are shown in Figure 1.

Route and route handlers
In Ember, the state of an app is represented by a URL. When the Ember app starts, the router is responsible for displaying templates, loading data or setting up the application state. It does this by matching the current URL to the routes we’ve defined. Each URL has a corresponding route object that controls what users can see.
The Ember router maps the URL to a route handler, which renders a template and also loads a model, which is then available to the template.

Templates
Like the AngularJS app, the Ember app also uses templates for organising the layout of HTML. The templates in an Ember app look like any HTML fragment.
An example is:
<div>This is a valid template </div>
Ember templates use the syntax of Handlebar templates. The Handlebars syntax is used to build the DOM app. Templates can also display properties provided to them by the context.
Models
Models represent a persistent state. Every route has a model associated with it, which contains the data associated with it along with the current state of the app. Models can be configured to be saved somewhere else, like in the browser’s local storage.
Components
Components control how the user interface works. Components consist of two parts—a template layout written in the Handlebars syntax, and a source file written in JavaScript that defines the logic behind the controller.
Installing Node.js
To use Ember CLI to build our app, Node.js must be installed first. Download and install Node.js. The Ember CLI is distributed as an npm package, so we will use Node and npm to install the Ember CLI.

Installing Ember
Open a terminal/command prompt and type the following command:
c:\>npm install –g ember-cli
This command will install EmberJS and all its dependencies.
Testing the installation
After installing the Ember CLI via npm, let’s check if everything is installed properly. Once we have installed the Ember CLI, we will have access to the ‘ember’ command in the terminal/command prompt. Let’s use the ‘ember new’ command to create a new sample application by running the following command:
c:\>ember new my-project
This will create a directory called ‘my-project’, and will set up a default new Ember application inside it. This application will create default configuration files and will also include the following:
- Development server
- Template compilation
- CSS and JavaScript minification
- The ES2015 feature via Babel
Now let us check if everything is working fine. Change the working directory to the ‘my-project’ directory by running the following command:
c:\>cd my-project
Now, start the development server by running the following command:
c:\my-project>ember server
After a few seconds, you will see the output in your terminal or command prompt, and it will look like what’s shown below:
Livereload server on http://localhost:49152
Serving on http://localhost:4200/
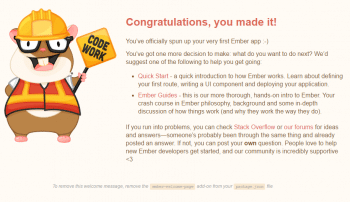
Open http://localhost:4200 in your browser. You should see an Ember welcome page, as shown in Figure 2.

Getting started with a sample app
To start building a sample app, create a new template in the ‘my-project’ directory, using the following command in a terminal or at the command prompt:
C:\my-project>ember generate template application
This command creates a template called ‘application’ at app\templates\application.hbs in the ‘my-project’ directory. This template is always loaded with your app and is always on screen.
Now open app\templates\application.hbs in your favourite editor and add the following code:
<h1> Open Source For You Magazines </h1>
{{outlet}}
This is the main template or, in simple words, ‘main page’ of our sample app. When we visit our sample app via the URL we will see this template first. We have also added ‘{{outlet}}’ to this template to render a route in that place.
Ember CLI has a watcher, which automatically detects and reloads the page in the background. When you run the server using the following command, you will see that the welcome page is replaced by ‘Open Source For You Magazines’.
C:\my-project>ember server
After a few seconds, you will see the output in your terminal or command prompt, which looks like what’s shown below:
Livereload server on http://localhost:49152
Serving on http://localhost:4200/
Open http://localhost:4200 in your browser. You should see a new page, as shown in Figure 3.
Defining a route
Let us build a simple app, which shows a list of issues for Open Source For You magazine. For this we need to create a route first. In simple words, routes are just different pages that make up your application.
To generate a route, run the following command in the terminal or command prompt:
C:\ project>ember generate route magazines
After running this command, you’ll see an output like what’s shown below:
installing route
create app\routes\magazines.js
create app\templates\magazines.hbs
updating router
add route magazines
installing route-test
create tests\unit\routes\magazines-test.js
This means Ember CLI has created a template for ‘magazines’, which will be displayed when the user visits http://localhost:4200/magazines. It also adds a unit test for this route.
Now open the created template in app/templates/ called magazines.hbs and add the following code:
<h2>List of Editions </h2>

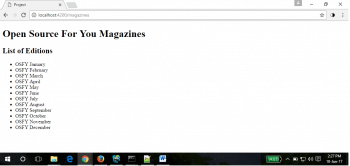
Open your browser, start the server and go to http://localhost:4200/magazines. You should see the rendered content of magazines.hbs along with our main application template, as shown in Figure 4.
Now that we have rendered the magazine’s template, let’s give it some data to render. We do that by specifying a model for that route, and by editing app/routes/magazines.js. Copy the following code into magazines.js:
import Ember from 'ember';

export default Ember.Route.extend({
model() {
return ['OSFY January', 'OSFY February', 'OSFY March',
'OSFY April', 'OSFY May', 'OSFY June', 'OSFY July',
'OSFY August', 'OSFY September', 'OSFY October',
'OSFY November', 'OSFY December'];
}
});
In the route’s model() function, return the data you want to make available for the template. In this case, pass the list of monthly OSFY issues to the template.
Now, we will render the array of strings, returned by model() method, into HTML. Open magazines.hbs and add the following code:
<h2>List of Editions</h2>
<ul>
{{#each model as |magazine|}}
<li>{{magazine}}</li>
{{/each}}
</ul>
We have used the Handlebar syntax to loop through the data and print it. We have also used each helper to loop over every item in the array we provided from the model() hook and print it inside an <li> element.
Now, open your browser, start the server and go to http://localhost:4200/magazines. You should see the rendered content of magazines.hbs along with our main application template, as shown in Figure 5.


