


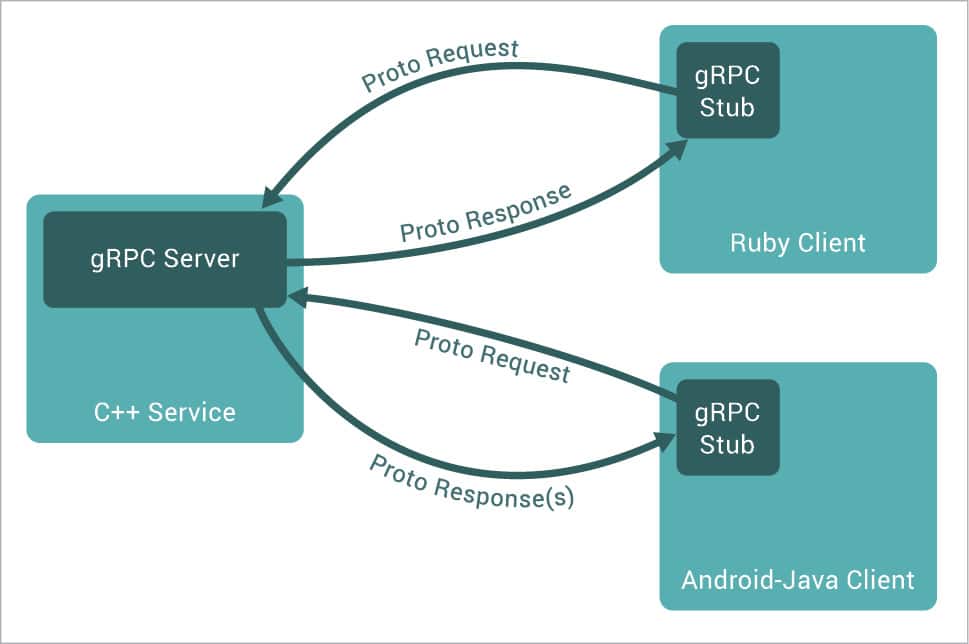
Remote Procedure Call (RPC) has been around for decades as a mechanism for inter-process communication in applications. The client making a call talks to a stub that works behind the scenes to handle the marshalling/unmarshalling of the request/response data. To the client it appears that the service is residing locally.
The last decade has seen the rise of public APIs and standards like REST for building HTTP based services. Both XML and JSON are frequently used as the data format for these service methods’ request and response data. With the proliferation of these services and the emerging trend towards micro-services, latency becomes an important consideration when creating high performance and efficient services.
To address this, Google had been working for a while to come up with a specification that defines both service interfaces and efficient communication protocols, along with bindings in multiple languages for both the client and server sides. The company later made this available as open source to the general public and the gRPC Project was born. The project helps to implement services in multiple languages with pluggable support for load balancing, health checking and authentication.
The gRPC model is shown in Figure 1.
The service, its methods and the messages are defined via a separate specification known as ProtocolBuffers. This specification is then implemented by the server in one of the supported languages. Most modern programming languages like Java, Python, C#, Node.js and others are supported. You can either generate the server bindings via the tools provided or even dynamically provide the implementation.
On the client side, you can generate the gRPC stub in a client language of your choice, and use that stub directly in your client to invoke the service.
Why use gRPC?
gRPC has several advantages that are worth considering in your application. Some of them are:
- It is built on HTTP/2, which provides us with a high speed communication protocol that can take advantage of bi-directional streaming, multiplexing and more.
- The latest version of ProtocolBuffer, i.e., version 3, supports many more languages.
- The ProtocolBuffer data has a binary format and, hence, provides a much smaller footprint than JSON/XML payloads that are currently the most popular. This can make a big difference when latency is an issue in your API.
gRPC and CNCF
gRPC was released by Google more than a year back and since then, there has been a lot of momentum towards getting the industry to consider this as the glue for micro-services communication, especially when latency is a key factor. Recently, it got adopted as a top level project in the Cloud Native Computing Foundation (CNCF), which is a big move towards the wider adoption of gRPC. It joined the likes of Kubernetes, Prometheus and others that are considered to be the foundation of a cloud native application.
Wire Protocol – ProtocolBuffers
ProtocolBuffers is both an interface definition language and a message format. It is primarily used to define the service interface, i.e., what the service methods are and the messages that are exchanged. The message formats are also defined via their individual parts.
This protocol definition file can then be used to generate both the server side and client side bindings, or you can dynamically load the definition and provide the implementations. ProtocolBuffers is currently available in two versions: proto2 and proto3, but we will go with the latter, which is the latest since it has support for a wide range of languages.
The best way to understand ProtocolBuffers is via an example that we will build over the course of this article. This will include the server and client implementations.
We are going to build a service called OSFY Stats. This service provides two methods, one for retrieving the top articles from the OSFY website and another method to retrieve the stats on a particular article, like the number of views, likes and so on. We are not going to provide a real implementation later, but this exercise is more to get an idea of how to start building the specification and message formats as per the ProtocolBuffers standard.
The proto file (osfy_stats.proto) is shown below:
syntax = "proto3";

package osfy_stats;

//Service. define the methods that the grpc server can expose to the client.
service OSFYStatsService {
rpc toparticles (TopArticlesRequest) returns (TopArticlesResponse);
rpc articleStats (ArticleStatsRequest) returns (ArticleStatsResponse);
}

//Message Type definition for TopArticlesRequest
message TopArticlesRequest{
int32 numResults = 1;
}

//Message Type definition for TopArticlesResponse
message TopArticlesResponse {
repeated Article articles = 1;
}

//Message Type definition for Article
message Article {
int32 id = 1;
string title = 2;
string url = 3;
}

//Message Type definition for ArticleStatsRequest
message ArticleStatsRequest {
int32 id = 1;
}

//Message Type definition for ArticleStatsResponse
message ArticleStatsResponse {
int32 id = 1;
int32 numViews = 2;
int32 numLikes = 3;
int32 numComments = 4;
}
Let us go through the proto file in brief:
- At the top of the file, we specify the version of ProtocolBuffers and that the service resides in a package named osfy_stats.
- We then define the service named OSFYStatsService and specify the two methods that it exposes, i.e., toparticles and articleStats.
- The input and output message formats are specified, and the message formats for each of the request and response messages are defined in the same file. Note that the ProtocolBuffers specification supports various scalar types (int32, float and string) and also other complex stuff like repeatable, Nested and more. The unique numbers that you see, i.e., 1, 2, 3, etc, are used by the binary format while encoding and decoding the messages.
- The toparticles method takes in the number of top articles that we want as input and returns an array of articles, where each article contains fields like the ID, title and a URL.
- The articleStats method takes the article’s ID as input, and returns a message containing stats like the number of views, likes and comments.
Implementing our server
Now that we have defined the service, we can implement our server. We will be using Node.js for the task, and it is assumed that you have a Node.js environment set up and available on your machine.
We will need a few node libraries to be installed and you can use npm install:
$ npm install grpc
$ npm install grpcli
Now, let us look at the implementation on the server side. The file server.js is shown below:
const grpc = require('grpc');

const proto = grpc.load('osfy_stats.proto');
const server = new grpc.Server();

let top_articles = [
{ id:20000 , title: 'T1', url: 'URL1' },
{ id:20001 , title: 'T2', url: 'URL2' },
{ id:20002 , title: 'T3', url: 'URL3' },
{ id:20003 , title: 'T4', url: 'URL4' },
{ id:20004 , title: 'T5', url: 'URL5' }
];

//define the callable methods that correspond to the methods defined in the protofile
server.addProtoService(proto.osfy_stats.OSFYStatsService.service, {
toparticles(call, callback) {

if (call.request.numResults < 1 || call.request.numResults > 5) {
callback(new Error('Invalid number of Results provided. It should be in the range of [1-5]'));
} else {

var topresults = top_articles.slice(0, call.request.numResults);

callback(null, { articles:topresults });

}
},

articleStats(call, callback) {
let article_id = call.request.id;
//make some calls to actual API

let numViews = 1000;
let numLikes = 30;
let numComments = 5;

callback(null, {
id:article_id,
numViews,
numLikes,
numComments
});
}
});

//Specify the IP and and port to start the grpc Server, no SSL in test environment
server.bind('0.0.0.0:50000', grpc.ServerCredentials.createInsecure());

//Start the server
server.start();
console.log('OSFY Stats GRPC Server is now running on port->', '0.0.0.0:50000');
Let us go through the code in brief:
- We load the proto definition file and create a server instance.
- For the server instance, we simply bind the service proto.osfy_stats.OSFYStatsService.service and provide the implementations for the two methods: articleStats and toparticles.
- We use mock implementations for the two methods and, in reality, you would have connected to your analytics API for this purpose.
To start the server, all we need to do is the following, and it will display that the server is running, via the message shown below:
$ node server.js
OSFY Stats GRPC Server is now running on port-> 0.0.0.0:50000
Testing the service
To test the service, we can use the node module grpcli that we installed. To launch grpcli and point it to the proto file and server that is running, use the command given below:
grpcli -f osfy_stats.proto --ip=127.0.0.1 --port=50000 -i
This will initiate the connection, and we can then use the rpc list and call methods to test out the service. The sample calls are shown below:
$ grpcli -f osfy_stats.proto --ip=127.0.0.1 --port=50000 -i
Package: osfy_stats
Service: OSFYStatsService
Host: 127.0.0.1
Port: 50000
Secure: No
[grpc+insecure://127.0.0.1:50000]# rpc list
toparticles(TopArticlesRequest) {
return TopArticlesResponse;
}
articleStats(ArticleStatsRequest) {
return ArticleStatsResponse;
}
[grpc+insecure://127.0.0.1:50000]# rpc call articleStats {"id":1}
Info: Calling articleStats on OSFYStatsService
Response:
{
"id": 1,
"numViews": 1000,
"numLikes": 30,
"numComments": 5
}
[grpc+insecure://127.0.0.1:50000]#
Consuming the gRPC service
Now that we have tested our service, we can write our client code as shown below. The code is similar in the sense that we load the proto file first and then create a client to the server that is running. Once the client is connected, we can directly invoke the service methods as shown below:
const grpc = require('grpc');

const proto = grpc.load('osfy_stats.proto');

const client = new proto.osfy_stats.OSFYStatsService('localhost:50000', grpc.credentials.createInsecure());

client.toparticles({"numResults":2}, (error, response) => {
if (!error) {
console.log("Total Articles: " + response.articles.length);
for (article of response.articles) {
console.log(article.id + " " + article.title + " " + article.url);
}
} else {
console.log("Error:", error.message);
}
});

client.articleStats({"id":2}, (error, response) => {
if (!error) {
console.log("Article ID : " + response.id + " Views : " + response.numViews + " Likes : " + response.numLikes + " Comments : " + response.numComments );
} else {
console.log("Error:", error.message);
}
});

You can execute the client and see that the two actions available by the service are invoked. The output is shown below:

$ node client.js
Article ID : 2 Views : 1000 Likes : 30 Comments : 5
Total Articles: 2
20000 T1 URL1
20001 T2 URL2
Other language bindings
We have seen how we can define the service interface via the ProtocolBuffers format, and then used Node.js to develop both the server side and client side bindings. The advantage of gRPC is that your server side could be implemented in a specific language, say Node.js, but the client bindings could be in another language, like Python, Java or other supported bindings.
Modern architectures suggest breaking up monolithic applications into multiple micro-services and to compose your applications via those services. This results in an explosion of inter-service calls and it is important that latency, which is one of the key factors to consider in providing a high performance system, is addressed. gRPC provides both an efficient wire transfer protocol and multiple language bindings that make this a possibility. With the recent adoption of gRPC as a top level project in the Cloud Native Computing Foundation, we are likely to see an increase in developers exploring and using this across a wide range of projects.


