Node-RED is a programming tool for wiring together hardware devices, APIs and online services in new and interesting ways. It provides a browser-based editor.
Since early 2014, the mobile has overtaken the personal computer (desktop/laptop) as the leading device used to navigate the Net. Along with the mobile, a number of other portable devices that connect to the Internet have also started proliferating at a very quick rate. Nowadays, most of us carry or possess at least one Internet-based device and mobile. So, the Internet of Things (IoT) now doesn’t only mean different ‘things’, but has evolved into ‘intelligent things’ which have onboard computation and network connections. Most importantly, they have the capability to sense the environment around us and, accordingly, act intelligently. These devices are now referred to as connected devices, smart objects or the Web of Things.
This adaptation of technology has led to many developments in the visual programming and visual coding arenas. As a result, it has evolved into a visual programming/coding tool based on the already popular Node.js (a server side Java Scripting platform), mainly targeting the Internet of Things space.
What is Node-RED?
Node-RED is a programming tool for wiring together hardware devices, APIs and online services. Primarily, it is a visual tool designed for the Internet of Things, but it can also be used for other applications to very quickly assemble flows of various services.
It is open source and was originally created by the IBM Emerging Technology organisation. It is included in IBM’s Bluemix (a Platform-as-a-Service or PaaS) IoT starter application package. Node-RED can also be deployed separately using the Node.js application. At present, Node-RED is a JS Foundation project.
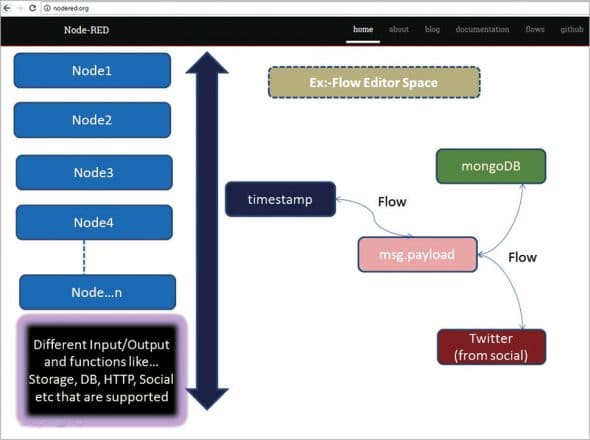
Node-RED enables users to stitch together Web services and hardware by replacing common low-level coding tasks (like a simple service talking to a serial port), and this can be done with a visual drag-drop interface. Various components in Node-RED are connected together to create a flow. Most of the code needed is created automatically.

Installation of Node-RED
To start using Node-RED, we have to first install it. This task is platform-specific and we have to choose the right installable for the respective platform. To make Node-RED work, we need to install Node.js. At present the recommended versions of Node.js are LTS 6.x or 6.x.
1) To install and configure Node-RED, first install the required Node.js, as follows:
$ sudo apt-get install node.js
2) Once you are done with the Node.js set-up, install the Node Package Manager (npm) as follows:
$ sudo apt-get install npm
3) After npm configuration is done, create a symbolic link with ‘node’ for ‘node.js’ as shown below:
$ sudo ln -s /usr/bin/nodejs /usr/bin/node
4) To make sure that Node.js is working fine, test the installation by executing the following commands:
$ node -v

<check for respective version>

$ npm -v

<check for respective version>
Once Node.js and npm are configured, we can go ahead and install Node-RED. The latest and most recent stable version of Node-RED can be downloaded from the GIT repository.
Note: To download from the GIT repo, make sure that you have configured the GIT package in your system.
$ sudo apt-get install git-core

$ cd ~

$ git clone https://github.com/node-red/node-red.git

$ cd node-red

$ sudo npm install
Now, test if Node-RED has been installed properly by executing the following command:
$ sudo node red.js
Note: If this configuration and installation is successful then we should get the following output (along with a lot of other information). We can verify this by typing http://localhost:1880 in your favourite browser, and we should get the following output:
Node-RED available on the default 1880 port...
More details on the installation steps can be found at http://nodered.org/docs/getting-started/installation.
Features of Node-RED
The major features of Node-RED are listed below.
- It supports browser-based flow editing.
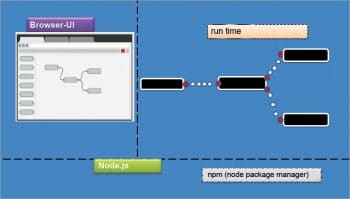
- As it is built on Node.js, it supports a lightweight runtime environment along with the event driven and non-blocking model.
- The various flows created in Node-RED are stored using JSON, which can be easily imported and exported for sharing with others.
- You can run it locally (Docker support, etc).
- It can easily fit on most widely used devices like Raspberry Pi, BeagleBone Black, Arduino, Android based devices, etc.
- It can run in the cloud environment like Bluemix, AWS, MS-Azure, etc.
Figure 2 explains the various components of Node-RED and its basic architecture.
Node-RED architecture
Some of the key aspects of Node-RED architecture are listed below:
- Node-RED (latest version 0.16) is fast because it is driven by the latest supported version of Node.js (LTS 6.x, 6.x).
- Asynchronous io and event-driven architecture.
- Single-threaded event queue, which supports simplicity.
- Single language support for JavaScript (both from front-end and back-end).
- Complete architecture has been built using express, d3, jquery and ws.
Different types of nodes
Inject node
- This node allows manual triggering of flows.
- It helps us to inject events at scheduled intervals.
Debug node
- The debug node helps in displaying the contents of a message—either the payload or the entire object.
Template node
- Modifies the output based on a Mustache (logic-less) template. More details can be found at https://mustache.github.io/mustache.5.html.
Other than the above, there are various input, output and function nodes, like:
a. Input nodes:
i. HTTP
ii. IBM IoT
b. Output nodes:
i. HTTP response
ii. IBM IoT
iii. Twilio (send SMSs using the Twilio service)
c. Function nodes:
i. Function
ii. Switch
Running Node-RED
Once the Node-RED installation and initial configuration is done, it is ready to be deployed or used. There are three ways in which Node-RED can be run:
- Locally (Docker-container)
- On a device (Raspberry-Pi, Arduino, Android based devices, etc)
- In the identified cloud environment

Where can Node-RED be used?
Node-RED can be used in a range of applications. The major ones are listed below.
1) In Bluemix, for connecting to IoT (with ReST and MQTT).
2) For binding and connecting to databases (MongoDB).
3) For storing IoT data for present and future computation.
4) For social media, when taking action and when event driven applications are needed (like Twitter).
Node-RED has over 225,000 package repos, to which it is easy to extend and add new packages. It also has a dedicated community, and is built with robust architecture using Node.js (which is very popular these days).
Node-RED can be used in event driven and fast-to-market applications and services, with easily implementable steps.
Home-OS and Node-RED
There is an alternate approach to visual programming in the IoT space, which uses Home-OS from Microsoft. In this case, users can record macros to activate sequences of actions, such as turning on lights, etc. This feature allows users to set up simple and easy-to-use macros, without the need to learn an abstract visual or verbal representation of the system.


