“By 2022, most Platform-as-a-Service (PaaS) offerings will evolve to a fundamentally serverless model, rendering the cloud platform architectures that are dominant in 2017 as legacy architectures.” – Gartner
In the September 2017 issue of OSFY, we demystified serverless computing. We also discussed its pros and cons, the technologies involved, use cases, the challenges, etc. So how about using serverless computing to simplify or automate your tasks? For example, wouldn’t it be nice to automatically retweet the tweets that have your favourite hashtags (such as #serverless or #opensource). That’s the topic we’ll explore in this article. We are going to implement a bot (let’s call it TweetBot), in which you can specify the hashtags to retweet at specified time intervals.
We will start with writing an auto-retweeting code in Python and get it working on our machine. Later, we will deploy it in OpenWhisk on IBM Bluemix. For this article, we assume you already know the fundamentals of Python programming. You need not know anything about OpenWhisk or Bluemix — we’ll introduce these to you in this article.
Developing the TweetBot
In order to write the Python code for auto-retweeting, the prerequisite is that Python 3 must be installed in your machine.
The Twitter API provides programmatic access to read and write Twitter data, create a new tweet, read user profile and follower data, retweet, and more. For this, you must first create a Twitter application (see https://apps.twitter.com/) and note down the OAuth credentials for the bot configuration.
The Twitter API in Python can be accessed using the TwitterFollowBot Python module. Using this module, you can do much more than just retweet – you can auto-follow and auto-like. For developing the TwitterBot, you must install the module into a folder rather than the default bin directory. For that, use the following command:
pip install --target <target_folder> TwitterFollowBot
Let us now create a program that uses the TwitterFollowBot Python module to retweet the latest ‘count’ number of tweets with a specific phrase (‘#Serverless’ in our case). For that, we need to create a TwitterFollowBot instance. The TwitterFollowBot uses the config.txt file in the current directory to configure the bot.


So, let us first configure the bot. To do so, you should create a config.txt file and fill in the following information so that the bot can connect to the Twitter API. Here are the entries for the config.txt file:
OAUTH_TOKEN:

OAUTH_SECRET: API keys from

CONSUMER_KEY: the twitter app

CONSUMER_SECRET:

TWITTER_HANDLE: <your twitter handle>

ALREADY_FOLLOWED_FILE:already-followed.txt

FOLLOWERS_FILE:followers.txt

FOLLOWS_FILE:following.txt

USERS_KEEP_FOLLOWING:

USERS_KEEP_UNMUTED:

USERS_KEEP_MUTED:
The files already-followed.txt, followers.txt and following.txt contain the respective twitter IDs. You must create these files — you can leave them empty, though. The rest of the fields may also be left empty.
# Program to retweet five latest tweets based on a hashtag (#Serverless)

from TwitterFollowBot import TwitterBot

def retweet():

# create an instance of the TwitterFollowBot

# by default, the bot will look for a configuration

file called config.txt

# in your current directory

my_bot = TwitterBot()

# autoretweets the 5(count)

latest tweets that matches the hashtag

my_bot.auto_rt(“#Serverless”, count = 5)

return {‘message’ : ‘retweeted successfully’}

retweet()
That’s the short and sweet code! Let’s save it as test.py and run it. The output is shown in Figure 1.
When you execute the Python script, it connects to the Twitter API and retweets. The result throws up a warning indicating that the followers.txt isn’t updated; you can just ignore that warning or update the files to get rid of the warning. The program displays the tweets that are retweeted, so we know it is working.
After we get the code working in our machine, it is time to deploy and execute it in the cloud using the serverless approach. We are going to use Apache OpenWhisk as the serverless platform. We will use IBM Bluemix as the cloud platform to deploy the OpenWhisk action(s).


Apache OpenWhisk
Apache OpenWhisk is an open source serverless cloud platform that executes functions in response to events at any scale.
OpenWhisk was started by IBM and is now incubated by Apache. Adobe is an important contributor to the project and has contributed the API Gateway. OpenWhisk executes functions (called actions) in response to events (called triggers). Since it is serverless, you just need to provide your code to be executed; specifically, you don’t need to concern yourself with how to manage the life cycle or operations of the underlying containers that execute the code.
You can run OpenWhisk on your laptop, on-premise, or in the cloud. When running in the cloud, you could use a Platform-as-a-Service (PaaS) version of the OpenWhisk provided by IBM Bluemix or you can provision it yourself into Infrastructure-as-a-Service (IaaS) clouds, such as Bluemix, Amazon EC2, Microsoft Azure and Google Cloud Platform.
Here are some key aspects of OpenWhisk:
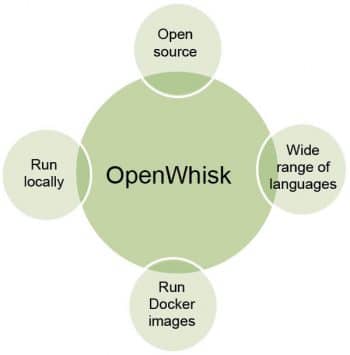
- It’s open source. If you want, you can explore the code and tinker with it, and change it according to your requirements. Support for a wide range of programming languages including Node.js 6, Python 3, PHP 7.1 and Swift 3.1.1 is available.
- Actions (serverless functions) can also be custom executable programs packaged in a Docker container, i.e., you can run Docker images in OpenWhisk.
- You can run it locally! None of the major serverless platforms provide this feature. You can build and run actions locally on your own hardware behind your own firewall, and then deploy it to execute in the cloud.
TweetBot using OpenWhisk
In order to use TweetBot in a serverless approach, you need to install OpenWhisk in your machine and have a BlueMix account. For installing OpenWhisk, refer to https://console.bluemix.net/openwhisk/cli for the set-up and configuration information. The beauty of serverless technology is that you don’t have to rewrite your entire application; just tweak the plain code that runs in your machine and you’ll be fine! Surprisingly, our TweetBot requires only one change — it should have a main function with an input parameter (dictionary type) and is to be saved as a __main__.py file.
Here is the modified Python code:
# Program to retweet five latest tweets based on a hashtag (#Serverless)

from TwitterFollowBot import TwitterBot

def retweet(dict):

# create an instance of the TwitterFollowBot

# by default, the bot will look for a configuration file called config.txt

# in your current directory

my_bot = TwitterBot()

# autoretweets the 5(count)

latest tweets that matches the hashtag

my_bot.auto_rt(“#Serverless”, count = 5)

def main(dict):

retweet(dict)

return {‘message’ : ‘retweeted successfully’}
Now, save this Python code in a file named __main__.py. Create the config.txt, already-followed.txt, followers.txt and following.txt (as earlier), and zip them all with the __main__.py file and the TwitterFollowBot dependency module files.


Invocation process
Once the wsk CLI (command line interface) is installed and the zip file is ready, follow the steps given below.
Step 1. Create and update an action: Log in to the IBM Bluemix account (https://console.bluemix.net/openwhisk/) and create a new action. You can upload the zip files with dependencies only via the CLI. The syntax is:
wsk action create <action-name> --kind <language:version> <file_name>

Sample Command:

wsk action create tweetBot --kind python:3 OpenWhisk.zip
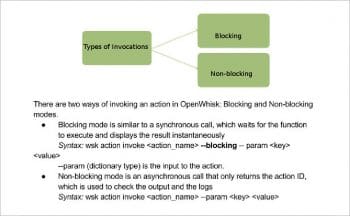
Step 2. Invoke the function (non-blocking mode): The syntax is:
wsk action invoke <action-name>

Sample Command: wsk action invoke tweetBot
Step 3. Check for the result: Since we invoked the function in a non-blocking mode (because we haven’t added the ‘–blocking’ parameter), the command returned immediately, but it is executing in the background. The syntax is:
wsk activation result <action ID>

Sample Command:

wsk activation result f4df0d1dcb12488396978d2cda832b09
Step 4. Check out the logs: The syntax is:
wsk activation logs <action ID>

Sample Command:

wsk activation logs f4df0d1dcb12488396978d2cda832b09

Automate the invocation
The moment the action was invoked, your Twitter account would have retweeted the five latest tweets that have the hashtag ‘#Serverless’ in it. However, this is still a manual invocation. For maximum impact, it would be better to automate the invocation process as well, so that you can configure the action and forget it once and for all.
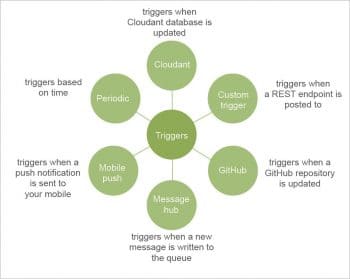
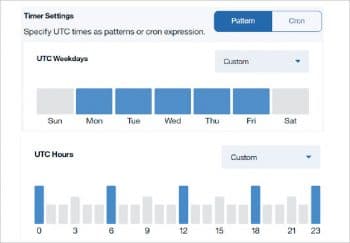
A periodic trigger would be the best option. It triggers the action based on a specific time, and will retweet the latest tweets with ‘#Serverless’ in it. One can either choose a pattern or write a cron expression.
The pattern shown in Figure 7 will invoke the TweetBot action every week day (Monday to Friday) every six hours, keeping your Twitter account live without your intervention!
Words of caution
Before we end this article, here are a couple of things you should be careful about:
1. OpenWhisk is open source and free, but to deploy it, we use IBM Bluemix which isn’t free. The TweetBot action will seamlessly run in the free tier, but for any other application, please estimate the monthly costs. The pricing calculator (https://console.bluemix.net/openwhisk/learn/ pricing) could be handy.
2. This action uses the Twitter API in the background via the TwitterFollowBot module. Misusing this may lead to the banning of your Twitter app, so please make sure you clearly read the Twitter automation rules (https://support.twitter.com/articles/76915).
In this article, we discussed a TweetBot that can be written to automatically retweet the latest tweets with certain given hashtags. We wrote the actions (serverless functions) in Python, and deployed them in OpenWhisk on IBM Bluemix. We also used triggers to automatically invoke the actions at specified time intervals. With this introduction, we invite you to further explore OpenWhisk as well as other exciting serverless technologies.


