Node.js is a platform-agnostic, free and open source JavaScript server framework. It extends the client-side scripting functionality to the server-side too, thus enhancing the Web experience. This article is an introduction to Node.js.
If you’ve ever used a search box on a website, checked the live score for a soccer game, or streamed a video, you probably have JavaScript to thank for making your experience seamless.
JavaScript (JS) is a high-level, interpreted programming language. It is often identified as dynamic, weakly-typed, prototype-based and multi-paradigm. Simply put, it is the language that infuses life into Web pages, providing animations, visuals and a degree of interactivity to the rather static elements of Web design. It was designed as a text-based language that could run as part of a Web-based application. While the name, syntax and structure seem similar to a lot of constructs available in Java, the design varies greatly with JavaScript influenced by languages such as Self and Scheme. Originally intended to complement Java, it grew exponentially to form one of the three pillars of Web development—the others being HTML and CSS. Today, almost all modern browsers contain a JS engine to support the use of JavaScript without the need for extensions, which is a testimony to its popularity.
JavaScript faced a fair amount of controversy over the course of multiple releases between 1996 and 2009 before all parties finally agreed to implement it as a common standard—thus, ECMAScript 5 was born. Meanwhile, open source efforts consolidated around AJAX and other libraries built to complement Vanilla JS (as ‘plain JavaScript code’ is commonly referred to), leading to the birth of the community of developers that continues to contribute to it today.
Why use Node.js?
JavaScript was primarily meant to be implemented by client-side scripting—embed the script in HTML and let the JS engine within the user’s Web browser handle the rest. However, Node.js extends the functionality to server-side scripting, representing the ‘JavaScript everywhere’ paradigm. By using Node.js, developers can generate dynamic Web pages before sending them to the user. In this manner, it unifies Web application development by using a single programming language for the client and server.

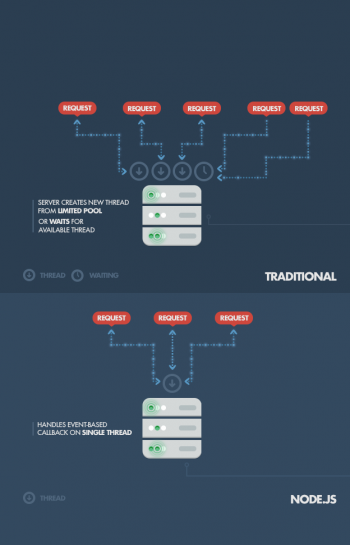
The motivation to develop this framework for JavaScript was to allow for a system designed for real-time communication from the ground up, rather than one that offers support for it as an additional feature. Node.js is built on an event-driven architecture capable of performing asynchronous I/O. Such design choices aim to optimise throughput and enhance scalability in applications with a large percentage of I/O tasks, as well as for real-time applications such as online gaming and communication. It offers a set of packages aimed at making the design of Web servers much easier, with a set of modules that handle file systems, I/O, data streams, cryptography and other core functionality. Thus, Node.js is both a runtime environment and a library, which runs on Google’s V8 VM—the same one that Chrome uses.
Node.js has found widespread application in organisations including Go Daddy, IBM, Walmart, Tauten, SAP, Yahoo and LinkedIn, among others.
Getting hands-on with Node.js
Let’s try our hand at building a Node.js server.
Installation: The popularity of Node.js has resulted in multiple versions often being installed on the same system for compatibility or separate projects. This calls for the need to manage these versions, which is where the node version manager (or nvm) comes into the picture. Note that you must have the following prerequisites installed.
For OS X:
$ xcode-select install
For Linux:
$ sudo apt-get update

$ sudo apt-get install build-essential
Check out the Windows installer at github.com/creationix/nvm, and install it on your Linux/OS X system by using cURL (or wget), as follows:
$ curl https://raw.githubusercontent.com/creationix/nvm/v0.33.8/install.sh | bash
(The version at the time of writing is 0.33.8, but this may change later.)
2. Now that we have nvm installed, we can go ahead and install Node.js, as follows:
$ nvm install
The above command pulls the latest version of Node.js for installation on the system. You can also append the version you require to the above command.
You should now have a working install of Node.js:
$ which node
As mentioned earlier, Node.js has a number of modules for providing a diverse set of functionalities and making it easier to build an application. Well, there’s a package manager to handle installation, storage, and the removal of these packages from your system, called the node package manager (npm). You can run the following command to verify this:
$ which npm
Building a Node.js server
We start with creating a directory for the project and making it the working directory, as follows:
$ mkdir myapp

$ cd myapp
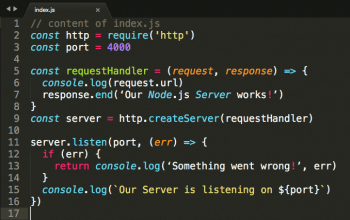
When you try to build your first server, the ‘http’ module is the first one you will interact with, in order to bind to a particular port as shown below. Let us create a file called index.js and add the following code to it:
$ touch index.js
As you can see, with the above code, we are starting to build a server using the ‘http’ module, which we direct to listen on Port 4000 for incoming requests. If there is an error, we print it to the console for debugging. That’s it. Now, simply run the following command:
$ node index.js
Navigate to ‘localhost:4000’ in your browser and view the message displayed.
Why Node.js is easier
We have built our own server from scratch, but the original claim was that Node.js makes things faster by eliminating the need to write everything from scratch. Well, let’s see how this is done.
We use a popular JS Web framework for Node.js, called ‘Express’:
$ mkdir mynewapp

$ cd mynewapp

$ touch app.js

$ npm init
The above command initialises a file called ‘package.json’ to keep track of the installed packages for your project.

Accept the default settings suggested by the command by pressing the ‘Return’ (Enter) key.
$ npm install express --save
Now open the app.js file and enter the content shown in Figure 6. Then run the following command:
$ node app.js
That’s all you need. Navigate to ‘localhost:3000’ in your browser and watch the magic unfold!


