


For various reasons, one may need to transfer an entire OS to a different system or an SSD. This seemingly difficult task has been explained in a stepwise manner in this tutorial.
Unless your first computer is still scratch-free and you’ve kept its warranty card, you probably need to do some migration. Maybe you’ve got a new machine, or you’re eager to know how fast your system boots with an SSD. Even if you don’t care about any fancy upgrades, you’re left with no other choice if your hard disk is dying.
Hand picking your personal files and copying them is tiresome enough. But you’re not yet done. You have to download and install the OS as well as hundreds of packages, and configure each one. If you are a developer, one can bet you’ll be spending more time doing these tasks than doing actual development.
That’s why everybody wonders if they can copy an entire system. Not just some personal files, but the whole OS, the boot setup and the applications. Upon the next startup, you want to be able to just select the new disk, and what boots has the same old spirit but new flesh.
Sounds good, right? But is it possible? It is, if you are using GNU/Linux and you’re not opting for an entirely different hardware architecture. It might be possible with many other operating systems also, excluding the proprietary ones that the developers usually put a lock into.
In this article, our discussion is limited to GNU/Linux, but applies to any distro that hasn’t dared to change the very fundamental things.
Methods
There are different methods to get an OS installation cloned into another disk or partition. They include:
- Taking a bit-by-bit copy of the entire disk or a partition (disk cloning or imaging).
- Copying the files manually and adjusting the configuration.
- Making use of some automated tools.
Each method has its own pros and cons. I prefer the second method. However, we’ll have a quick review of each one and many of the things explained here will be useful, regardless of which one you choose.
Which one to choose?
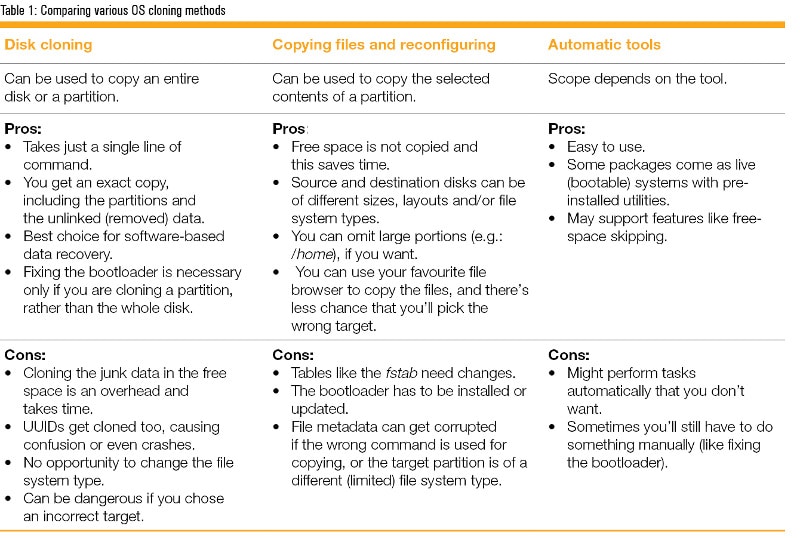
As always, it depends on your needs. When it comes to cloning, nothing is better than the imaging method, as the disk is copied bit-by-bit, preserving the low-level details like file system structures. Disk images have other wonderful applications also. One is software-based data recovery, where a tool gets access to each bit of the disk without actually hurting the dying disk. Disk cloning can be done using the standard GNU/Linux utilities like cp and dd, and it takes just a single line of command. However, this kind of verbatim copying is an overhead for normal purposes, because it’ll copy the junk data in the blank areas also. Besides, it may not work if the source and destination are of different sizes. Another issue is that applications will get confused if you keep both the original and the cloned disks connected or mounted at the same time, because some parts of disks like UUIDs are expected to be unique.
Copying files and reconfiguring them is the most flexible method. It allows you to choose a target partition of a different size and file system type. You can omit unwanted files. The only overhead is to adjust the configurations, which isn’t that hard.
Automated tools include Partclone and Clonezilla live, a bootable GNU/Linux distribution with Partclone pre-installed. I haven’t tested any of these automatic tools, since the manual methods are already simple; and even if you use automatic cloning tools, you’ll have something to fix manually.
Now you know why the second method is preferred if you just want to get your existing OS installation copied on a new disk or machine. To make things clear, a side-by-side comparison is given in Table 1.
Overview of manual copying and tweaking
Now that we’ve decided to perform manual copying and reconfiguration, this is the algorithm that should be followed.
1. Boot into a live GNU/Linux CD or USB stick, or a secondary installation that you already have.
2. Know your machine – find the device names, right partitions, etc.
3. Remove junk files and applications.
4. Partition and format, if necessary.
5. Copy the files.
6. Edit the configuration files.
7. Fix the bootloader.
It is important that Step 2 is only done after Step 1, since device names can change from installation to installation and session to session.
Note: Although removing junk files while running a live CD is fairly simple, you’ll have to boot the to-be-copied OS itself to remove junk applications, unless you’re familiar with *chroot*.
Finding the device names
In GNU/Linux, disks and partitions are usually mapped into the device files inside /dev.
/dev/sdX represents a SATA mass storage device, where X can be a, b, c, etc. A mass storage device can be anything – a hard disk, SSD or a USB Flash drive, while optical disks are usually mapped to /dev/sr0. When referring to a single partition, /dev/sdXY is used, where Y is a number. This means the first partition in your first hard disk is probably /dev/sda1.
Guessing is okay if you have a passion for system destruction and data removal. Otherwise, be extremely careful, because naming can vary based on different factors.
There are multiple ways to find the device names. You can use some graphical utility like GNOME Disks or gparted. When it comes to the console, I’d recommend a combination of df and blkid because you won’t make any accidental changes that way.
df -h will print the device names, used and unused space, and the path where each one is currently mounted – all of which are sufficient to identify the name of the disk or partition that you are considering. blkid DEVICE-NAME will print the UUID and label (if set) of the partition so that you can verify.
Removing junk files and programs
Unless you are considering a bit-by-bit copy of the disk or partition, it is better to remove unwanted programs and junk files before copying so that you can save time and protect the target disk from too much wear. However, do not do this if your source disk is ageing. In that case, all you want is to get the contents copied first. (If the condition of the disk is worse, it’s better not to let it spin at all; seek professional service.)
Trash is an obvious collection of junk files in a desktop distro. But apart from that, there are many hidden files (the ones starting with a dot, which you can list using Ctrl + H in a graphical browser or using ls -a in a command shell) in your /home file. Some might be holding really important data like your browser bookmarks and security keys, but the ones like .thumbnails and select children of .cache are safe to remove. You can also make use of file decluttering tools, if you like.
There can be system-level removable data too. For example, in Debian-based distros, sudo apt-get clean can remove hundreds of megabytes of package management cache.
System migration is a good opportunity to remove junk applications, too. You can use commands like apt-get purge PACKAGES so that the configuration files are also removed. If apt is your package manager, another useful command is sudo apt-get autoremove, which will remove packages that were installed automatically and are no longer required..
Copying the files
The basic idea is to copy the files in the root partition of your existing OS to an empty partition (usually on another disk). This involves:
1. Creating a new partition of sufficient size on the destination disk (or choosing an existing one).
2. Formatting it with a compatible file system (usually ext4 for modern GNU/Linux distros).
3. Copying all the files preserving the file metadata.
You can use console utilities like fdisk, gdisk and mkfs.ext4 to perform the partitioning and formatting. If you are not sure, it’s safer to use a graphical utility like gparted.
Unlike the disk imaging method, both source and destination partitions can be mounted before copying (in fact, that’s necessary). But you have to make sure that no other write activity is going on. That’s why copying the root of a running GNU/Linux system is not recommended. Boot into a live distro, mount the root of the to-be-copied OS to some safe place like
/mnt, and start copying.
Copy as the root user so that there will be no permission issues (you can use sudo). You have to preserve file metadata also. Assuming the old root is mounted to /mnt, the command can be something like this:
sudo cp -a /mnt/* /media/liveuser/NEWPARTITION/
You can use the rsync utility also. Both will accept the -a option, which preserves the metadata.
Updating fstab
/etc/fstab is the file that maps partitions to their automatic mount points. Once the copying is complete, you can edit the fstab file in the new partition, to replace the ID (usually a long hexadecimal value) of the old root partition with the new one. Yes, you can use blkid to know the ID.
You can also consider this an opportunity to bring your /home into or out of the root partition, which is easily done by adding or removing entries in the fstab file (of course, you have to move the files manually).
Another possible change that you may like to make is regarding the swap partition.
Note: If you have encrypted volumes, you may want to update /etc/crypttab as well.
 Fixing the bootloader
Now we have to fix the bootloader. In this article, we look at only GRUB, since it is the most popular and compatible choice. GRUB is installed to a disk using the command sudo grub-install DEVICE-NAME (not the partition name) and updated using sudo update-grub.
One common pitfall when fixing the bootloader from a live CD is to run sudo update-grub directly. There are no notable errors, but the bootloader does not get updated. Has the command worked? Yes, in only that it has updated the GRUB installation of the live system.
If update-grub will fix the bootloader in the disk related to the running OS only, how do we update the GRUB in the hard disk or SSD without being able to boot it first? We have some solutions.
- Run the GRUB utilities provided by the live system, but instruct them to consider a different target root.
- Use update-grub provided by your permanent OS itself (i.e., on HD/SSD), but run it from the live CD using chroot.
- If your permanent disk contains any other GNU/Linux installation that is bootable, load it and run update-grub from it.
I don’t prefer the first option since there can be version incompatibilities. The third option is the easier one. But that’s not always available, so we have to go for the second.
Assuming you are running a live, rescue or different OS installation, and calling the newly copied OS (forget the old disk or partition) target OS, this is what you have to do.
1. Mount the root of the target OS to your live system (replace X and Y with the disk and partition numbers of the target OS root):
sudo mount /dev/sdXY /mnt
for i in /dev /dev/pts /proc /sys; do
sudo mount --bind $i /mnt$i
done
sudo chroot /mnt
Now that you are in the target OS, issue the following commands:
grub-install /dev/sdX
update-grub
exit
It’s time to restart. If you are going to issue the umount command (which is unnecessary), be sure to do that in reverse order (i.e., /sys first).
Caution: The package grub-pc is used for legacy booting and grub-efi is used for UEFI booting (names may vary slightly). Make sure the version you are using is compatible with your motherboard setup. Consult your package manager to know which version is in charge.
Tip: There are several pitfalls related to UEFI. Here is a good read to start with: https://help.ubuntu.com/community/UEFI#General_principles
Cloning a disk or a partition
Taking a bit-by-bit copy may sound like something that happens only in an advanced lab. It does, but that doesn’t mean you can’t do it. In fact, all it takes is a single line of command:
cp SOURCE DESTINATION
…or:
dd if=SOURCE of=DESTINATION
Both SOURCE and DESTINATION can be real disks, partitions or image files. Some applications include taking the backup of a DVD or applying the ISO image of a live GNU/Linux distro to a CD or USB Flash drive.
This example copies Partition 1 of the first [hard] disk to Partition 2 of the second:
dd if=/dev/sda1 of=/dev/sdb2
dd provides more options like defining the buffer size, I/O synchronisation and error control. See man dd to know more.
Regardless of the tools you choose, it’s a good idea to issue the sync command after the copying to flush any cache.
Caution: Neither SOURCE or DESTINATION can be a mounted disk or partition.
Disclaimer: All the facts and instructions given in this article are shared in the hope that they will be informative and useful. How-to parts have been tested and verified by the author. However, the author or the publisher cannot guarantee that they will work in all situations or on all machines. Things can fail due to multiple reasons including version differences, software bugs, hardware issues and human errors. Since failures during system cloning can render the system useless or even wipe-off disks, users are advised to double-check the information and the commands they issue, and then proceed at their own risk.


