


The world of machine learning (ML) and deep learning (DL) is a fascinating one. Many newbies would like to dabble in this field but have some inhibitions. This article introduces readers to some of the best tools to kickstart their journey into the ML/ DL domain.
Machine learning is a term that is applied to a broad range of topics which have one thing in common – the use of algorithms and other statistical models to improve the performance of a particular task. All machine learning (ML) models are used to build a mathematical model of the data provided, to help the user predict or make decisions with a very high level of accuracy; thereby considerably reducing the strain of manually sifting through the data. Currently, there are several fields in which ML is used extensively, from filtering out emails and computer vision, to choosing a smart assistant. Readers are urged to spend some time researching only the topics that they are interested in and not get overwhelmed or distracted by the countless other applications of ML.
Deep learning can be considered a subset of machine learning, though to call it that really does not do it justice. Currently, most applications have moved on from the somewhat old fashioned ML algorithms to employ deep learning (DL) algorithms. The latter provide much more support for the building of more complex mathematical models which cannot be provided by ML. Deep learning algorithms employ multiple ML algorithms in a manner vaguely inspired by how the human brain works, and hence the term‘neural networks’. Deep learning algorithms have been developed to the point where it has been proved that computers can indeed be smarter than humans.
This article explores five of the most user-friendly, highly scaleable ML libraries/tools available. These are:
- Scikit-learn
- OpenCV
- TensorFlow
- Keras
- Google Colaboratory
Some of you may be familiar with a couple of these libraries and even know how to use them. This is not meant to be an in-depth tutorial for any of these tools. The idea is that, hopefully, by the end of this article, readers will discover which of the five libraries featured, interests them enough to read further on the topic.
Scikit-learn
The founders of Scikit-learn started off by trying to find answers to simple problems. I believe that any aspirant must follow the pioneer’s footsteps. Scikit-learn is a free library written for Python which lets users do exactly that. It operates using Python’s NumPy and SciPy libraries to achieve multiple aspects of machine learning with ease, such as various algorithms for classification, regression and clustering. It lets the user easily step into the world of artificial intelligence (AI) without making them feel that they’ve taken too big a leap. With its easy-to-use libraries, you can easily incorporate any of the above ML algorithms into your code. While Scikit-learn is essentially for older ML algorithms, beginners will have their hands full trying to implement various algorithms to see how they affect a particular use case.
This library is largely implemented in Python with some parts of it written in Cython, thus restricting its usage to how much Python you know. Python, incidentally, has a tremendous collection of libraries and third party APIs.
The advantage of starting off with Scikit-learn is that most programmers with similar aspirations have also started off along the same path. There is huge support for Scikit-learn with the entire code written using the Scikit-learn library, making the learning process fairly simple. It also helps that the official documentation of Scikit-learn is one of the more refined and well written. So, most of your doubts will probably get clarified by just going through the documentation.
To start off with Scikit Learn, just follow the instructions available at the official site, at https://scikit-learn.org/stable/install.html.
OpenCV
OpenCV is a cross platform library that lets the user tackle any kind of real-time computer vision.
Note: Computer vision is a field of computer science that deals with how computers can be made to acquire a high level knowledge from photos or videos. It includes the tasks of acquiring, processing, analysing and understanding the data.
OpenCV has a wide range of applications, starting with simple algorithms that deal with 2D images, all the way up to augmented reality, motion tracking, etc. OpenCV is not as user-friendly as Scikit-learn, yet, with a little time anyone can easily understand the flow of things – well enough to use OpenCV to its maximum extent. OpenCV, unlike Scikit-learn, is mostly written in C/C++ and is a cross platform library. This means that the users can truly optimise their code by using lower level and complied languages such as C/C++ or Java. OpenCV also includes a statistical ML library with which it can stand alone to some extent. OpenCV also has integrations with leading DL frameworks such as TensorFlow and Torch/PyTorch, making it a very versatile tool which can be used even if the provided ML library does not meet the user’s demands.
One of the notable things about OpenCV is that it supports hardware acceleration in three different cases, namely:
- Intel’s Integrated Performance Primitives
- A CUDA based GPU interface
- An OpenCL based GPU interface
The fact that OpenCV can use hardware acceleration means that the user can easily increase the performance of the code with simple modifications, thereby resulting in smoother real-time applications due to faster code execution.
Note: It is advisable to use hardware accelerations that are mathematically intensive to perform, else there is a chance of a drop in performance due to the time it takes to shift resources to the GPU from the CPU.
Detailed installation instructions for OpenCV are available from the official documentation for the Python programming language at https://docs.opencv.org/3.0-beta/doc/py_tutorials py_setup/py_setup_in_windows/py_setup_in_windows.html. Other installations can also be found in the documentation.
TensorFlow
TensorFlow is an open source library which tackles data flow programming across a range of applications, from a symbolical mathematical library to the core library in neural network programming. Developed by the Google Brain team for the search giant’s internal use, today it is used within the firm for purposes ranging from research to production.
Note: The TensorFlow library is so named because it operates on multi-dimensional data arrays called tensors, whilst performing calculations for neural networks.
Unlike the earlier libraries, TensorFlow has been streamlined to make neural networks and is optimised for DL applications. TensorFlow is best at data crunching at a scale where data can be realistically processed using any other older technique. You can do all this while keeping the usage so simple, that, any devoted Python user will feel right at home with the line-by-line implementation of the neural network, allowing the user to easily implement high level concepts that involve a huge amount of mathematical theory behind them, with the call of a single function. This allows the user to quickly create a neural model and focus on refining it rather than worry about the mathematics behind it, making for faster prototyping.
Like OpenCV, TensorFlow is not restricted to Python but supports other languages. Support ranges from having direct support to having third party APIs taking care of that. TensorFlow has a very flexible architecture system that allows it to be used in various devices, whether it is CPUs, GPUs or even TPUs (tensor processing units), as well as clustered servers or even handheld devices such as mobile phones. This allows TensorFlow to have a hardware acceleration capability that is unrivalled by most other libraries.
Note: Keras is a pure Python library unlike TensorFlow
TensorFlow can take code to the browser with the use of TensorFlow.js, making DL projects lightweight and easily scaleable. TensorFlow Lite, which was built for using TensorFlow, specifically for Android development (beginning from Android Oreo) is even lighter. It has a wide reach. There are several applications of this library for different use cases, from being the foundation of some new technologies such as Deep Dream, an automated image captioning software, to being the core in many users’neural network projects. While it can be applied for a great many things, getting started off is not that hard. TensorFlow has huge support online with no lack of example code to go through before you tackle your first project.
You can begin your TensorFlow journey by getting the Python library at https://www.Tensorflow. org/install/ and if you have a GPU that meets CUDA requirements, you can even optimise your execution using hardware acceleration.
Keras
Keras is an open source Python library which runs on top of other Python libraries such as TensorFlow, Microsoft Cognitive Toolkit, or Theano. Keras focuses on being more user-friendly, modular and extensible compared to the libraries that it runs on top of.
Keras has official support from Google’s TensorFlow team (for the TensorFlow core library), allowing users to quickly build their code using the numerous implementations of commonly used neural networks methods already predefined in the Keras package. Like TensorFlow, Keras also supports hardware acceleration by the use of GPUs or TPUs, allowing the user far easier coding in almost the same execution time.
Unlike the other tools mentioned in our list, Keras is not a standalone library. Rather, it acts as a high-level API to other libraries that require comparatively more complex ways of coding. This allows users to achieve far more rapid prototyping with their code. As a trade-off for this level of user-friendly Python coding, you lose some level of control over your code. For example, in Keras, while you do have considerable control over your network, any of the lower level packages that implement Keras will control the finer things of the network.
This might lead you to wonder, why one should even use Keras? The sole reason is that most of the time, while trying out new implementations of neural networks, that high level of control over the hyper parameters isn’t required. The trade-off obtained by dropping that functionality makes far more sense to any programmer who only wants to see how the network performs. You can think of Keras as a way of getting the feel of what you are trying to build before trying to optimise it at a much lower level so that your networks perform the best. Keras has one of the most user-friendly approaches to coding neural networks. For anyone who just wants to try out the latest advances in current technology, Keras will almost always meet such a user’s demands. One small shortcoming is that Keras is a pure Python library unlike TensorFlow.
Note: As of June 2019, Keras has officially been ported together with Tensorflow to bcome Tensorflow 2.0. This new version of Tensorflow cuts back on a lot of extras previously available, resulting in a more standardised approach of writing code using the Keras API. Tensorflow 2.0 is currently in beta stage, but it already implements a lot of the more commonly used features, so if you feel like foraging into the new and improved library, head over to: https://www.tensorflow.org/beta
It is possible for one to transform Keras models from Python to lower level languages such as C/C++.
As an example of how easy it is to understand and use Keras as compared to TensorFlow, let us take a look at both these libraries when used for the same application – the classification of handwritten numbers using the Mnist data set.
First let us look at an example of using pure TensorFlow to finish the task, as shown below:
import tensorflow as tf
mnist = tf.keras.datasets.mnist

n_nodes = 512
n_classes = 10
batch_size = 100

x = tf.placeholder('float', [None, 784])
y = tf.placeholder('float')

def neural_network_model(data):
layer_1 = {'weights':tf.Variable(tf.random_normal([784, n_nodes])),
'biases':tf.Variable(tf.random_normal([n_nodes]))}
output_layer = {'weights':tf.Variable(tf.random_normal([n_nodes, n_classes])),
'biases':tf.Variable(tf.random_normal([n_classes])),}
l1 = tf.add(tf.matmul(data,layer_1['weights']), layer_1['biases'])
l1 = tf.nn.relu(l1)
output = tf.matmul(l1,output_layer['weights']) + output_layer['biases']
return output

def train_neural_network(x):
prediction = neural_network_model(x)
cost = tf.reduce_mean( tf.nn.sparse_softmax_cross_entropy_with_logits(logits=prediction,labels=y) )
optimizer = tf.train.AdamOptimizer().minimize(cost)
hm_epochs = 5
with tf.Session() as sess:
sess.run(tf.initialize_all_variables())
for epoch in range(hm_epochs):
epoch_loss = 0
for _ in range(int(mnist.train.num_examples/batch_size)):
epoch_x, epoch_y = mnist.train.next_batch(batch_size)
_, c = sess.run([optimizer, cost], feed_dict={x: epoch_x, y: epoch_y})
epoch_loss += c
print('Epoch', epoch, 'completed out of',hm_epochs,'loss:',epoch_loss)

correct = tf.equal(tf.argmax(prediction, 1), tf.argmax(y, 1))
accuracy = tf.reduce_mean(tf.cast(correct, 'float'))
print('Accuracy:',accuracy.eval({x:mnist.test.images, y:mnist.test.labels}))

train_neural_network(x)
Now that we have that part done, let us take a look at the same implementation using tf.keras :
import tensorflow as tf
mnist = tf.keras.datasets.mnist

(x_train, y_train),(x_test, y_test) = mnist.load_data()
x_train, x_test = x_train / 255.0, x_test / 255.0

model = tf.keras.models.Sequential([
tf.keras.layers.Flatten(),
tf.keras.layers.Dense(512, activation=tf.nn.relu),
tf.keras.layers.Dense(10, activation=tf.nn.softmax)
])
model.compile(optimizer='adam',
loss='sparse_categorical_crossentropy',
metrics=['accuracy'])
print("running...")
model.fit(x_train, y_train, epochs=5)
model.evaluate(x_test, y_test)
The Keras code is far simpler and the language is at a higher level than TensorFlow.
Colaboratory by Google
Increased performance in the execution of code is possible through the use of hardware like GPUs or TPUs rather than by running it solely on the CPUs. This is because CPUs, unlike the other two, have a limited number of cores and cannot process the vast mathematical calculations required even for quite a simple neural network. However, what can be done if your GPU is not supported by CUDA or you simply do not have one?
That is where services such as Colaboratory come into play. Colaboratory is an online service that lets you use an online notebook system called Jupyter to write and execute code which is wholly based on the cloud. This avoids investing in expensive hardware such as a GPU to optimise code. Google Colaboratory gives you access to a Nvidia Tesla K80 GPU at no cost at all. The Colaboratory environment is exactly the same as any offline Python implementation. This means that there is absolutely no learning curve prior to starting off with Colaboratory. The fact that you run you code completely online means that you do not have to install any of the dependencies on your personal computer and this means that you are not restrained from implementing the latest ideas.
Putting your projects completely on the cloud allows you far more freedom and the access to Google TPUs which power the Colaboratory project. Unlike the Nvidia Tesla K80 GPU, the TPU does not come free, but you can use it for a basic fee calculated on TPU usage per second. This allows for the least possible execution time at the cheapest possible price. Like the TPU, Colaboratory also has several plans for other more powerful GPU prices, which are lower than the TPU rates, allowing you to choose what you feel is best for your particular use case.
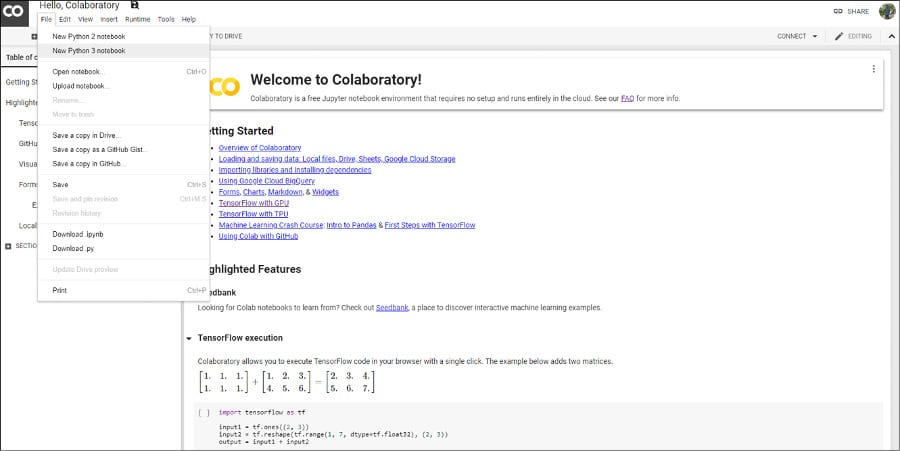
As mentioned earlier, Colaboratory is the same as any offline Python development environment that you may already be used to, thus allowing you to use packages that you normally do, such as OpenCV, TensorFlow, Keras, etc. A simple implementation of TensorFlow using Google Colaboratory is given below, starting from the official welcome page, https://colab.research.google.com/notebooks/welcome.ipynb.
To start off, first create your Python3 notebook in Colaboratory as shown in Figure 1.
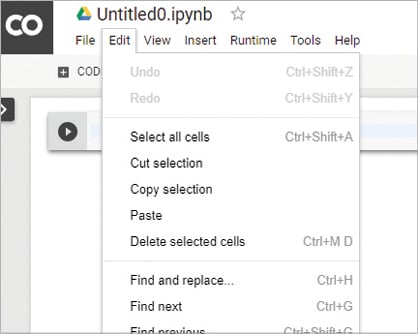
Once you have done that, navigate to the notebook settings (Edit > Notebook Settings) as shown in Figure 2.
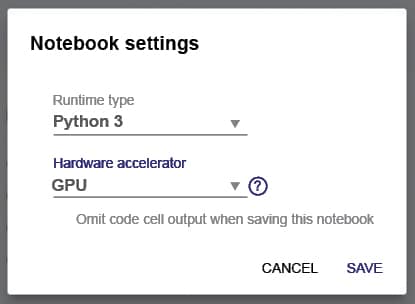
Once you have selected the notebook settings, you can now change the runtime type to Python2 or Python3 and you can also change the hardware accelerator. It is here that you will decide on whether you want use the free Nvidia Tesla K80 GPU or the TPU provided by the service (Figure 3).

Now that the environment is set up, we can finally try out some program to test it. The purpose of this article is not to take you through any specific machine learning or deep learning example. For the sake of testing Colaboratory, let’s use the classic Mnist example that has been taken directly from the TensorFlow website https://www.tensorflow.org/tutorials/
Once you have grabbed the code, simply execute it in the notebook and you should see an output as shown in Figure 4.
Using Colaboratory, you have executed a basic classification example within minutes, without the need for any extra installations of TensorFlow (or even Python) on your computer. Thus, you can fully concentrate only on what you want to achieve and not bother about the dependencies needed for your project.
We have seen only five of the vast number libraries that are available in the open source world. These five tools will provide the reader with a strong-enough footing to push forward and explore more complex tools that are streamlined for a particular use case. I urge you to also try to learn the mathematics of any new technology that you implement as it gives you a finer understanding of the how and whys of each thing. A nice start to any theory is the Machine Learning Cheatsheet, https://ml-cheatsheet.readthedocs.io/en/latest/index.html which, while barely scratching the surface of the mathematics behind the implementations, gives a very clear idea about the concepts and code examples to lead you in the right direction


