Web servers are generally dominated by GNU/Linux based software, whereas Windows has the lion’s share of desktop PCs. Web development tools are generally more focused on the Linux environment, but Windows developers can take advantage of the Windows variants to develop applications on their OS, and later deploy these on an appropriate server.
The LAMP stack is a well known setup that powers a big portion of the Internet. LAMP stands for Linux, Apache, MySQL and PHP. A similar Windows variant is called WAMP, where W stands for Windows. WAMP can be used to develop dynamic websites quickly and take advantage of the battle-tested tooling that comes with it.
Let’s set up Apache and PHP in a Windows development environment.
Note: This tutorial assumes this is being done in a development and not a production server. For production, it is generally recommended that a GNU/Linux based OS is used.
Apache
The Apache HTTP server is free and open source Web server software and is ranked the second most popular after Nginx. Apache is the application the outside world contacts to access the Web pages, which in turn use one of its modules to generate content based on the requests.
Apache is extensible and can be extended by using Apache Modules for additional features.
PHP
PHP: Hypertext Preprocessor is a programming language designed for Web development. It enables users to create dynamic Web pages that can interact with a database, handle state and make changes at the server level. PHP code is run through the PHP interpreter, which is called by Apache upon a request. It then prepares a response for the request and sends it back to Apache for the user.
PHP is primarily a dynamically typed language, which also supports optional type declarations on function parameters and returns values enforced at runtime. PHP code can be mixed with HTML code to generate output, although it goes against the best practices.
There are packages like WAMP Server and XAMPP that pack all the necessary applications including Apache and PHP together in a single bundle, easing installation to the point of just hitting Next for each step and simply choosing the components.
Although this eases the task of installation considerably, manually installing and configuring the applications will help you understand the underlying system and configurations better.
This tutorial focuses on the manual installation of Apache and PHP. So, let’s get started!

Installing Apache
Downloading the files
The Apache HTTP server website itself doesn’t maintain an official binary build or an MSI installer for the newer versions and just hosts the source files. To get a binaries distribution, head over to https://www.apachelounge.com/download/ and download the appropriate Zip file for your OS’ architecture.
Also make sure the latest Microsoft Visual C++ runtime for your system is installed.
Extract the Zip file using your favourite file archiver utility like WinRAR, and store it in the desired location. For this tutorial, we are using C:\Apache24 as the Apache home.
Test run
By default, Apache is configured to listen to Port 80 of the server. You can test run the server by firing up your command prompt, then pressing the Windows Key + R, followed by typing ‘cmd’ in the Run box, and hitting Enter.
Then navigate to your installation directory and enter the bin folder that houses the executable for the server; for me it is at C:\Apache24\bin.
cd C:\Apache24\bin
Once you have entered the bin folder, run the following command:
httpd.exe
This will trigger the Windows security to ask for your permission. You can choose to allow Apache to be accessed over a private network like your home network or public networks. It’s up to you to make that choice. If this is a personal development system, I recommend that you just select Private networks and click on Allow access.
Once you do that, you can see a similar output on the command prompt (Figure 1).
This means that Apache has started running correctly, but a domain name was not set for Apache, which is fine for now, as we are just testing it and not deploying it on a real server for the world to access.
To get rid of this message, go to the conf directory in the Apache24 installation folder. Open the file httpd.conf with your favourite text editor and find the line that says # ServerName www.example.com:80. Remove the hash # and replace www.example.com with localhost.
After this is done, it should look like what follows:
#
# If your host doesn’t have a registered DNS name, enter its IP address here.
#
ServerName localhost:80
Now open up a browser and the URL: http://localhost. This should open up a page saying “This works!” which means just that. Apache was successfully able to be run on your computer.
Running as a server
You can’t expect to fire up a command prompt every time you’d like to play around with your Web server. In order to automatically start it when you start your computer and run it in the background, you need to register it as a service.
Exit the application first by pressing Ctrl+C in the command prompt and close the command prompt.
Since we are going to install the application, we need administrative privileges. So, run the command prompt as an administrator first and navigate to the Apache bin directory once again. Then run the following command:
httpd.exe -k install -n “Apache HTTP Server”
This will install the Apache service. Run the following to check if it has been installed correctly:
services.msc
You should be able to find Apache HTTP Server in the list of services active on your computer.
The startup type for Apache should be set as Automatic.
Apache is now active on your computer. Let us configure Apache to work according to our needs.

Configuration
Head over to the Apache24 installation directory and navigate to the folder named htdocs. This is called the document root. This is where your files reside — those that are to be hosted and that will be served by Apache. You will find a single index.html file available inside it. index.html is the first file Apache looks for by default if you do not mention a file name. For example, www.example.com/ will actually be served by www.example.com/index.html.
Replace the contents of index.html with your own content. You can add your files here and host your website on Apache. You can also access your website on the same network by typing the IP address of your host computer in another computer’s browser in the same network.
However, if you’d like to change the document root, you can do that by going back to Apache24/conf/httpd.conf. Find the line that starts with DocumentRoot. It should look something like what’s shown below:
# DocumentRoot: The directory out of which you will serve your
# documents. By default, all requests are taken from this directory, but
# symbolic links and aliases may be used to point to other locations.
#
DocumentRoot "${SRVROOT}/htdocs"
<Directory "${SRVROOT}/htdocs">
We just have to change the directory to the location you desire. For this tutorial, I will point my new document root to C:\web. Make sure you have copied your files with an appropriate index.html to the new location. Now edit the httpd.conf file to:
DocumentRoot “C:/web”
<Directory “C:/web”>
Notice the ‘/’ forward slash has been used rather than the Windows backward slash.
Save the file and restart the server by going to Windows Services. Now try loading localhost again and it should display your index.html from the new document root.
Installing PHP
Downloading the files
Downloading PHP is pretty straightforward. You just need to head over to the PHP Windows site at https://windows.php.net/download/ and download the latest stable thread safe binaries. At the time of writing this, the latest stable version is PHP 7.3.10 for Win64.
Download and extract the Zip file to an appropriate location. I will be extracting it to C:\php7. Use the location where you extracted PHP in httpd.conf.
Preparing Apache for PHP
Apache needs to be configured to communicate with PHP to be able to serve dynamic Web pages from PHP. For this, we need to prepare Apache to be able to find the PHP interpreter. Add the following code to the top of httpd.conf:
AddHandler application/x-httpd-php .php
AddType application/x-httpd-php .php .html
LoadModule php7_module “c:/php7/php7apache2_4.dll”
PHPIniDir “c:/php7”
This configuration tells Apache to redirect all requests to pages ending with .php to the PHP interpreter with the module located at C:\php7\php7apache2_4.dll.
Configuring PHP
We will now need to configure PHP to be able to handle the pages. For this, PHP comes with two sets of configurations — one for development and the other for production. Since we are building the system for development, we will use the development configuration, which allows PHP to explicitly throw errors on the Web page if there are any, which is useful for debugging. However, something like that in production will let users see your PHP errors, which can be a major usability and security concern.
To set up the configuration, rename the php.ini-development file to php.ini in your PHP installation directory. PHP is now configured to be used in a development environment.

Test running a dynamic page
To test if PHP is working correctly, just head over to your document root, delete the original index.html file and create a new file called index.php with the following content:
<?php
phpinfo();
?>
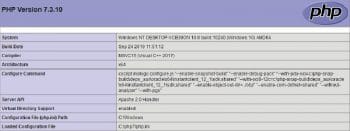
Now restart your Apache service at Windows Services and reload http://localhost on your browser. You should see something like what’s shown in Figure 3.
This page shows you all the configuration settings in PHP.
If you have made it this far, congratulations! You have successfully set up PHP in your Windows computer.
You can now enable certain modules, based on your needs, by modifying the php.ini file and simply uncommenting the lines. For example, to enable mysqli support on PHP, you need to find and uncomment the line:
;extension=mysqli
Then change it to:
extension=mysqli
After this, simply restart the server to start using the mysqli module, which allows you to connect to a MySQL server.
Now you can edit the PHP file to build dynamic websites. If you are new to PHP development, a good starting point is to start with the PHP documentation provided at https://www.php.net/manual/en/index.php.
That’s all there is to it. PHP has been set up with Apache to be able to serve dynamic Web pages written in PHP. To deploy it in a production environment, simply rename the php.ini-production file to php.ini.
However, there are a few more things to take care of when deploying in production, especially at the Web server level.
You can find a better tutorial geared towards deploying a LAMP system securely to production at https://www.opensourceforu.com/2019/05/securing-a-lamp-server-in-2019/.


