


The author takes readers through an in-depth tutorial on how to use Eclipse in programming.
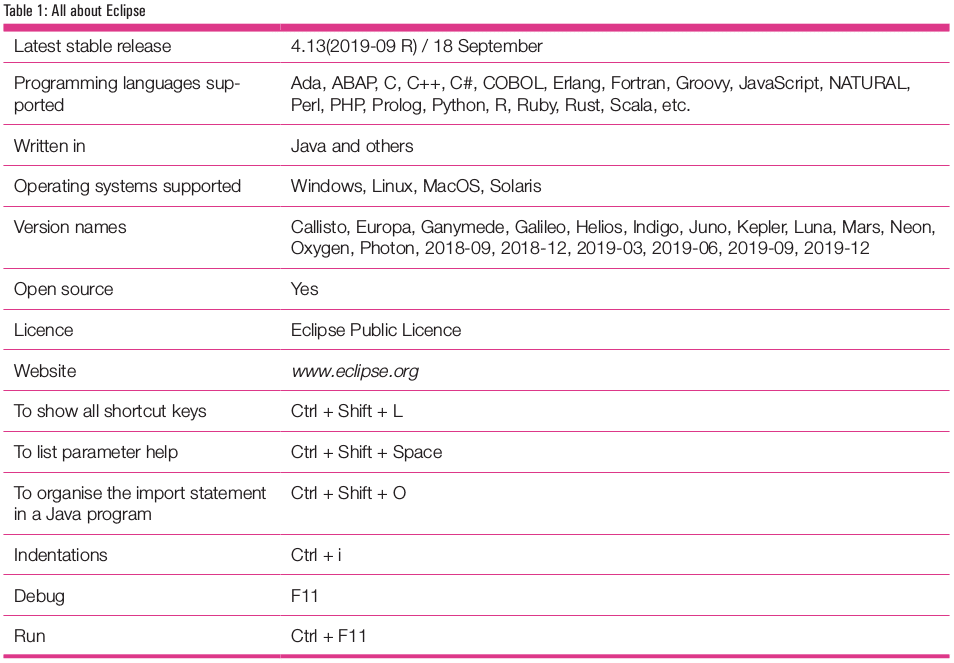
Eclipse is an integrated development environment (IDE) that is used in programming, and is one of the most widely used Java IDEs. One of its strengths is its extensible plugin system for customisation. Table 1 lists the features of Eclipse.
Let’s now look at how to download and install Eclipse.
Download and installation
Eclipse can be downloaded from https://www.eclipse.org/downloads/. Find the section called Get Eclipse IDE 2019-09. Click on Download. The default mirror site will be available, such as ‘Download from: Japan – Japan Advanced Institute of Science and Technology (http)’. We can click on Select Another Mirror as well. Click on Download again. Next, click on the installer file. For Windows, it will be eclipse-inst-win64.exe (the 64-bit version).
 Let us now select ‘Eclipse IDE for Enterprise Java Developers’. This will pick up Java 1.8+ and the installation folder on its own. Then click on Install.
Step 1: Review and accept licences before Eclipse can be installed. All Eclipse downloads are provided under ‘Terms and conditions’of the ‘Eclipse Foundation Software User Agreement’ unless specified otherwise.
Step 2: Click on Accept. The installation of packages will continue.
Step 3: Another dialogue box will appear, named ‘Accept Trusted Certificates’. Select the certificates available and click on Accept Selected Certificates.
Step 4: Once the installation is complete, click on Launch.
Step 5: Select a directory as a workspace. Eclipse IDE uses the workspace directory to store its preferences and development artefacts.
Step 6: Click on Launch.
Step 7: If you are using an older version of Eclipse, then you will get a warning about compatibility.
Step 8: Hence, click on Change Workspace and then on Launch.
Click on the workbench in the top right corner to go to the IDE.
 Eclipse and Java
Let’s now create a sample Maven project.
Step 1: Click on Create a Maven Project.
Step 2: In the New Maven Project dialogue box, select Project name and Location. Click on Next.
Step 3: Select an Archetype and click on Next. We want to create a simple Web application; hence select maven-archetype-webapp and click on Next.
Step 4: Specify the archetype parameters such as Group ID and Artefact ID.
Step 5: Click on Finish.
Take the following steps to run the project.
Step 1: Select the Project in Project Explorer.
Step 2: Right click on the project and select Run as.
Step 3: Select Maven Clean and verify the output in Eclipse Console.
Let’s now try to run the maven build command.
[INFO] Scanning for projects...
[INFO]
[INFO]--< com.clouds.app:devops-app >--
[INFO] Building devops-app Maven Webapp 0.0.1-SNAPSHOT
[INFO] --------------------------------[ war ]----------------------------[INFO]
[INFO] --- maven-resources-plugin:2.6:resources (default-resources) @ devops-app ---
[WARNING] Using platform encoding (Cp1252 actually) to copy filtered resources, i.e. build is platform dependent!
[INFO] Copying 0 resource
[INFO]
[INFO] --- maven-compiler-plugin:3.1:compile (default-compile) @ devops-app ---
[INFO] Nothing to compile - all classes are up to date
[INFO]
[INFO] --- maven-resources-plugin:2.6:testResources (default-testResources) @ devops-app ---
[WARNING] Using platform encoding (Cp1252 actually) to copy filtered resources, i.e. build is platform dependent!
[INFO] skip non existing resourceDirectory C:\Users\Mitesh\eclipse-workspace-new\devops-app\src\test\resources
[INFO]
[INFO] --- maven-compiler-plugin:3.1:testCompile (default-testCompile) @ devops-app ---
[INFO] Nothing to compile - all classes are up to date
[INFO]
[INFO] --- maven-surefire-plugin:2.12.4:test (default-test) @ devops-app ---
[INFO] No tests to run.
[INFO]
[INFO] --- maven-war-plugin:2.2:war (default-war) @ devops-app ---
[INFO] Packaging webapp
[INFO] Assembling webapp [devops-app] in [C:\Users\Mitesh\eclipse-workspace-new\devops-app\target\devops-app]
[INFO] Processing war project
[INFO] Copying webapp resources [C:\Users\Mitesh\eclipse-workspace-new\devops-app\src\main\webapp]
[INFO] Webapp assembled in [59 msecs]
[INFO] Building war: C:\Users\Mitesh\eclipse-workspace-new\devops-app\target\devops-app.war
[INFO] WEB-INF\web.xml already added, skipping
[INFO] ------------------------------[INFO] BUILD SUCCESS
[INFO] ------------------------------[INFO] Total time: 6.639 s
[INFO] Finished at: 2019-10-26T20:09:13+05:30
[INFO] ------------------------------
Picked up _JAVA_OPTIONS: -Xmx512M
There are no test resources available as of now. Hence, test results won’t be available. Verify the Packaging WebApp step. As it is a Web application, it will create a WAR file.
Servers in Eclipse
Apache Tomcat (or just Tomcat) is one of the most popular open source (Apache Licence 2.0) implementations of the Java Servlet and JavaServer Pages technologies. It provides a ‘pure Java’ environment in which Java code can execute. It is very easy to use and, hence, very popular in project teams.
We can verify the WAR file created in the earlier section by deploying it into the Tomcat server.
Step 1: Click on the Servers tab in the Eclipse window. You will see the message: ‘No servers are available. Click this link to create a new server…’
Step 2: We want to configure the Tomcat server. Hence, select Apache. Select Tomcat v7.0 Server.
Step 3: Provide the server’s host name and name. Click on Next.
Step 4: Specify the Tomcat installation directory. Click on Next.
Step 5: Select the newly created project as resources that are configured on the server, and click on Add.
Step 6: Click on Finish.
Step 7: Right click on the newly added server and select Start.
Step 8: Right click on our Project -> Run As -> Run on Server -> Choose an existing Server. Select Tomcat v7.0 server at Localhost that we created. Click on Finish.
This action will open the application page in Eclipse browser at http://localhost:9999/devops-app/.
What if we want to publish changes directly to the server and not manually deploy it every time we change files? Take the following steps for that.
Step 1: Right click on the Tomcat server in the Servers tab and select Open or press F3.
Step 2: This will open the Overview tab. Go to the publishing section and select Automatically publish when resources change and Save.
Step 3: Using the browser, visit http://localhost:9999/devops-app/ to verify if the changes have taken place.
 Eclipse and Java programming
Next, let’s try and create a simple Java program.
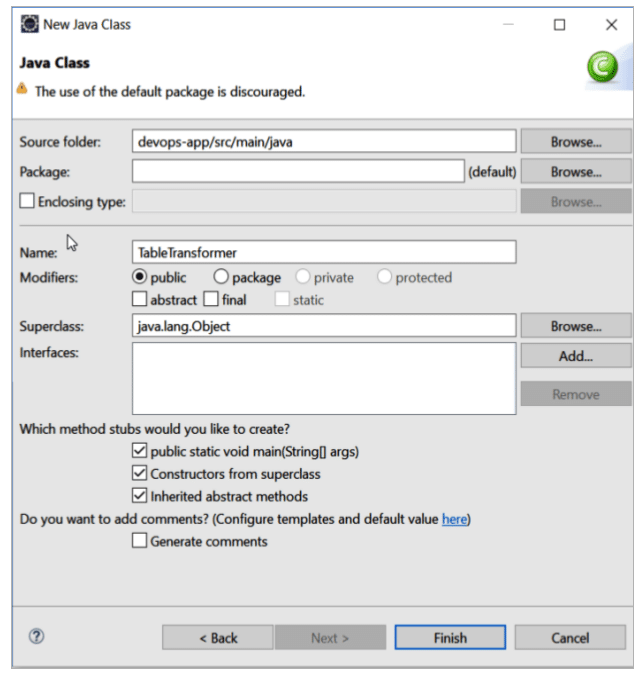
Right click on the src folder in Eclipse and create a new class TableTransformer.
Select method stubs as shown in Figure 1, and click on Finish. The following code will be generated:
public class TableTransformer {

public TableTransformer() {
// TODO Auto-generated constructor stub
}
public static void main(String[] args) {
// TODO Auto-generated method stub
}
}
Template proposals help to write programs quickly. Use Ctrl + space in the IDE work area to bring the template proposals.
Select a proposal and click on it to bring the code block in the program, as shown below:
public class TableTransformer {

public TableTransformer() {
// TODO Auto-generated constructor stub
}

public static void main(String[] args) {
// TODO Auto-generated method stub

if (condition) {
try {

} catch (Exception e) {
// TODO: handle exception
}
} else {

try {

} finally {
// TODO: handle finally clause
}
}
}
}
To manage libraries, jar files or external jar files in Eclipse, we need to use the Java build path. It is useful to compile the Java project to provide dependencies/libraries, jar files or external jar files.
Go to Java Properties by right clicking on a Java project in the Package Explorer view of Eclipse. Click on Properties. Select Java Build Path, and then click on Libraries.
Eclipse and Azure DevOps
Can we manage cloud and DevOps operations from Eclipse IDE? Yes, we can. Let’s try it out for Azure DevOps, earlier known as Visual Studio Team Foundation Server, and Microsoft Azure Cloud.
Visual Studio Team Explorer Everywhere (TEE) is an Eclipse plugin that provides a way to work with Team Foundation Server (TFS), Microsoft Azure Cloud and Azure DevOps, using both Team Foundation Version Control (TFVC) and Git version control systems.
Step 1: Go to the Help menu and select Install New Software
Step 2: Click on the Add button to add a new repository.
Step 3: Give the name and location as https://dl.microsoft.com/eclipse.
Step 4: Click on Okay.
Step 5: Select All in the list of features. Click on Next.
Step 6: Review install details and click on Next.
Step 7: Review licences and click on I Accept.
Step 8: Click on Finish.
Step 9: A new dialogue box will appear that says ‘Would you like to restart Eclipse IDE to apply the changes?’ Restart Eclipse.
Step 10: Click on Open Perspective and select Team Foundation Server Exploring.
Step 11: Click on Connect to TFS / VSTS.
Step 12: In the Server Selection dialogue box, select Browse Visual Studio Team Services.
Step 13: Another pop-up box will open with the URL and code.
Visit the URL and enter the code in the browser when it asks for it. You will be redirected to Login. Provide the user name and password. Once login is successful, you will be asked to close the browser window or tab. Click Okay on the pop-up dialogue box and wait.
Step 14: The progress bar will indicate that processing is going on behind the scene.
Step 15: Select the Project and click Finish.
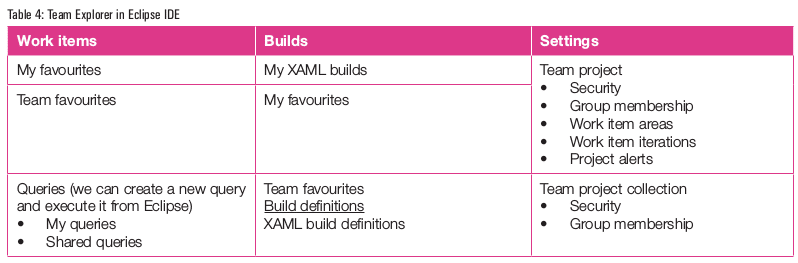
Table 4 lists the options available in Eclipse IDE for each project. Some operations are allowed from Eclipse IDE and some are redirected in the browser.
 Eclipse and Microsoft Azure
Let’s look at how to connect to Microsoft Azure Cloud and perform the available operations based on the plugin.
Step 1: Go to Windows -> Show View. Select Azure, and click on Azure Explorer.
The following services are available:
• Container registries
• Docker hosts
• HDInsight
• Redis caches
• Storage accounts
• Virtual machines
• Web apps
Step 2: Click on Sign in.
Step 3: It will open a dialogue box for authentication.
Step 4: Select Azure Device Login -> Copy Code & Open.
Step 5: Sign in with Microsoft Azure credentials.
Step 6: Select Subscription; it is available in the dialogue box after authentication.
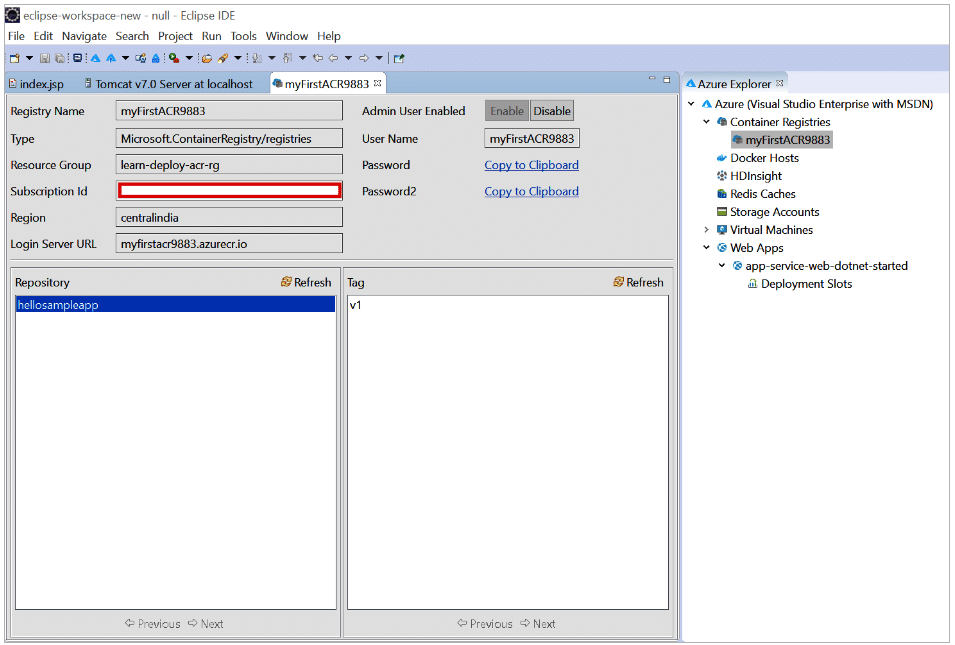
Step 7: Select Container Registries. We already have one container registry; so select and right click on it. Select Open ACR Explorer and verify the details.
Step 8: Select the Web app that is already available in Microsoft Azure. Right click on it and select Show Properties.
We can perform operations such as Start, Stop, Restart and Delete Web App from the Eclipse IDE.
Do verify other options available in Azure Explorer, such as the virtual machine, as an exercise.


