This article is targeted at beginners in Web development. It covers the basics of Node.js, along with a demo on how to use it with the Express Framework to create a basic to-do app.
Node.js is one of the most popular technologies currently. JavaScript, apart from being one of the most popular programming languages on earth, is also very powerful. Node.js, in simple terms, is JavaScript on the server or, maybe, even more than that.
Node.js is used to build scalable and efficient REST APIs. From building hybrid mobile applications to IoT, JavaScript has come a long way from its role in the 90s as the language for flashing images and scrolling messages in your browser.
The main idea of Node.js is to use non-blocking, event-driven I/O to remain lightweight and efficient, which means that the main thread won’t be blocked in I/O operations, and the server will keep attending requests. It is a runtime environment. It does not follow the request/response multi-threaded stateless model. Instead, it follows the single-threaded, event loop model. The event loop is an infinite loop and is the only thread available. The event mechanism helps the server to respond in a non-blocking way and makes it highly scalable, as opposed to traditional servers like Apache which create limited threads to handle requests. Node.js comprises two main components – the core and its modules. The core is built in C and C++. It combines the Google V8 JS engine with Node’s Libuv library and protocol bindings, including sockets and HTTP. Node.js is super-fast. All of this sums up the reason why tech giants like eBay, GoDaddy, etc, rely on it for their needs.
While talking about Node.js, we shouldn’t forget one of its biggest features – the built-in support for package management using npm. This tool comes, by default, with every Node.js installation. The packages are a set of publicly available, reusable components, available easily with version and dependency management.
So, we are going to try out Node.js by developing a very basic to-do list. In order to do so, you need to have Node.js installed on your local machine.
Visit https://nodejs.org/en/download/ to learn more about how to get it up and running.

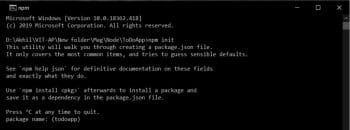
Once you are done with the installation process, let us create an empty directory named ToDoApp to configure our development environment. Initially, we will start npm, our package manager. To do so, open up your console (in my case, the command prompt) in this directory and run the following command:
npm init
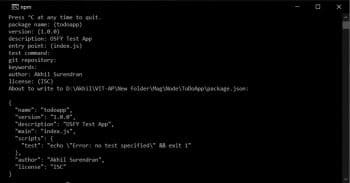
Fill out the information required to initialise the project (or you can simply skip it by pressing Enter until the end), as prompted by the command prompt. For example, see Figure 2.
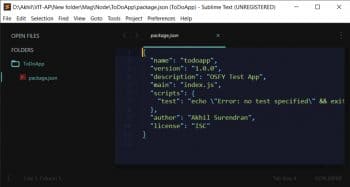
Now, as we are done with this step, we will have a new file created in our directory named package.json, which will contain the project details as shown in Figure 3.
Within the ToDoApp directory, create a new file named index.js – this is where most of our code will reside. It will have the startup code for our app with routing and other functions of our application.
We will use Express to manage and run the Web server. Express is a flexible and minimal Web framework of Node.js, which makes it really easy to create and run a Web server with Node.
To install Express, we will run the following command:
npm install express --save
After the installation, we can add the following code to the index.js file:
//require the express app
var express = require(‘express’);

//to call express
var app = express();

//takes us to the root(/) URL
app.get(‘/’, function (req, res) {
//when we visit the root URL express will respond with ‘Hello World’
res.send(‘Hello World!’);
});

//the server is listening on port 3000 for connections
app.listen(3000, function () {
console.log(‘OSFY Test App listening on port 3000!’)
});
We will now test our server. To do so, enter the following command in your console:
node index.js
To check the output, open your favourite browser and visit localhost:3000. This will show us the response that it was meant to show – Hello World!


In a real-case scenario, we do not want to respond with Hello World, do we? So, we would prefer to definitely send back an HTML file with all that we want to display to our users – it could be forms, images, videos, and the list goes on. Since we are creating a to-do list app, we will have a form for adding new tasks, two buttons to add and remove items, and some basic text. For that, we will be using EJS (Embedded JavaScript), a templating language. Install EJS by running the following command:
npm install ejs --save
Now, we will set up the template engine with the following line of code in the index.js file:
app.set(‘view engine’, ‘ejs’);
By default, EJS is accessed in the views directory of the app. So, we will create a new folder named views in our directory and inside this folder, add a new file named index.ejs. Consider this as our HTML file:
<html>
<head>
<title> ToDo App </title>
<link href=”https://fonts.googleapis.com/css?family=Lato:100” rel=”stylesheet”>
<link href=”/styles.css” rel=”stylesheet”>
</head>

<body>
<div class=”container”>
<h2> A Simple ToDo List App - OSFY Test</h2>

<form action =”/addtask” method=”POST”>

<input type=”text” name=”newtask” placeholder=”add new task”>
<button> Add Task </button>


<h2> Added Task </h2>

<button formaction=”/removetask” type=”submit” id=”top”> Remove </button>
</form>

<h2> Completed task </h2>
</div>

</body>
</html>
In order to display this, let us replace our app.get code in the index.js file so that it sends the corresponding HTML to the client.
app.get(‘/’, function(req, res){
res.render(‘index’);
});
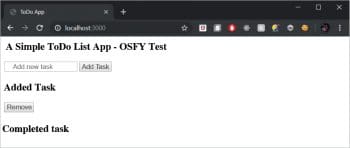
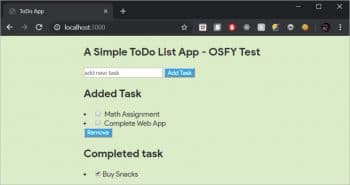
Now, when we run node index.js and navigate to localhost:3000 in our browser, you should be able to see the index.ejs file being displayed.
So we have set up a route for our app. But, for our to-do app to work, we need a post route as well. In our index.ejs file, our form is submitting a post request to the /addtask route:
<form action =”/addtask” method=”POST”>
This is where our form is posting data, so we will set up the route now. The post request looks similar to a get request, but with certain changes:
app.post(‘/addtask’, function (req, res) {

res.render(‘index’)
});
In this case, we cannot just respond with the same HTML template, but have to access the name of the newtask typed in by the user. For this, we will have to use some Express middleware – functions that have access to the req and res bodies in order to perform more advanced tasks. We will use the body-parser middleware. It allows you to use the key-value pairs stored on the req-body object. So, we will be able to access the name of the newtask typed in by the user on the client side and save it into an array on the server side. Install body-parser as follows:
npm install body-parser --save
Once installed, we can require it in our app, and then use it with the following code in our index.js file:
var bodyParser = require(“body-parser”);

app.use(bodyParser.urlencoded({ extended: true }));
And now, we can update our post request to store the value of newtask in an array and then display it in the list. To make the required changes, we will add the following code to our index.js file:
//the task array with initial placeholders for added task
var task = [“Math Assignment”, “Complete Web App”];

//post route for adding new task
app.post(‘/addtask’, function (req, res) {

var newTask = req.body.newtask;

//add the new task from the post route into the array
task.push(newTask);

//after adding to the array go back to the root route
res.redirect(“/”);
});

//render the ejs and display added task, task(index.ejs) = task(array)

app.get(“/”, function(req, res) {
res.render(“index”, { task: task});

});
And our index.ejs file is as follows:
<h2> Added Task </h2>
<% for( var i = 0; i < task.length; i++){ %><li><input type=”checkbox” name=”check” value=”<%= task[i] %>” /> <%= task[i] %> </li><% } %>
After adding a new task, we should be able to delete a completed task from the to-do list as well. We can do so by checking the completed task and using the remove button in our EJS file, as shown below:
<button formaction=”/removetask” type=”submit”> Remove </button>
Now make the necessary changes in our index.js file:
//the completed task array with initial placeholders for removed task
var complete = [“finish jquery”];

app.post(“/removetask”, function(req, res) {
var completeTask = req.body.check;

//check for the “typeof” the different completed task, then add into the complete task
if (typeof completeTask === “string”) {
complete.push(completeTask);

//check if the completed task already exist in the task when checked, then remove using the array splice method
task.splice(task.indexOf(completeTask), 1);

} else if (typeof completeTask === “object”) {
for (var i = 0; i < completeTask.length; i++) { complete.push(completeTask[i]);
task.splice(task.indexOf(completeTask[i]), 1);
}
}
res.redirect(“/”);
});
We can also make some changes to the index.ejs file:
<h2> Completed task </h2>
<% for(var i = 0; i < complete.length; i++){ %>
<li><input type=”checkbox” checked><%= complete[i] %> </li>
<% } %>
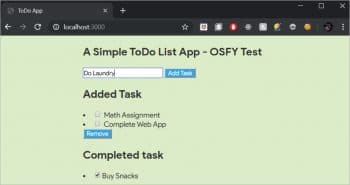
We have completed our app functionalities now. To add beauty to our page, we will use some CSS, for which you’ll need to create a new folder called Public in the project directory, and within that folder create a file named styles.css. But Express won’t allow access to this file, by default; so we need to add the following piece of code to our index.js file, as follows:
app.use(express.static(“public”));
And now, we will add our CSS to the file that we just created.
* {
font-family: “Product Sans”;
}

body {
background: #DCEDC8;
color: #333333;
margin-top: 20px;
}

.container {
display: block;
width: 400px;
margin: 0 auto;
}

ul {
margin: 0;
padding: 0;
}

button{
background-color: #03A9F4;
color: white;
}

button:hover{
box-shadow: 0 12px 16px 0 rgba(0,0,0,0.24), 0 17px 50px 0 rgba(0,0,0,0.19);
}
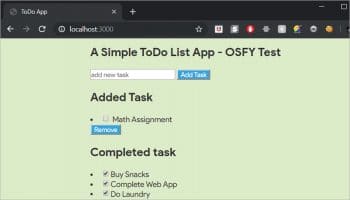
On running the app, it should look somewhat like what’s shown in Figure 8 .
Finally, our files should look something like what’s shown below. The index.js file should look like:
//dependencies required for the app
var express = require(“express”);
var bodyParser = require(“body-parser”);
var app = express();

app.use(bodyParser.urlencoded({ extended: true }));
app.set(“view engine”, “ejs”);
//render css files
app.use(express.static(“public”));

//placeholders for added task
var task = [“Math Assignment”, “Complete Web App”];

//placeholders for removed task
var complete = [“Buy Snacks”];

//post route for adding new task
app.post(“/addtask”, function(req, res) {
var newTask = req.body.newtask;
//add the new task from the post route
task.push(newTask);
res.redirect(“/”);
});

app.post(“/removetask”, function(req, res) {
var completeTask = req.body.check;
//check for the “typeof” the different completed task, then add into the complete task
if (typeof completeTask === “string”) {
complete.push(completeTask);
//check if the completed task already exits in the task when checked, then remove it
task.splice(task.indexOf(completeTask), 1);
} else if (typeof completeTask === “object”) {
for (var i = 0; i < completeTask.length; i++) {
complete.push(completeTask[i]);
task.splice(task.indexOf(completeTask[i]), 1);
}
}
res.redirect(“/”);
});

//render the ejs and display added task, completed task
app.get(“/”, function(req, res) {
res.render(“index”, { task: task, complete: complete });
});

//set app to listen on port 3000
app.listen(3000, function() {
console.log(“OSFY Test App Server is running on port 3000!”);
});
And the views/index.ejs file should look like:
<html>
<head>
<title> ToDo App </title>
<link href=”https://fonts.googleapis.com/css?family=Lato:100” rel=”stylesheet”>
<link href=”/styles.css” rel=”stylesheet”>
</head>

<body>
<div class=”container”>
<h2> A Simple ToDo List App - OSFY Test</h2>
<form action =”/addtask” method=”POST”>
<input type=”text” name=”newtask” placeholder=”add new task”>
<button> Add Task </button>
<h2> Added Task </h2>
<% for( var i = 0; i < task.length; i++){ %>
<li><input type=”checkbox” name=”check” value=”<%= task[i] %>” /> <%= task[i] %> </li>
<% } %>
<button formaction=”/removetask” type=”submit” id=”top”> Remove </button>
</form>

<h2> Completed task </h2>
<% for(var i = 0; i < complete.length; i++){ %>
<li><input type=”checkbox” checked><%= complete[i] %> </li>
<% } %>

</div>
</body>
</html>
To add a task, fill the text box with the contents and click the button ‘Add Task’.
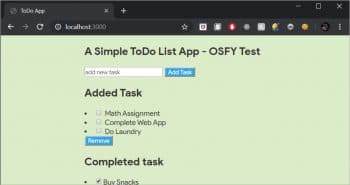
Once the button is pressed, you can see the task added to the list.
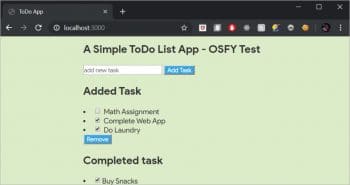
In order to remove a completed task, check the item first and press Remove.
Once you press Remove, the corresponding events/tasks will be pushed to the Completed task section of the app.
Node.js may be a bad choice when it comes to tasks with heavy computation, since it might block the server’s responsiveness. As stated, Node.js is single-threaded and uses only a single CPU core. It was never created to solve the compute scaling issue but to solve the I/O scaling problem, which it does really well.
Do try to build something with Node.js, and share the results with me.


