This article provides an overview of WordPress. It also includes an in-depth tutorial on the installation of Nginx, MySQL and PHP-FPM, as well as how to deploy WordPress using LEMP.
WordPress is open source software that you can use to create beautiful websites, blogs or apps. It is a content management system (CMS) written in PHP, and uses the MySQL and the MariaDB database. WordPress first appeared in 2003 as a joint effort between Matt Mullenweg and Mike Little. The latest version of it is 5.4 (Adderley), which was released in March 2020.
The features of WordPress are:
- Customisable designs
- SEO-friendly
- Responsive mobile sites
- High performance
- High security
- Powerful media management
- Easy and accessible
The LEMP stack
LEMP is a software stack that can be used to serve dynamic websites and Web applications.
It is an acronym that stands for the following:
L -> Linux operating system
E -> Nginx Web Server (Nginx is pronounced ‘engine-x’)
M -> MySQL database server
P -> PHP language
Prerequisites:
- You require the Linux server/system. You can go with AWS EC2. Use T2.micro for testing purposes as it comes under the free tier.
- Any Debian based OS (I used Ubuntu OS).
- Root privileges to that server.
- Whatever domain or subdomains in use should point to the server.
Considerations:
- You have some domain/subdomain name (like osfy-test.linuxgeek.in) and that points to the server.
- You have server access and you are connected to the server using ssh.
Section 1- Installing the Nginx Web server
The Nginx Web server is used to display Web pages to visitors. It is used as a reverse proxy, load balancer, mail proxy and HTTP cache.

In a Debian based OS, you can install any package using a simple apt command. The best practice is that whenever you deploy a server, you do an update and an upgrade with the following commands:
sudo apt-get update
sudo apt-get upgrade
Install the first package, Nginx, using the following:
sudo apt-get install nginx
You can check whether Nginx is installed properly or not by visiting the following URL:
http://public_ip
If you see the ‘Welcome to Nginx’ page, then the installation is done.
| Note: You need to allow HTTP and HTTPS requests from your firewall if it’s enabled. |
Section 2 – Installing the MySQL server
MySQL is an open source relational database management system. Its name is a combination of ‘My’, the name of co-founder Michael Widenius’s daughter, and ‘SQL’, the abbreviation for Structured Query Language.
To install the MySQL database, you need to execute the following command:
sudo apt-get install mysql-server
Configure MySQL. To secure the installation, execute one script. This script comes with the MySQL package.
| Note: This mysql_secure_installation is optional. |
If you enable the ‘Validate password’ plugin and if your password doesn’t match the specified criteria, it will be rejected by MySQL with an error.
sudo mysql_secure_installation

Would you like to setup VALIDATE PASSWORD plugin?

Press y|Y for Yes, any other key for No: Y

There are three levels of password validation policy:

LOW Length >= 8
MEDIUM Length >= 8, numeric, mixed case, and special characters
STRONG Length >= 8, numeric, mixed case, special characters and dictionary file

Please enter 0 = LOW, 1 = MEDIUM and 2 = STRONG: 1

Please set the password for root here.
New password:
Re-enter new password:
Do you wish to continue with the password provided?(Press y|Y for Yes, any other key for No) : y
Remove anonymous users? (Press y|Y for Yes, any other key for No) : Y
Disallow root login remotely? (Press y|Y for Yes, any other key for No) : Y
Remove test database and access to it? (Press y|Y for Yes, any other key for No) : Y
Reload privilege tables now? (Press y|Y for Yes, any other key for No) : Y
All done!
For an Ubuntu system running MySQL 5.7 (or later versions), the root MySQL user is set to authenticate using the auth_socket plugin by default rather than with a password. Switch its authentication method from auth_socket to mysql_native_password. To do this, execute the following commands:
sudo mysql

mysql > SELECT user,authentication_string,plugin,host FROM mysql.user;

mysql > ALTER USER ‘root’@’localhost’ IDENTIFIED WITH mysql_native_password BY ‘password’;

mysql > FLUSH PRIVILEGES;

mysql > SELECT user,authentication_string,plugin,host FROM mysql.user;

mysql > exit

mysql -u’root’ -p’password’
Your MySQL database installation and configuration is done.
Section 3 – Installing PHP-FPM and additional PHP extensions
We have Nginx which serves our Web pages and the MySQL database that stores and manages our data. But we still don’t have anything to process dynamic Web pages. This is where PHP-FPM comes into play.
Ubuntu comes with one specific version of PHP, so it is a best practice to add a PHP repository. After adding the PHP repository, you can install any version of PHP. To add a repository and install the latest version of PHP with an extension, execute the following commands:
sudo apt-get install software-properties-common
sudo add-apt-repository ppa:ondrej/php
sudo apt-get install php7.4-fpm php7.4-mysql php7.4-curl php7.4-gd php7.4-intl php7.4-mbstring php7.4-soap php7.4-xml php7.4-xmlrpc php7.4-zip
Section 4 – Creating a MySQL database and user for WordPress
We now have all the things that run WordPress. In this section, let’s create one database and user. Give privileges to that user on that database only. Execute the following command for this:
mysql -u’root’ -p’password’

mysql> create database MyWordPress;
mysql> create user ‘MyUser’@’localhost’ IDENTIFIED BY ‘password’;
mysql> GRANT ALL PRIVILEGES ON MyWordPress.* TO ‘MyUser’@’localhost’;
mysql> FLUSH PRIVILEGES;
mysql> exit
You can check whether or not the user and database have been created with the following command:
mysql -u’MyUser’ -p’password’

mysql> show databases;
mysql> exit
Section 5 – Downloading WordPress and setting up the document directory for it
To download the WordPress content and set it in the document directory, execute the following commands:
cd /tmp
curl -O https://wordpress.org/latest.tar.gz
tar -xzvf latest.tar.gz
cp /tmp/wordpress/wp-config-sample.php /tmp/wordpress/wp-config.php
mkdir /tmp/wordpress/wp-content/upgrade
mkdir /tmp/wordpress/wp-content/uploads
Create the directory in /var/www/html.
Best practice: Use a directory name that is the same as your domain or sub-domain that you want to deploy. Execute the following commands for this:
sudo mkdir /var/www/html/osfy-test.linuxgeek.in
sudo cp -a /tmp/wordpress/. /var/www/html/osfy-test.linuxgeek.in
Section 6 – Setting up the directory level permissions and ownership
Set ownership and file permissions for the document directory to make the site secure, so that the Nginx or PHP processes are able to access this content.
To do this, execute the following commands:
sudo chown -R your_user:www-data /var/www/html/osfy-test.linuxgeek.in
sudo find /var/www/html/osfy-test.linuxgeek.in -type d -exec chmod 750 {} \;
sudo find /var/www/html/osfy-test.linuxgeek.in -type f -exec chmod 640 {} \;
Description of commands
- chown: Change owner and group owner of a file.
- your_user: This is the local user. You can get your_ user by executing the whoami command.
- www-data: This is the group owner. It can be used by Web processes like Nginx and PHP-FPM.
- chmod: This command changes the permissions of the file.
Understanding the permissions in Octal
- Read – 4
- Write – 2
- Execute – 1
- No Permission – 0
- find command: Search for files in a directory hierarchy
Section 7 – Setting up the WordPress configuration file
Next, to configure WordPress, execute the following commands:
curl -s https://api.wordpress.org/secret-key/1.1/salt/
Copy the output of this command. After that, open the WordPress configuration file as follows:
vi /var/www/html/osfy-test.linuxgeek.in/wp-config.php
In that file, you will get similar lines, which you copy. Remove those lines and paste what you copied (output of the curl command).
Modify the database connection configuration in that file, as follows:
/** The name of the database for WordPress */
define( ‘DB_NAME’, MyWordPress );

/** MySQL database username */
define( ‘DB_USER’, ‘MyUser’ );

/** MySQL database password */
define( ‘DB_PASSWORD’, ‘password’ );

/** MySQL hostname */
define( ‘DB_HOST’, ‘localhost’ );
After that, add the following line at the end of the file:
//Add below line to install plugins directly
define(‘FS_METHOD’, ‘direct’);
After modifying these values, save the file and close it.
Section 8 – Setting up the Nginx configuration file
It is time to configure the Web server. You can do so in two ways:
- HTTP only: It will listen on Port 80 only.
- HTTPS and HTTP: In this case, we configure the SSL certificate and listen on both Ports 80 and 443. The request received by Port 80 gets redirected to HTTPS.
The ‘HTTP only’ method
To configure Nginx for HTTP only, create the configuration files in the /etc/nginx/sites-available/ directory. You can execute a command to create and open that file:
sudo vi /etc/nginx/sites-available/osfy-test.linuxgeek.in
Then copy the following contents to that file.
upstream fastcgi_backend {
server unix:/run/php/php7.4-fpm.sock;
}

server {
listen [::]:80;
listen 80;
server_name osfy-test.linuxgeek.in;

root /var/www/html/osfy-test.linuxgeek.in;
index index.php;
access_log /var/log/nginx/osfy-access.log;
error_log /var/log/nginx/osfy-error.log;

location = /robots.txt {
allow all;
log_not_found off;
access_log off;
}

location / {
try_files $uri $uri/ /index.php?$query_string;
}

location ~ /\. { deny all; }

location ~ \.php$ {
try_files $uri =404;
fastcgi_split_path_info ^(.+\.php)(/.+)$;
fastcgi_pass fastcgi_backend;
fastcgi_intercept_errors on;
fastcgi_index index.php;
include fastcgi.conf;
}
}
Save this file and exit. After this, execute the following commands:
su - // Switch To Root User
ln -s /etc/nginx/sites-available/osfy-test.linuxgeek.in /etc/nginx/sites-enabled/
nginx -t //To check weather configuration is right or not
nginx -s reload //To reload the Nginx service
The HTTP and HTTPS method
To configure Nginx for HTTP and HTTPS, create configuration files in the /etc/nginx/sites-available/ directory. You can execute a command to create and open that file.
sudo vi /etc/nginx/sites-available/osfy-test.linuxgeek.in
Then copy the following contents to that file.
upstream fastcgi_backend {
server unix:/run/php/php7.4-fpm.sock;
}

server {
listen 443 ssl http2;
server_name osfy-test.linuxgeek.in;

root /var/www/html/osfy-test.linuxgeek.in;
index index.php;
access_log /var/log/nginx/osfy-access.log;
error_log /var/log/nginx/osfy-error.log;

location = /robots.txt {
allow all;
log_not_found off;
access_log off;
}

location / {
try_files $uri $uri/ /index.php?$query_string;
}

location ~ /\. { deny all; }

location ~ \.php$ {
try_files $uri =404;
fastcgi_split_path_info ^(.+\.php)(/.+)$;
fastcgi_pass fastcgi_backend;
fastcgi_intercept_errors on;
fastcgi_index index.php;
fastcgi_param HTTPS on;
include fastcgi.conf;
}
}

server {
listen [::]:80;
listen 80;
server_name osfy-test.linuxgeek.in;
return 301 https://osfy-test.linuxgeek.in$request_uri;
}
Save this file and exit. After this, execute the following:
su - // Switch To Root User
ln -s /etc/nginx/sites-available/osfy-test.linuxgeek.in /etc/nginx/sites-enabled/
nginx -t //To check weather configuration is right or not
nginx -s reload //To reload the Nginx service
You can change in nginx configuration as per your requirements.

Section 9 – Installation and Configuration of the Certbot
To enable HTTPS on your website, you need to get a certificate (a type of file) from a certificate authority (CA). Let’s encrypt a CA. -> To enable HTTPS on your website, you need to get a certificate (a type of file) from a certificate authority (CA). Let’s encrypt is a certificate authority(CA).
To install, let’s add a repository.
sudo add-apt-repository ppa:certbot/certbot
sudo apt-get update
sudo apt-get install python-certbot-nginx
To generate the SSL certificate, execute the following commands.
| Note: Before executing these commands, you should point the DNS to the server IP. Only then will it generate the SSL. |
certbot --nginx
//To configure SSL Certificate

Enter email address (used for urgent renewal and security notices) (Enter ‘c’ to cancel): me@linuxgeek.in
You must agree to the following prompts in order to register with the ACME server at https://acme-v02.api.letsencrypt.org/directory.
(A)gree/(C)ancel: A
Next, respond to the following: “We’d like to send you an email about our work on encrypting the Web, EFF news, campaigns and ways to support digital freedom.”
(Y)es/(N)o: N
Which names would you like to activate HTTPS for?
1: osfy-test.linuxgeek.in
Select the appropriate numbers separated by commas and/or spaces, or leave the input blank to select all options shown (press ‘c’ to cancel): 1
Please choose whether or not to redirect HTTP traffic to HTTPS, removing HTTP access:
1: No redirect - Make no further changes to the Web server configuration.
2: Redirect - Redirect all requests to secure HTTPS access.
Select the appropriate number [1-2] then press enter (press ‘c’ to cancel): 2
Congratulations! You have successfully enabled https://osfy-test.linuxgeek.in.
Test your configuration at https://www.ssllabs.com/ssltest/analyze.html?d=osfy-test.linuxgeek.in.
sudo nginx -t
//To check whether configuration is right or not
sudo nginx -s reload
//To reload the Nginx service
Section 10 – Checking if all services are running
To run the WordPress site in the backend, the following three services should run. To check if they are, execute the following commands:
sudo systemctl status nginx.service
sudo systemctl status mysql.service
sudo systemctl status php7.4-fpm.service
Output of these 3 commands should be active (running).
Section 11 – Completing the installation through the Web browser
The backend installation is done. So open your browser and insert the following URL:
https://osfy-test.linuxgeek.in/
or
http://osfy-test.linuxgeek.in/
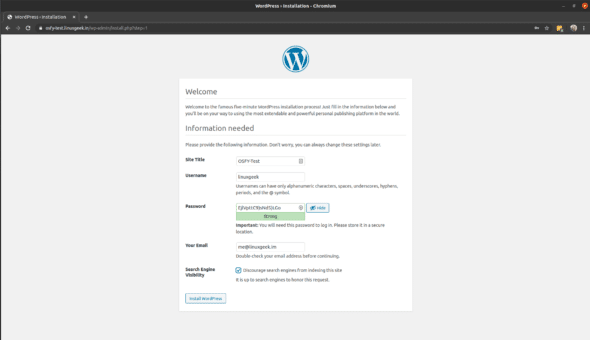
Completing the WordPress installation through the browser
- Step 1: Select the language.
- Step 2: Configure your site name, user name, password, your mail and discourage SEO.
- Step 3: Log in with credentials.

Section 12 – Installation of a security related plugin
After login, you will see the WordPress dashboard. Now let’s install a security related plugin. So click on ‘Plugins’ and then on the ‘Add New’ button. In the ‘Search’ box, type ‘Wordfence Security– Firewall & Malware Scan’. Before installing this plugin, give write permission to the wp-content directory. So go back to the terminal and execute the following commands:
cd /var/www/html/osfy-test.linuxgeek.in
chmod g+w wp-content/ -R
Go to the browser dashboard and install that plugin. After that, you will see the button for ‘Activate’. Click on it.
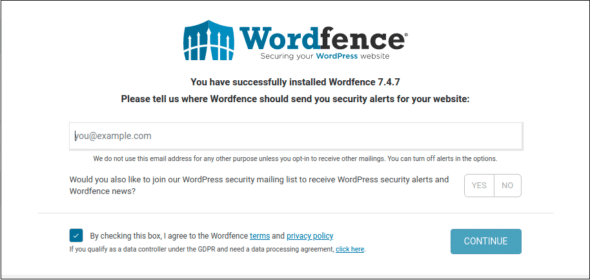
After activation, open the screen shown in Figure 3. Enter your email ID, agree to the terms and click on the ‘Continue’ button.
The plugin installation is done. So now, repeat Section 6.
Go back to the site in the browser. You will see the ‘Wordfence’ option in the sidebar. Click on it and then click on ‘Manage Firewall’.
Change the ‘Web Application Firewall Status’ ‘Learning Mode’ to ‘Enabled and Protecting’. Save this so you can do various settings in this. Go back to the ‘Wordfence’ dashboard. Click on ‘Manage Scan’, select ‘High Sensitivity’ and save it.

Again, go back to the ‘Wordfence’ dashboard. In the sidebar, you will see the ‘Scan’ option, which you can click on and then on ‘Start new scan’. This will scan all files, directory permissions and the contents.
Finally, it’s done
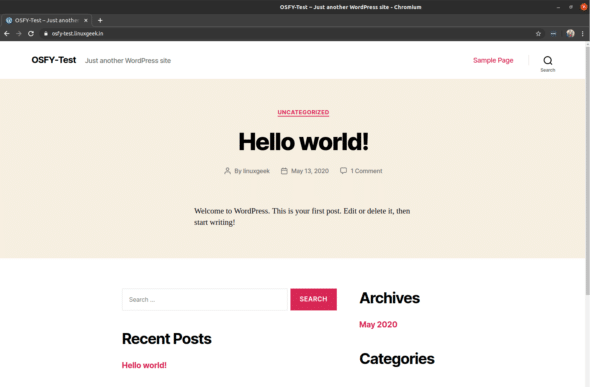
The installation is done and ready for use. You can visit the site by typing in the following URL in the browser:
https://osfy-test.linuxgeek.in/
or
http://osfy-test.linuxgeek.in/


