


Version control systems (VCS) have made collaboration on large projects much simpler than before. This first article in a two-part series discusses Git, a very powerful and popular VCS. It looks at Git’s important characteristics, its data structures and workflow, as well as some of its important basic commands and use cases.
With the advent of modern technologies, big, diverse teams working on large codebases became quite common. In hindsight, keeping track of code changes and different versions is very difficult. To solve this problem, version control systems were created. VCSs manage the changes made to the collection of information like documents, project code, etc. They track all the collaborative changes to a project and keep a record of all the previous versions.
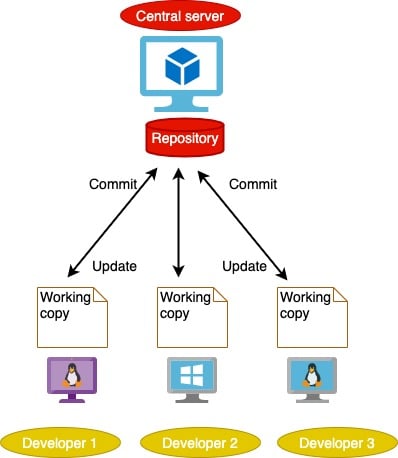
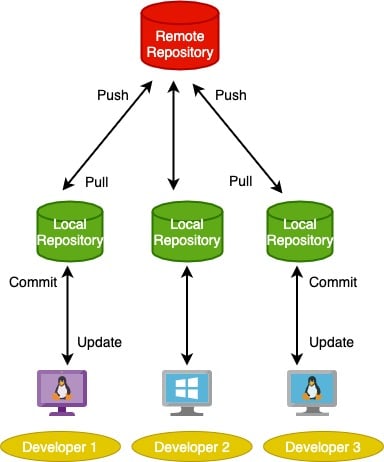
The two major types of VCSs are: centralised and distributed. The centralised system works on a client-server model with one centralised repository and multiple clients. Subversion is an example of a centralised VCS. The problem with this type of system is that you will always need to connect to the centralised repository to work on the project. So there’s a single point of failure that can lead to availability issues, loss of data or the loss of code history. Distributed version control systems solve this problem. Distributed VCSs work on a peer-to-peer approach, whereby each developer has his/her own local repository. In this way, changes can be made to the code without needing any network connections. There is also no fear of data loss if one system fails, as it can be recovered from the other systems. Figures 1 and 2 show the schematic diagrams of a centralised and distributed VCS, respectively.
Git is an example of a distributed version control system. It was created by Linus Torvalds in 2005 for the development of the Linux kernel. Although described as ‘the stupid content tracker’ by its creator, Git soon became one of the most popular VCSs and is used equally by tech giants as well as the open source world.
What makes Git so popular?
At the time Git was being developed there were already a few version control systems in the market. It is Git’s unique design and certain characteristics that resulted in it being so widely adopted compared to other VCSs. Some of those important characteristics are discussed here.
Non-linear and parallel development: One of the problems Git developers understood was that development is never a linear process. There are always some parallel changes that continue to happen. Hence, strong support for non-linear and parallel development was crucial. Git provides this by supporting rapid branching and merging, and by offering tools to visualise and traverse this non-linear development history. A branch in Git is extremely lightweight as it is a reference to just one commit. With the help of parent commits, the full branch structure can be constructed.
Snapshot based vs delta based version control: One major difference between Git and the traditional VCSs is the way they handle data. Most traditional VCSs store the initial file in its entirety and then only store the subsequent changes made to it. These changes are stored in files called deltas. This is the delta-based approach to version control. Because Git was inspired by the Linux file system, it stores data as a series of snapshots. So every time a commit is made or a project saved, Git takes a snapshot of how the files looked at that moment. If the file doesn’t change, then instead of storing the file, a reference to the earlier file is stored. This functionality makes Git almost like a mini file system rather than a simple VCS.
Local operations: Because Git is a distributed version control system, it gives developers a local directory to work with. Each Git directory is a full-fledged repository that contains all the versions and the entire development history. There is no need for any network connection or a central server.
Garbage accumulation and collection: Many operations like untidy commits or abort operations may leave dangling objects in the Git database. Git accumulates all the garbage, and once it is big enough it automatically collects all of it.
Garbage collection can also be explicitly done using the following command:
$git gc --prune.
Periodic object packing in packfiles: Git creates a new binary object for every new version of a file. It stores every object as an individual file. This approach takes up a lot of space and is inefficient. So to solve this problem, Git compresses a lot of objects into a single file called a packfile. An index file is also created for every packfile which stores the offset for each of the objects. This packing of objects is done at regular intervals. Since this operation of packing is computationally expensive, Git schedules it at a time when computational requirements are low.
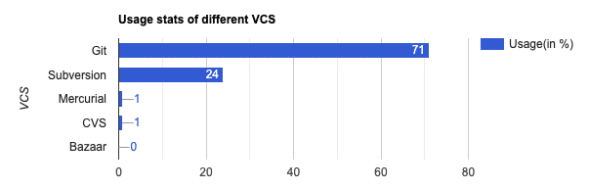
The above characteristics make Git the most commonly used VCS. Figure 3 compares different VCSs with Git (https://www.openhub.net/repositories/compare).
A peek into a .git folder
Every Git repository contains a .git directory. This is where all the file’s contents, commits and configuration reside, as shown in Figure 4.
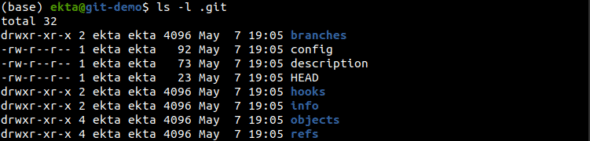
The branches folder has been deprecated; hence, it is no longer in use. The config file contains project specific configuration options. The description is supposed to contain the repository name as set by the user but, by default, has the value unnamed repository. The HEAD points to the current branch checked out, which by default is a master in a newly created or cloned Git repository, and the hooks directory contains client or server side hooks scripts. The info directory contains a global ‘exclude’ file to keep track of patterns to ignore, mentioned in .gitignore file.Objects. And refs form the core part of Git, which is explained more in detail later.
The Git object model
At its core, Git is simply a key-value data store. Every bit of content that is added to Git has a unique key that can be later used to retrieve the contents. There are primarily two data structures that are used in Git — a mutable index that stores information about the working directory and an immutable object database. Each object in the object database is identified by a unique SHA-1 hash. There are three parameters related to an object — size, content and type. ‘Size’ specifies the volume of content and ‘type’ specifies the type of content in the object. There are four types of objects.
- Blob: A binary large object (blob) is the content of the file. A new blob is created for every version of the file. This snapshot approach is different from the delta approach used in many VCSs, as discussed earlier.
- Tree object: This is a reference to blobs and other trees, and is an equivalent of a directory. The tree object contains one line per file or sub-directory, and it has information like the object type, object hash, file name, file permissions, etc.
- Commit object: This links all the tree objects together. It is a reference to the tree as well as all the parent commits, and contains metadata of all the changes introduced in the repository, like the author, committer, commit data, comment, etc.
- Tag object: This assigns a human readable name to a specific object, usually a commit object. It contains the object name, object type, tag name, tagger name and tag message.
As stated, Git gives a unique identifier (key) for the contents of each object, which is calculated by the SHA-1 hash. The identifier is 40 characters long, with the first two characters being the directory name and the remaining 38 characters the file/object name. All these objects are stored in the .git/objects directory.
Git refs
It is necessary to know the hashes of Git objects in order to manipulate objects. It would be easier if simple names are used, instead of raw hashes. Git has references inside .git/refs to save the day. A ref is simply a text file somewhere in .git/refs containing a hash of a commit object. Its structure is shown in Figure 5.
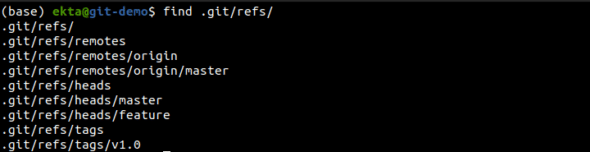
The heads directory defines the branches in the local repository, one file per branch, containing a SHA-1 commit hash of the tip of the branch. To change the tip of the branch, simply edit the /heads/<branch-name> file with the commit hash. Git also has the command git update-ref to achieve the same.
The remotes directory contains the list of all remote repositories created using git remote. Each item in the list has a file with a branch name containing a SHA-1 commit hash of the tip of the branch, just like local branches.
The tag ref created by a user points to a commit object unlike the branch ref that points to a tree object. The tags directory contains tag files, each containing the SHA-1 hash of the commit object it points to.
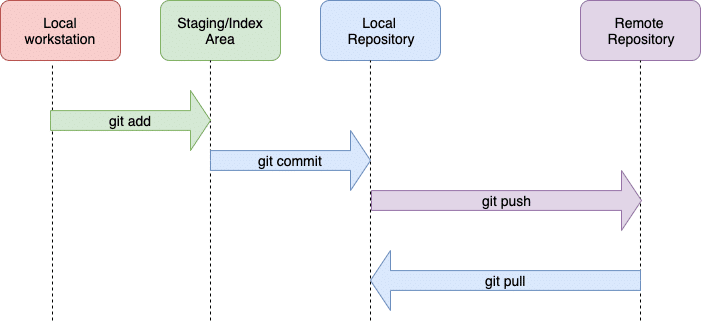
The Git workflow
Now that we have looked at the basic structure and characteristics of Git, let’s have a brief look at its overall workflow. Being a distributed VCS, Git has two repositories — local and remote. The local repository sits on the developer’s personal system and has the complete codebase. Developers can make and commit any changes they want in their local codebase.
Files can be either tracked or untracked in the working directory. A newly created file is initially always in the untracked state, which means the changes made in that file are still not tracked by Git. Tracked files are the ones present in the previous commit. They can be in the following three states.
- Modified means the file has been changed but hasn’t been committed yet.
- Staged means a modified file is marked in its current version to go in the next commit snapshot. The file is moved to the staging area.
- Committed means that the data is safely stored in the database.
To reflect these changes in the global codebase, developers need to push them to a remote repository, which is usually hosted on Web based file hosting services like GitHub, GitLab, etc. A remote repository is where developers can show their commits and collaborate with the whole team. Also, if they want the changes made by other developers to reflect on their local repository, they can pull the code from a remote repository. The complete workflow is shown in Figure 6.
Installation
Check if your machine already has Git by typing the following command at the terminal:
Figure 6: The Git workflow
If the above command does not return the Git version, then take the following steps to install Git.
1. Linux
For Ubuntu/Debian, type:
$sudo apt-get update
$sudo apt-get install git
For Fedora, give the following command:
$sudo dnf install git
2. Windows
- Download the latest installer from https://git-scm.com/download/win.
- Go through with the installation wizard. It’s a good idea to keep the default options.
3. MacOS
Download the installer from https://git-scm.com/download/mac and go through the prompt. Or, install via homebrew, using the following command:
$brew install git
Configuration
The first most important step after installation is to configure the system for things like setting up identity, as it will be embedded in every Git commit done. Once set, these configs stick around almost forever.
$git config --global user.name “<your name>”
$git config --global user.email “<your email ID>”
Setting up a Git repository
There are two ways to set up a Git repository.
- Clone a Git repository from a source on the Internet. In other words, it creates a local copy of a remote repository in the machine, which is shown in Figure 7.
- Take a local directory (empty or non-empty) and initialise it to become a Git repository, as follows:
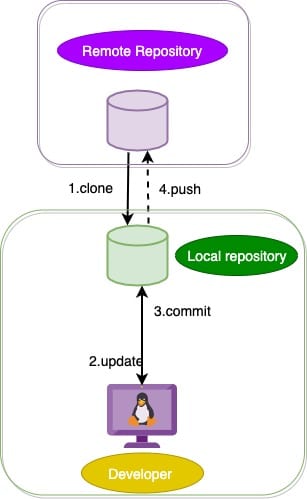
Figure 7: Flow diagram of a Git clone
$mkdir git-demo; cd git-demo
$git init
Recording changes
Let’s create a new file called file_1.txt in the previously initialised git-demo directory and put some content into it to see how changes are tracked and committed in the Git repository. file_1.txt is in the working directory but not yet tracked by Git. In order for Git to track this file, we use git add <file> in the working directory. This moves file_1.txt to the staging area, as shown in Figure 8.

To commit the changes staged, git commit -m “<commit-message”> is used, as shown in Figure 9.

Viewing changes
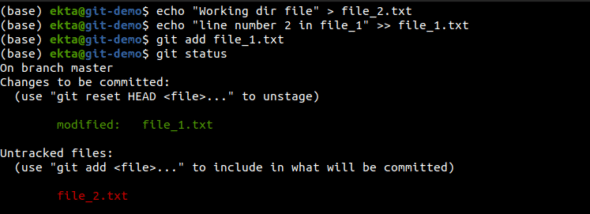
git status is used to see the files that are in the working directory and in the staging area. The files under the title ‘Changes to be committed’ show the staged files and the ones under ‘Untracked files’ show the files in the working directory, as in Figure 10.
To view the changes made to the tracked files in the working directory and not yet staged, we use git diff. It shows the lines added and removed from the previous snapshot, as shown in Figure 11.

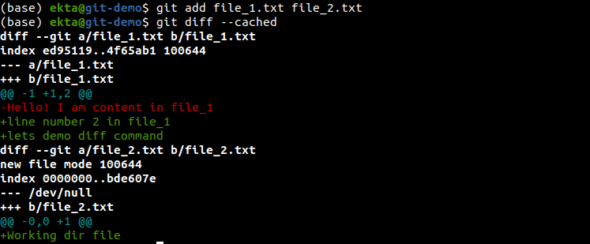
And after doing git add <file>, to view the changes made to the tracked files present in the staging area that are to be committed, we do git diff –cached, which is shown in Figure 12. This is followed by a git commit -m “Add file2. 2nd commit.
Viewing history
After doing several commits or cloning an existing repository, in order to see the commit history, git log is used, which is shown in Figure 13.
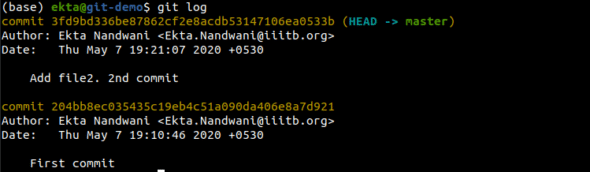
There are several flags that can be used. For example, git log –pretty –oneline to see the history with short one-liner commit messages, git log –stat to see stats associated with each commit, and git log -p to view patches introduced per commit.
Undoing changes
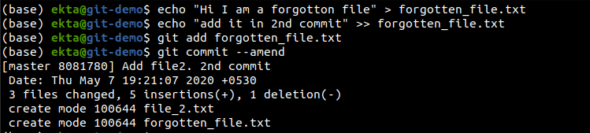
One of the great things about a VCS along with tracking the changes is being able to undo them whenever necessary. If you forget to add a file in a commit, it can be included in the commit using git commit –amend. This will open the default text editor associated with Git with the commit message mentioned in the commit, previously. You can change the commit message or simply close the editor, and the new file will now be included in the commit as shown in Figure 14.
Commits can be reverted with changes removed along with the commit using git revert <commit-hash>. This leaves a commit message in the history about reverting the commit. The flag –no-commit with the command is to not leave a commit message in the history and simply delete the changes. It is advised to be careful as the changes get lost when reverting the commit, which is shown in Figure 15.

Commits can be reverted with changes preserved. There are several ways of achieving that. The following two commands are examples of resetting the commit without losing the changes: git reset <commit-hash> or git reset HEAD^. Files in the staging area can be unstaged using git reset HEAD <file>.
So, in this part we introduced Git, looked closely at its overall workflow and discussed some basic commands to get started. In the next part of this article, we will discuss about the collaborative aspects of git, working with remote repository and how it facilitates open source contributions.


