


Helm is a package manager for Kubernetes, and uses a package format called Chart. A Chart consists of several Kubernetes YAML files. Helm packages a set of Charts that describe Kubernetes resources. Let’s learn how to create our own private Helm repository to host Helm Charts using Apache Web Server.
Kubernetes is a portable, extensible and open source platform for managing containerised workloads and services. It facilitates both declarative configuration and automation, and provides a way to run distributed systems resiliently. K8s allows you to take care of self-healing, scaling, load balancing and failover of your applications.
In the last article on Helm, we discussed its usage, creating your own Helm Chart and installation methods. Now let’s create our own private Helm repository to host Helm Charts using Apache Web Server with a self-signed SSL certificate.
The requirements are:
- Kubernetes
- Helm
- Kubectl
- Apache Web Server

Install and configure Apache Web Server
Install Apache Web Server with a self-signed SSL certificate, with basic authentication on CentOS 7.
Let’s update and install Apache:
# yum update
# yum install httpd mod_ssl -y
Now create a self-signed SSL certificate:
# mkdir /etc/httpd/ssl
# openssl req -x509 -nodes -days 365 -newkey rsa:2048 -keyout /etc/httpd/ssl/helm_private.key -out /etc/httpd/ssl/helm_repo.crt
After answering the questions, you will get /etc/httpd/ssl/helm_private.key and /etc/httpd/ssl/helm_repo.crt.

Now, configure this SSL certificate in httpd configuration.
Open /etc/httpd/conf.d/ssl.conf and edit the following lines:
SSLCertificateFile /etc/httpd/ssl/helm_private.key
SSLCertificateKeyFile /etc/httpd/ssl/helm_repo.crt
Configure basic authentication for Apache:
# echo “test101” | htpasswd -i -c /etc/httpd/.htpasswd admin
Now, add the following lines at the end of /etc/httpd/conf/httpd.conf:
<Directory “/var/www/html”>
AuthType Basic
AuthName “Helm Private Repo”
AuthUserFile /etc/httpd/.htpasswd
Require valid-user
</Directory>
Restart httpd service to enable changes:
# systemctl start httpd
# systemctl enable httpd
# systemctl status httpd
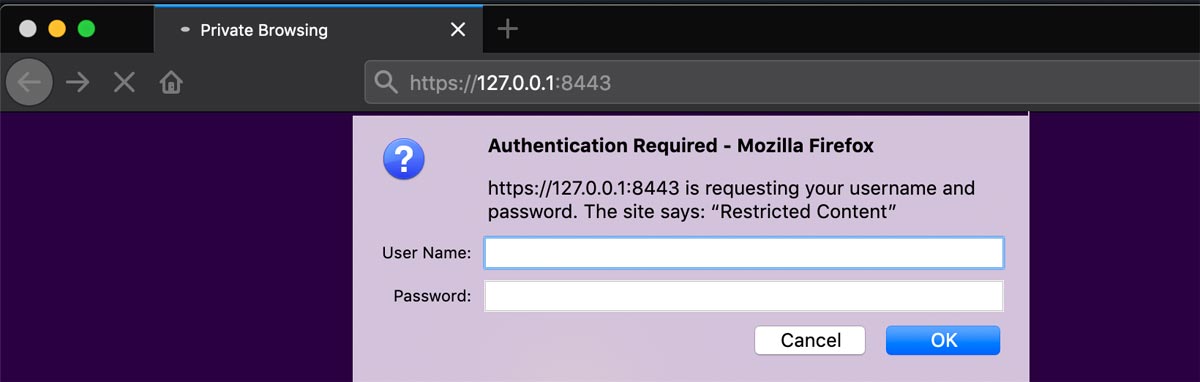
Go to your browser and visit https://localhost to verify Web server status and basic authentication.
Create a Helm repository
We have the Web server up and running to host our Helm repository. Now, create a Helm repository inside the Apache Web root directory:
# mkdir /var/www/html/charts
# cd /var/www/html
# helm repo index charts/ --url https://localhost/charts
Once done, you can visit https://localhost/charts/index.yaml and get the output shown in Figure 2.
To add a basic Helm Chart, download https://github.com/Akasurde/shared_contents/raw/master/helm_chart/mychart-0.1.0.tgz to the chart’s directory.
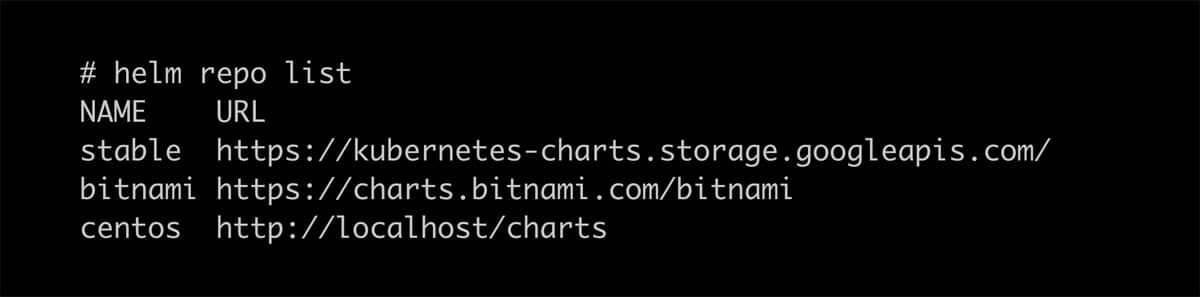
Add this newly created repository to the Kubernetes cluster:
# helm repo add centos https://localhost/charts/ --insecure-skip-tls-verify --username admin --password admin
This will add the new repository centos in the Helm Chart repository. You can cross-verify by typing:
# helm repo list
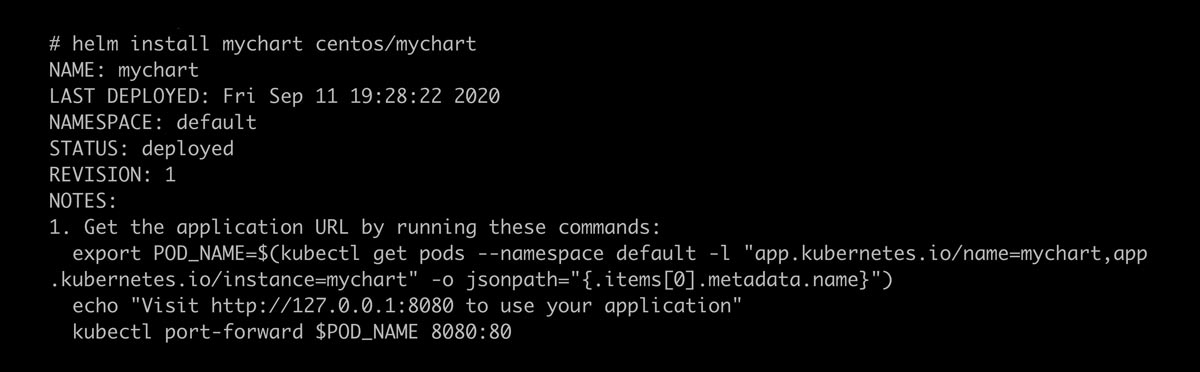
Install Helm Chart
Install the Helm Chart from the newly added repository by using the following code:
# helm install centos/mychart mychart-web
You can check your deployed application using:
# kubectl get pods
So, we have successfully created a private Helm repository and deployed a Helm Chart from this repository.


