


Frequent roll outs of microservices demand self-contained units that ensure safe and successful deployments. Containerisation offers an elegant solution. In this part 7 of the Design Odyssey, we will build and deploy the AddService of UMS as a Docker container.
In the previous part of this series, it was observed that a packaged Spring Boot application carries an embedded Tomcat Web server along with class files and dependent libraries. However, the JRE was left out of the application package. The deployment engineer is still required to find and install a suitable JRE before deploying the application. How about including the JRE also into the package and distributing it so that the deployment can be automated fully?
That’s exactly what containerisation is!
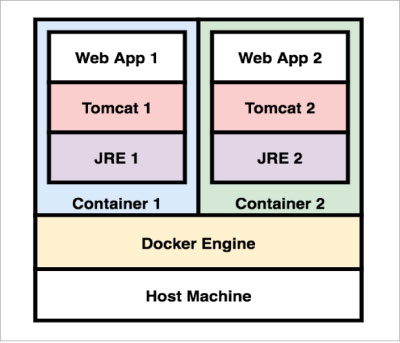
As depicted in Figure 1, a container is a deployment unit that consists of not only the application code but also the required operating environment, which includes artifacts like JRE, Python runtime, Node runtime, etc, as required.
Docker containers
In theory, the concept of containerisation is not very new. For example, the Linux operating system has already been offering the necessary bits and pieces in that direction. However, credit goes to the Docker containers for the popularity of this approach in the last decade.
The architecture of Docker containers can be summarised as shown in Figure 2. It consists of: (1) a Docker Hub, which is a repository of distributable images of Docker containers, and (2) a Docker Engine, which runs the Docker containers.
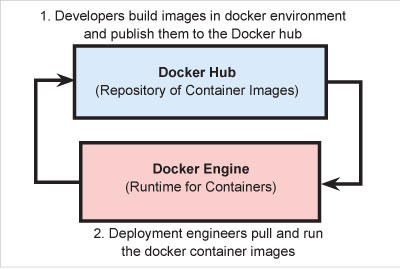
The architecture is well supported by the other ecosystem players like Git, Jenkin, Maven, etc.
As part of the development cycle, the engineers write and push the code to Git repositories. As part of the build cycle, build tools like Jenkins pull the code from Git repositories, build the Docker image and push it to the Docker Hub.
As part of the deployment cycle, the Docker runtime pulls the image from Docker Hub and creates Docker containers that bring the applications to life. Any number of images can be pulled and launched on a single instance of Docker runtime. Where is the magic?
Docker containers are language-agnostic. They are capable of running applications on any platform. For example, they can run an Express Web service on Node or a Flask Web service on Python, or a Spring Boot Web service on JRE. The answer is simple. The container just offers a sandbox with a Linux environment. The container image must package everything else that is required for the application. For example, the image of a Flask service must include Python runtime into the container image and similarly, the image of a Spring Boot service must include JRE.
Let’s explore the last option a bit more.
Spring Boot and Docker container
The Maven build tool packages a Java application. The Docker build tool packages a container. Just like the pom.xml acts as the manifest file for the Maven build tool, Dockerfile acts as the manifest file for the Docker build tool.
A Dockerfile specifies the root container as the prerequisite, and presents directives to be followed in order to create the image. For instance, the following is a manifest for building a Docker image of a Spring Boot Web application.
FROM maven:3.5-jdk-8
COPY src /usr/glarimy/src
COPY pom.xml /usr/glarimy
RUN mvn -f /usr/glarimy/pom.xml clean package
EXPOSE 8080
ENTRYPOINT [“java”,”-jar”,”/usr/glarimy/target/ums-add-service.jar”]
Let’s decipher it line by line.
FROM maven:3.5-jdk-8
The above directive specifies maven:3.5-jdk-8 as the root container. This makes sure that a Docker container is started with a JDK of version 8 and the Maven of version 3.5 is available for the rest of the packaging process. This container is used only for building the image. Let’s call this a build-container.
COPY src /usr/glarimy/src
COPY pom.xml /usr/glarimy
The above directives create /usr/glarimy folder on the build-container and copy the code from a local src folder to a /usr/glarimy/src folder on the build-container. They also copy the local pom.xml file to /usr/glarimy on the build-container.
RUN mvn -f /usr/glarimy/pom.xml clean package
This directive kicks off the Maven build process to package the Java code as per the referred pom.xml. Note that all this happens on the build-container. Once the process is completed, the container image for the Spring Boot application is ready. This image can be run as a container, which we refer to as deployment-container. However, we still need to specify the directives on how to launch this on the deployment-container.
EXPOSE 8080
The above directive specifies that port 8080 be opened up for traffic on the deployment-container when this image runs.
ENTRYPOINT [“java”,”-jar”,”/usr/glarimy/target/ums-add-service.jar”]
This directive specifies the command to launch the application on the deployment-container.
There are several other directives possible, but the approach is more or less similar. Once the Dockerfile is ready, and the Docker is installed on a given machine, the following command on a Docker runtime is sufficient to build the container image.
docker build -t glarimy/ums-add-service .
Observe that the last token of the above command points to the location of Dockerfile, which is the current folder in this case.
The following command lists all available images on the local Docker Engine:
docker images
Figure 3 presents a sample output of the above command. This list includes the images that are pulled from the Docker Hub as well as built locally.

It’s not useful if the created Docker image of the application just lies on the local Docker Engine. In order for it to be deployed on the target infrastructure, the image needs to be distributed. The following command publishes the local image on the Docker Hub so that anyone can pull it for deployment. Of course, an account needs to be created on https://hub.docker.com before pushing the image to the hub.
docker push glarimy/ums-add-service
The images on the Docker Hub can be searched online at https://hub.docker.com/.

Individuals and organisations can create private spaces to ensure the confidentiality of the images. In fact, automated builds can also be set up on Docker Hub in such a way that it listens to the code commits on Git and kicks off building a new version of the image immediately. Organisations may use several other tools like Jenkins and design a CI pipeline.
One way or another, once an image is available in the hub, it can be pulled to any Docker machine with the following command:
docker pull glarimy/ums-add-service
And the following command launches a new Docker container from the image and exposes it to the clients:
docker container run -d --name ums-add-service -p 8080:8080 glarimy/ums-add-service
This command may look a bit complicated, but it’s not really so once it is understood.
- The docker container run is the command that runs the container.
- The -d switch makes it a daemon process so that the prompt is back.
- The -name switch names the container as expected. Without this switch, the Docker Engine generates a name that may not be intuitive.
- The -p switch maps the port 8080 of the container to the port 8080 of the host machine so that the clients outside of the container can also access the service.
- And the last part is the actual name of the image that needs to be run, which is glarimy/ums-add-service in this case.
- The list of containers running currently can be found using the following command:
docker container ps
Now the service can be accessed from the host machine using the appropriate CURL command or using any REST client, just like it was done in the previous parts of this series.
Next steps
Though the Docker containers solve the problem of building ready-to-run self-contained images that can be deployed onto any Docker machine, this is certainly not sufficient. What if microservices running in two different containers want to access each other? What if a microservice wants to access a database server? What if N number of instances of a given service must always be run to handle the load?
The answer lies in networking and orchestrating the containers, which will be covered in the next part of this series.


