


Independently deployed microservices need a mechanism to collaborate among themselves asynchronously. Apache Kafka has emerged as the first choice for establishing such an environment. In this part 8 of the series of articles titled ‘The Design Odyssey’, the AddService of the user management system is connected to Kafka on the Docker network.
Apache Kafka plays different roles in different use cases. It can act as a message store, a messaging queue, or a stream processing engine. In the enterprise microservices environment, it has been very popular as a messaging queue where the services communicate with each other by producing and consuming messages asynchronously. Apache Kafka makes sure that the messages are delivered from the producers to the consumers with various guarantees. (Refer to the article published in the September 2021 issue of Open Source For You for an introduction to Apache Kafka by the author.)
The path covered so far
Before introducing Kafka into the architecture of the user management system (UMS), let’s look at the big picture once.
We initially designed the UMS as a monolith system by applying appropriate object-oriented design patterns like Factory, Adapter, Proxy, Observer, etc. Later, we refactored the design by decomposing the monolith into a set of microservices, namely, AddService, SearchService, FindService, and JournalService by applying the principles of Domain-Driven Design. We chose to develop REST API for the AddService on the Spring Boot platform and integrated it with a JPA database. And in the previous part, the AddService was containerised and deployed on the Docker platform.
We are yet to integrate the AddService with the JournalService.
Recollect that the job of the JournalService is to log all the activities on UMS into a central location without being a show-stopper. In other words, the JournalService must listen to the events published by the AddService, FindService as well as SearchService. Obviously, it requires an implementation of the observer pattern. Apache Kafka is one such implementation when it is used as a messaging infrastructure.
In our architecture, JournalService acts as a consumer whereas AddService acts as a producer, along with the FindService and SearchService.
AddService as Kafka producer
In order to produce messages to the Kafka broker, the AddService requires the Kafka library. Spring Boot comes with a ready-to-use library for Kafka. Add the following snippet as one of the dependencies in the pom.xml of the AddService.
<dependency>
  <groupId>org.springframework.kafka</groupId>
  <artifactId>spring-kafka</artifactId>
</dependency>
For ease of use, add the following declaration in the build section of the pom.xml. It names the resulting package as ums-add-service.jar at the end of the build process.
<finalName>ums-add-service</finalName>
Now, let’s move on to the actual code. Spring Boot makes Kafka integration much simpler by offering a template named KafkaTemplate. Let us inject the template into the UserController of the AddService.
@Autowired
private KafkaTemplate<String, UserRecord> template;
This statement says that we intend to produce a Kafka message with a String as the key and UserRecord as the value.
Then, the following code does the job of actually publishing the message to Kafka broker:
template.send(“com.glarimy.ums.user.add”, record);
The first argument is the topic name and the second argument is the message value. We choose com.glarimy.ums.uesr.add as the topic name. This topic acts as the virtual channel between the producer (AddService) and the consumer (JournalService) to notify the event of user additions.
Here is the complete code:
package com.glarimy.ums.app;
import java.util.Set;
import javax.validation.ConstraintViolation;
import javax.validation.Validator;
import org.slf4j.Logger;
import org.slf4j.LoggerFactory;
import org.springframework.beans.factory.annotation.Autowired;
import org.springframework.http.HttpStatus;
import org.springframework.http.ResponseEntity;
import org.springframework.kafka.core.KafkaTemplate;
import org.springframework.web.bind.annotation.PostMapping;
import org.springframework.web.bind.annotation.RequestBody;
import org.springframework.web.bind.annotation.RestController;
import com.glarimy.ums.domain.Name;
import com.glarimy.ums.domain.PhoneNumber;
import com.glarimy.ums.domain.User;
import com.glarimy.ums.domain.UserRepository;
@RestController
public class UserController {
  Logger logger = LoggerFactory.getLogger(UserController.class);
  @Autowired
  private UserRepository repo;
  @Autowired
  private Validator validator;
  @Autowired
  private KafkaTemplate<String, UserRecord> template;
  @PostMapping(“/user”)
  public ResponseEntity<UserRecord> add(@RequestBody NewUser newUser) {
    logger.debug(“Received new user”);
    Name name = new Name(newUser.name);
    PhoneNumber phoneNumber = new PhoneNumber(newUser.phone);
    logger.debug(“Building User domain object”);
    User user = new User(name, phoneNumber);
    logger.debug(“Validating User domain object”);
    Set<ConstraintViolation<User>> violations = validator.validate(user);
    ResponseEntity<UserRecord> response;
    if (!violations.isEmpty()) {
      violations.forEach(v -> logger.debug(v.getMessage()));
      response = new ResponseEntity<>(HttpStatus.BAD_REQUEST);
      logger.debug(“Response: “ + response);
    } else {
      logger.debug(“Saving the User domain object”);
      repo.save(user);
      logger.debug(“Building the response”);
      UserRecord record = new UserRecord(user.getName().getValue(), user.getPhone().getValue(), user.getSince());
      template.send(“com.glarimy.ums.user.add”, record);
      response = new ResponseEntity<>(record, HttpStatus.OK);
      logger.debug(“Response: “ + response);
    }
    logger.debug(“returning the response”);
    return response;
  }
}
Note that the responsibility of sending event notifications is coded within the controller and not in the domain object, since it is not the primary responsibility of the AddService.
Serialisation
The UserRecord is a DTO that we developed in the past. In the above code, we sent the same object as the value in the Kafka message. However, Kafka does not really transport Java objects. It only accepts byte array to remain platform-neutral. We must have a serialiser to convert the UserRecord into a byte array so that Kafka transports it.
Here is the serialiser, which is self-explanatory.
package com.glarimy.ums.app;
import org.apache.kafka.common.serialization.Serializer;
import com.fasterxml.jackson.core.JsonProcessingException;
import com.fasterxml.jackson.databind.ObjectMapper;
public class UserSerializer implements Serializer<UserRecord> {
  @Override
  public byte[] serialize(String topic, UserRecord user) {
    ObjectMapper mapper = new ObjectMapper();
    try {
      return mapper.writeValueAsBytes(user);
    } catch (JsonProcessingException e) {
      e.printStackTrace();
      return null;
    }
  }
}
Configuration
Though we have finished the coding part, it is not sufficient. The template still requires the location of the Kafka cluster and the serialisers to be used for converting the keys and values to byte arrays. The following additions to the application.properties file do that job for us:
spring.kafka.bootstrap-servers=kafka:9092
spring.kafka.producer.key-serializer=org.apache.kafka.common.serialization.StringSerializer
spring.kafka.producer.value-serializer=com.glarimy.ums.app.UserSerializer
Note that the above configuration claims that the Kafka broker is listening on port 9092 and is running on the machine with the DNS name kafka. So, it is our responsibility to set up Kafka to run accordingly.
Building the Docker image
Once the above code and configuration are ready, we can build the service and create the Docker image. The Dockerfile that was developed in the previous part is still valid.
FROM maven:3.5-jdk-8 AS build
COPY src /usr/glarimy/src
COPY pom.xml /usr/glarimy
RUN mvn -f /usr/glarimy/pom.xml clean package -DskipTests
EXPOSE 8080
ENTRYPOINT [“java”,”-jar”,”/usr/glarimy/target/ums-add-service.jar”]
And the following command builds the Docker image, as in the past:
sudo docker build -t glarimy/ums-add-service .
Deploying Kafka cluster and services
Kafka runs as a cluster of one to any number of brokers along with Zookeeper. In other words, to set up the Kafka cluster, we need to run the Zookeeper server and also at least one Kafka broker. Since we want everything to run on the Docker environment, we need the Docker images of Zookeeper and Kafka. The most popular choices are bitnami/zookeeper:3.8 and bitnami/kafka:3.1.
Since both the images are required to always run together, we can use the docker-compose tool to simplify the deployment. Using docker-compose, we can deploy multiple services in one go on a dedicated network so that they can access each other using the published names and port numbers. We can also manage the dependencies among the services as well.
The docker-compose tool expects a manifest file named docker-compose.yml in which the required list of services, their dependencies, etc, are declared.
Let’s first declare the zookeeper service:
zookeeper:
  image: docker.io/bitnami/zookeeper:3.8
  ports:
    - “2181:2181”
  volumes:
    - “zookeeper_data:/glarimy”
  environment:
    - ALLOW_ANONYMOUS_LOGIN=yes
  networks:
    - glarimy
This declaration tells the docker-compose tool to run a container named zookeeper from the specified image on the network named glarimy. Also, it tells that the port 2181 of zookeeper is to be mapped to the same port number on the network. It mounts a volume and sets up some configuration for the container via environment.
For the above declaration to work, we need to set up the network named glarimy. The following does that job.
networks:
  glarimy:
    driver: bridge
With this, any container on the same glarimy network can reach the Zookeeper service using the DNS name zookeeper. Consequently, if we run the Kafka on the same network, it can connect to the Zookeeper without any issue.
Just like we declared the Zookeeper, we can also declare the Kafka:
kafka:
  image: docker.io/bitnami/kafka:3.1
  ports:
    - “9092:9092”
  volumes:
    - “kafka_data:/glarimy”
  environment:
    - KAFKA_CFG_ZOOKEEPER_CONNECT=zookeeper:2181
    - ALLOW_PLAINTEXT_LISTENER=yes
  networks:
    - glarimy
  depends_on:
    - zookeeper
The only additional field in the above declaration that is of interest is the depends-on. It tells the docker-compose tool to start the kafka container only after the zookeeper container is started.
Why should we limit ourselves only to the Zookeeper and Kafka? We can also deploy the AddService along with them in the same docker-compose since they have intimacy.
ums:
  image: glarimy/ums-add-service
  networks:
    - glarimy
  depends_on:
    - zookeeper
The above is self-explanatory. Following is the full manifest:
version: “2”
networks:
  glarimy:
    driver: bridge
services:
  zookeeper:
    image: docker.io/bitnami/zookeeper:3.8
    ports:
      - “2181:2181”
    volumes:
      - “zookeeper_data:/glarimy”
    environment:
      - ALLOW_ANONYMOUS_LOGIN=yes
    networks:
      - glarimy
  kafka:
    image: docker.io/bitnami/kafka:3.1
    ports:
      - “9092:9092”
    volumes:
      - “kafka_data:/glarimy”
    environment:
      - KAFKA_CFG_ZOOKEEPER_CONNECT=zookeeper:2181
      - ALLOW_PLAINTEXT_LISTENER=yes
    networks:
      - glarimy
    depends_on:
      - zookeeper
volumes:
  zookeeper_data:
    driver: local
  kafka_data:
    driver: local
Once the Docker images are available, either locally or on the Docker Hub, the following command from the location of docker-compose.yml simply deploys them on the Docker environment:
sudo docker-compose up -d
Use the following command to see if all the three containers are up and running:
sudo docker ps --format “table {{.ID}}\t{{.Names}}\t{{.Ports}}\t{{.Status}}”
It gives an output similar to Figure 1.

Now, go to the container where the AddService is running:
sudo docker exec -it f4aa72bcec4a bash
Once the bash terminal of the container is available, run a CURL command to post a new user to the AddService.
curl -H “Content-Type: application/json” -d ‘{“name”:”Krishna Mohan”, “phone”:9731423166}’ http://localhost:8080/user
It gives an output like Figure 2.

You can exit the bash terminal and verify the logs of the container using the following command:
sudo docker logs f4aa72bcec4a
You can see that the AddService is processing the POST requests by saving the user data and also by sending the notifications to Kafka.
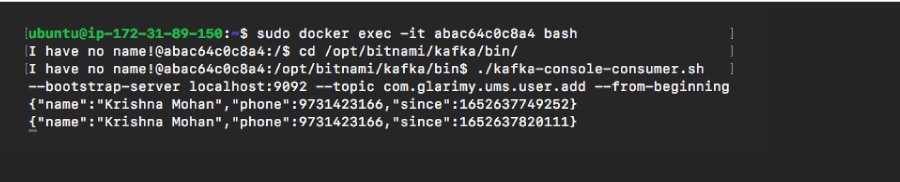
As the last activity, let us verify that Kafka is indeed receiving the notifications from the AddService. First, identify the container ID of the Kafka and log into the container:
sudo docker exec -it abac64c0c8a4 bash
Run the following command to start a consumer that listens to the topic on which the AddService was writing messages.
/opt/bitnami/kafka/bin//kafka-console-consumer.sh --bootstrap-server localhost:9092 --topic com.glarimy.ums.user.add --from-beginning
An output similar to Figure 3 can be observed.
Once the job is done, the following command can bring down all the services at once:
sudo docker-compose down
What did we do?
We just accomplished two objectives. We were able to create a network and orchestrate multiple Docker containers. We were also able to connect AddService and Kafka cluster on Docker. The beauty of this architecture is that the services are not actually aware of each other. It is only through the configuration that we are connecting them. And the producers and consumers of Kafka do not block each other.
In the next several parts, we will develop and deploy the FindService and SearchService on the Python and Node environments, orchestrate containers on different machines using Kubernetes, scale them, and also develop the JournalService as a Kafka consumer.


