


Learn how to get started with Kubernetes with the help of this simple tutorial.
An orchestrator is a piece of software that distributes container workloads over several servers or nodes. Its primary function is to orchestrate container workloads. To prevent any kind of downtime from occurring, it is necessary to ensure that the containers have access to all the appropriate resources, that the correct number of containers is always on hand, and that additional steps, such as rolling deployments, are done. Kubernetes is the container orchestrator that has had the highest amount of adoption recently.
An orchestrator is a piece of software that distributes container workloads over several servers or nodes. Its primary function is to orchestrate container workloads. To prevent any kind of downtime from occurring, it is necessary to ensure that the containers have access to all the appropriate resources, that the correct number of containers is always on hand, and that additional steps, such as rolling deployments, are done. Kubernetes is the container orchestrator that has had the highest amount of adoption recently.
It is common practice to credit Docker as the breakthrough that led to the development of containerization. This is because Docker made it possible to package software into a portable virtual container. Containerization provides the portability of code to cloud services such as Google Cloud Platform, Amazon Web Services, and Digital Ocean.
However, complications arise as the number of containers increases. Deploying and managing hundreds of containers across several servers or virtual machine instances can be a very time-consuming process. That’s what led to the development of container orchestration tools like Kubernetes.
Kubernetes, which is often referred to as K8s, was first released by Google in 2015, and is now being maintained by an open source community (of which Google is also a member). Kubernetes is a system that, by using a combination of application programming interfaces and command line tools, enables the coordination of container processes that span several hosts. The process of deploying, scaling, and maintaining container clusters across several hosts is simplified as a result of using this tool. Because it handles problems like configuration management, Kubernetes, which is often referred to as K8s, was first released by Google in 2015, and is now being maintained by an open source community (of which Google is also a member). Kubernetes is a system that, by using a combination of application programming interfaces and command line tools, enables the coordination of container processes that span several hosts. The process of deploying, scaling, and maintaining container clusters across several hosts is simplified as a result of using this tool. Because it handles problems like configuration management, service discovery and job scheduling, which occur with the deployment of microservices, it is often utilised as a host for such endeavours.
In addition to the original Kubernetes codebase, there are a number of cloud providers and distributions that provide their very own versions of the Kubernetes container orchestration system.
Here are a few Kubernetes attributes and qualities:
- Performs a number of hard tasks automatically, in addition to regulating server hosting and startup.
- Services like data storage, networking security, and management are controlled by containers.
- Maintains a constant vigil on the states of the nodes and containers under its care.
- Rollbacks are handled automatically for any modifications that are unsuccessful.
- Puts together an application mount for storage and adds a storage system to utilise with it.
Why is Kubernetes considered imperative?
Kubernetes has seen increased demand as a result of the trend towards ‘microservices’, which are defined as applications that are smaller and more agile. Containers are the appropriate host for these decoupled microservices, since they are able to manage dependencies, operate independently, are not dependent on any particular platform, and may be destroyed when they are no longer required.
It is not unheard of for an application to be composed of hundreds, or even thousands, of microservices. This kind of program often has a great number of moving pieces. If we manage all of these varied components using custom-written programs or scripts, then increasing the size of these microservices while maintaining availability will be a challenge. Because of this, there is a need for a better technique of component management.
A glance behind the scenes at how everything works
When a K8s cluster is in operation, one of the nodes is designated as the master, and it is this node that is responsible for making all the crucial decisions affecting the cluster. The other nodes, which are referred to as slaves or worker nodes, are responsible for carrying out the workloads for the applications in accordance with the master’s directives.
A straightforward Kubernetes design
Figure 1 presents an illustration of a fundamental K8s setup, which consists of a single master node and two worker nodes.
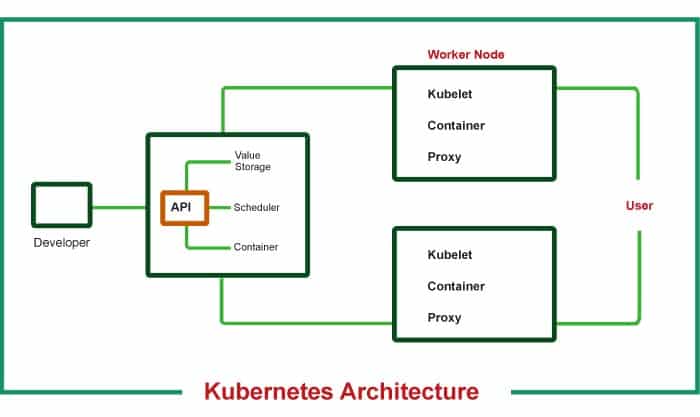
Master node(s)
The master node acts as the cluster’s primary coordinator. It is responsible for making decisions on the general status of the cluster as well as the duties that are delegated to each of the worker nodes. In order to make a master node operational and ready for usage, the following four operations need to be running on it.
- API server
- User queries received through kubectl are routed via this node, making it the cluster’s primary gateway.
- It controls who can access resources and make requests by acting as a gatekeeper for authenticating and verifying requests.
2. Scheduler
- Determines on which node the next pod will be spun up. However, this action does NOT spin up the pod itself; Kubelet is responsible for this step.
3. Controller manager
- Identifies when the cluster’s status has changed (for example, when pods have died) and attempts to return it to its initial, created state.
- In case the launch of a pod is unsuccessful for whatever reason, the Controller Manager will request that the Scheduler choose a node for the launch of a new pod. After that, Kubelet will begin the spinning of the new pod.
4. etcd
- This is the key-value storage used by the cluster.
- It is the location where any adjustments that have been made to the cluster are recorded.
- This location is used only for the storage of information pertaining to the cluster itself; no application data is ever stored there. It is important to remember that the master node is not a worker but rather the command and control hub for the cluster. The status information is saved in etcd so that the previously described procedures may acquire knowledge of the cluster.
Slave/worker node(s)
In order for Kubernetes to be able to connect with the nodes and launch pods on its own, the Central Concentration of Servants and Employees (s) component of Kubernetes mandates that three different node processes be installed on each and every worker node. The following three steps are required.
1. Kubelet a.k.a. kubelet
- Facilitates two-way communication between the node and the container.
- It is responsible for reading configuration files and starting the pod by using the container runtime that is provided by the node 2 server (more on this later!). It’s the OS for containers.
2. Container runtime
- A computer setup that already has a container runtime installed (e.g., Docker, containerd)
- Kube’s proxy, often known as kube-proxy, comes in third.
3. Kube Proxy a.k.a. Kube-proxy
- It is located between computers and intelligently forwards requests, either inside a node or to other nodes.
- Since we now have an understanding of how K8s operates, we are able to investigate the Kubernetes building pieces that are most often seen throughout the process of application deployment.
Components of Kubernetes
Now that we understand how K8s functions, we can examine the Kubernetes building blocks most often seen during application deployment.
1. Pod
- The smallest building element that makes up a Pod K8, and the location where a real instance of your software is deployed.
- Over the top of a receptacle is an abstraction.
- Every pod has its own one-of-a-kind IP address (public or private).
- Until the pod service is rebuilt, the IP address will be changed.
2. Service
- Despite the ephemeral nature of pods, the service provides a means to ‘give’ them a permanent IP address.
- Even if the pod is destroyed and then re-created while it is still connected to the service, it will keep the same IP address.
- It redirects traffic to pods while maintaining a single IP address, functioning in a manner that is similar to that of a load balancer.
- Similar to load balancers, the service may either be internal or external. An external service is one that is exposed to the general public (has public IP), while an internal service is one that is intended for use with internal applications (has private IP).
3. Ingress
- Because of services, we may now have a web service that is listening on a certain port (for example, 8080) at an IP address (for example, 10.104.35). Unfortunately, it is not possible to browse a public-facing application by using the address http://10.104.35:8080. This is because it is not a practical address.
- This indicates that we are in need of a domain-based entry point (such as https://my-domain-name.com) that directs traffic to the service (such as http://10.104.35:8080).
- In essence, Ingress makes available to internal cluster services both HTTP and HTTPs routes that originate from the outside.
- Due to SSL termination, traffic destined for the service and its pods will not be encrypted (also known as SSL offloading).
- Just so there is no confusion, constructing an Ingress resource serves no use on its own. An Ingress Controller is required in addition to an Ingress in order for the latter to be finished.
What is an Ingress Controller?
- The Ingress Controller is responsible for load balancing and also controls the traffic that enters and exits the cluster.
- This controller is responsible for services that need to connect with other services that are located outside of the cluster.
ConfigMap
- To be more specific, it is a configuration file that may be edited by the user.
Secret
- It is similar to a configuration file, but designed to contain private data.
It is Base64-encoded.
Volumes
- It is capable of retaining data forever and offering useful benefits.
- Because pods are ephemeral, it is necessary to store data in volumes so that pods of varied ages may continue to refer to the same state of the application.
- It provides capabilities that are analogous to that of an ‘external hard drive’, but for your pods.
- The volumes of your pods may either be stored locally on the same node or remotely on another node (e.g., cloud storage, NFS).
Deployment
- In most cases, we focus our attention on deployments rather than on pods.
- In case of problems with the main deployment, most also have a copy accessible as a backup.
- Stateful programs, on the other hand, can’t have their components replicated, which means that things like databases can’t be cloned either. We will need the Kubernetes module known as StatefulSet in order to do this. Due to the complexity of this undertaking, databases should almost always be stored on servers that are geographically distinct from the Kubernetes cluster.
Utilisation of the Kubernetes platform
In order to continue with our introduction to Kubernetes, let’s take up the New York Times as a case study.
- Following the publisher’s decision to close its data centres, smaller deployments were carried out, and virtual machines (VMs) were placed in charge of managing the applications.
- They got to work in order to produce brand new instruments. However, at some time they realised that they were missing the target since they treated Amazon like any other data centre.
- The programmers quickly responded to the issue and came up with an elegant solution. The panel discussed the possibility of using Google Cloud Platform to deploy Kubernetes.
- The use of Kubernetes brought about a number of benefits, including the following:
- A quickening of the pace in performance and delivery.
- The time required for deployment was reduced from minutes down to seconds.
- The updates were sent on their own and only when absolutely required.
- Increased portability as well as an improved and more standardised approach of deployment for all engineers.
In conclusion, the New York Times has shifted from a system that was based on tickets to an automated system that is based on Kubernetes in order to request resources and schedule installs.
Kubernetes demo
In order to proceed with the tutorial on getting started with Kubernetes, let’s get directly into a demonstration.
- Open the command prompt in Ubuntu.
- The installation of all requirements may be completed with the following command:
$ sudo apt-get update

$ sudo apt-get install -y apt-transport-HTTPS
3. Make use of the following command in order to install the Docker dependency:
$ sudo apt install docker.io
4. To activate Docker and get it up and running, use the following commands:
$ sudo systemctl start

$ sudo apt-get install curl
Obtain the Kubernetes installation key, and then add it to your machine using the following instructions:
$ sudo curl -s https://packages.cloud.google.com/apt/doc/apt-key.gpg | sudo apt-key add
It is possible to change permissions by using the command that is listed here:
$ sudo chmod 777 /etc/apt/sources.list.d/
After that, create a repository by inserting the following information into the /etc/apt/sources.list.d/kubernetes.list file:
deb http://apt.kubernetes.io/ Kubernetes-xenial main
Put your modifications in a safe place, and then close the file.
To configure Kubernetes, use the following commands:
$ apt-get update
$ apt-get install -y kubelet kubeadm kubectl Kubernetes-cni
5. Before we can initialise the master node, we need to first switch the nodes by executing the following command:
$ sudo swapoff -a
6. The following command should be used to initiate the master node:
$ sudo kubeadm init
Following are three sets of instructions. Simply cut and paste, and press ‘Enter’.
$ mkdir -p $HOME/.kube
$ sudo cp -i /etc/Kubernetes/admin.conf $HOME/.kube/config
$ sudo chown $(id -u):$(id -g) $HOME/.kube/config
7. To release pods, just follow these command steps:
$ $ sudo kubectl apply -f https://raw.githubusercontent.com/coreos/flannel/ master/Documentation/kube-flannel.yml
$ sudo kubectl apply -f https://raw.githubusercontent.com/coreos/flannel/ master/Documentation/k8s-manifests/kube-flannel-rbac.yml
8. You can view a complete list of dropped pods by typing the following command into your console:
$ sudo kubectl get pods –all-namespaces
9. To install an NGINX service (and to make the service available via port 80), the following commands need to be executed:
$ sudo kubectl run --image=nginx Nginx-app --port=80 --env=”DOMAIN=cluster”

$ sudo kubectl expose deployment nginx-app --port=80 --name=nginx-HTTP
10. In order to see the services that are available, use the following command:
$ sudo docker ps -a


