


Building a mobile application is a necessity for every business and choosing the right tech stack for building the app is always a challenge. With so many options available in the market, why choose Flutter? Let’s find out.
Launched in May 2017, Flutter is a free, open source, and cross-platform UI SDK created by Google to develop an application for Android and iOS, as well as web applications.
One of the first reasons to consider using Flutter is that you will end up with one code base to maintain, one place to debug, and one place to update your application. This is a huge advantage compared to creating your apps natively, say, building your iOS apps in Swift and your Android apps in Java or Kotlin. To update any feature in your application, you need to make changes at numerous places within it, which is both difficult and error-prone. If you use Flutter, you only need to know one language — Dart, which is a powerful language and easy to work with. Once you have learnt and understood how to use it, you can create your iOS, Android, and web apps. You have to learn only one language instead of many.
If you have done any kind of programming before, then you will realise that Dart is actually very similar to a lot of modern object-oriented programming languages. It has been used at Google to build powerful tools such as Google AdWords and Google Fiber. I bet its usage is only going to get bigger in the future.
Anatomy of a Flutter app
Everything in the Flutter app is a widget. Just like Lego blocks, you put a widget upon another widget to build the application. To develop an app using Flutter, the first thing to do is to create a scaffold, i.e., a blank screen for our app. Inside this scaffold, we need to add an app bar at the top and a container below that. These are pre-built widgets. The app bar looks like the toolbar/app bar and acts like one. The container is nothing but a box that will contain the contents of the application. This will look somewhat like the Android UI design — scaffold as your parent layout, app bar as a toolbar, and container just like the fragment/nested layout.
Let’s build it further such that the container has a column. Like any other widget, the column can be nested too. It stacks the items/widgets vertically. Let’s say this column has two items: a row at the top and some text at the bottom. What is a row, you may ask? This is nothing but a widget — like I said before, everything is a widget. Row arranges the widgets horizontally. We can go deeper into the widget tree by adding some text and an icon in the row. What you need to remember is that when you want widgets to be positioned vertically (one on top of the other), use the column to lay them out, and when you want widgets to be positioned horizontally, use a row. To add text, use a text widget, and if you want to add an icon, use an icon widget. For images, use the image widget. Pretty simple, isn’t it? Your widget tree will look something like what’s shown in Figure 1 by the time you build the app.
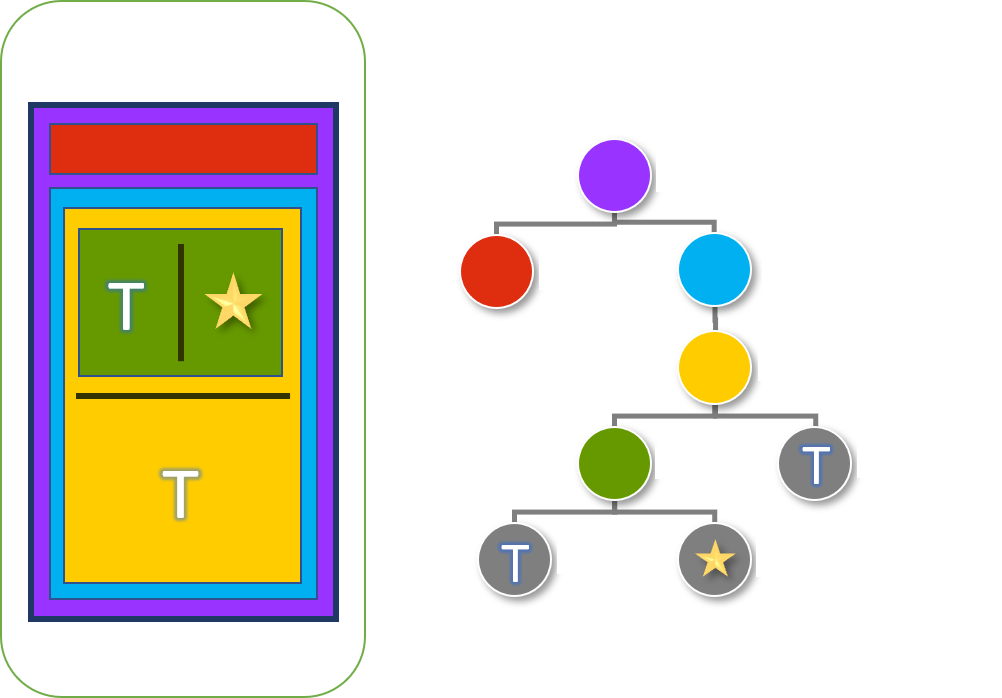
Our widget tree is just a whole bunch of widgets that are nested within each other. Using these widgets, you can create a beautiful yet interactive UI. Now let’s set up/download the tools to get started with app development.
Prerequisites for Flutter app development
Development environment setup: Linux, Mac or Windows based computer
IDE: Android Studio/Visual Studio Code
Disk space: Minimum 10GB free space. Although Flutter requires only 1.64GB, you will need space to install Android Studio
Tools: Git
| Note: For this article I will be covering only Android application development using a Windows system and Android Studio. |
Before you begin, make sure you have a version of Java 11 installed and that the JAVA_HOME environment variable is set to the JDK’s folder. If you have installed Android Studio version 2.2 and higher, this should already be the case as it comes with a JDK.
There are three steps for completing the installation process:
- Install the Flutter SDK
- Install Android Studio
- Install Android Emulator
Installing the Flutter SDK
Download the Flutter SDK for Windows (https://docs.flutter.dev/get-started/install/windows) and follow the installation instructions. Once the installation is over, update the environment variable as mentioned in the installation guide. Let’s verify that we have installed it correctly by running the following command:
Flutter –version
C:\Users\verma_ru>flutter --version
Flutter 3.7.6 . channel stable • https://github.com/flutter/flutter.git
Framework revision 12cb4eb7a0 (7 days ago) • 2023-03-01 10:29:26 -0800
Engine revision ada363ee93
Tools • Dart 2.19.3 DevTools 2.20.1
This will give you the installed version of Flutter and Dart. Now, run another command to check the environment details:
Flutter doctor
This will display a status report of the installation and the other software that we may need to install.
C:\Users\verma_ru>flutter doctor
Doctor summary (to see all details, run flutter doctor -v):
[V] Flutter (Channel stable, 3.7.6, on Microsoft Windows [Version 10.0.17763.557], locale en-IN)
[√] Windows Version (Installed version of Windows is version 10 or higher)
[√] Android toolchain develop for Android devices (Android SDK version 33.0.1)
[√] Chrome - develop for the web
[√] Visual Studio develop for Windows (Visual Studio Professional 2019 16.11.11)
[√] Android Studio (version 2020.3)
[√] Android Studio (version 2021.3)
[√] Connected device (2 available)
[√] HTTP Host Availability
• No issues found!
Installing Android Studio
If you don’t have Android Studio installed, download and follow the instructions mentioned in the Flutter installation link. Once you have installed Android Studio, be sure to go through the Android Studio setup wizard. This installs the latest Android SDK, Android SDK platform tools, and Android SDK build tools which are going to be required by Flutter when it’s building the Android app.
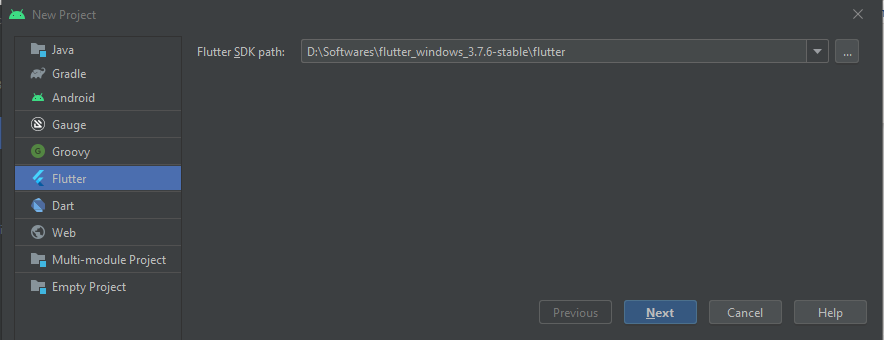
Next, open the Android Studio. It should display a Welcome screen. We will configure Flutter and Dart in Android Studio by browsing for the Flutter and Dart repositories. Click on the Plugin menu, search for Flutter, and click on Install. It’s also going to install the Dart plugin together with this (Figure 2).

Once this is done, restart Android Studio. You will notice a new menu item on the Welcome screen – ‘New Flutter Project’. If you see this, the installation has been successful.
Installing Android Emulator
To run your application, we must install an Android Emulator. You can choose to run the application on a physical device as well. But first, we must create a Flutter app.
Click on ‘New Flutter Project’ on the Welcome screen to start, and click on the Flutter menu. Make sure that the Flutter SDK path is listed here. Now click on the Next button. Refer to Figure 3.
Next, enter the project name as HelloFlutter and select the project location. Select project type as Application. Additionally, select the Android and iOS development language of your choice. You do not need to learn or know the language at this moment. Select the platforms for which you are building the application. Once done, click on the Finish button to build your first Flutter app. In case the IDE is displaying a popup for creating a new directory, click on the Create button.
Now we will set up the Android Virtual Device (Emulator) to run our application. To get the Android Emulator, click on the Device Manager (Tools -> Device Manager).
You can find the Device Manager in the toolbar too.
This will open a device manager window as shown in Figure 4, where you can create a new virtual device or start an existing one.
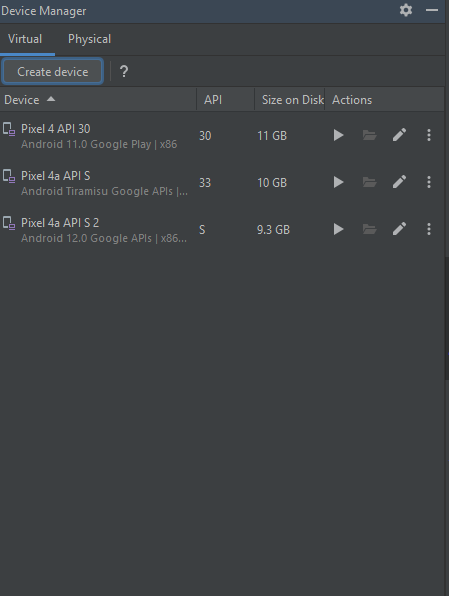
Let’s click on the Create Device button to create a new one. I would recommend using the Pixel or Nexus emulator from the list.
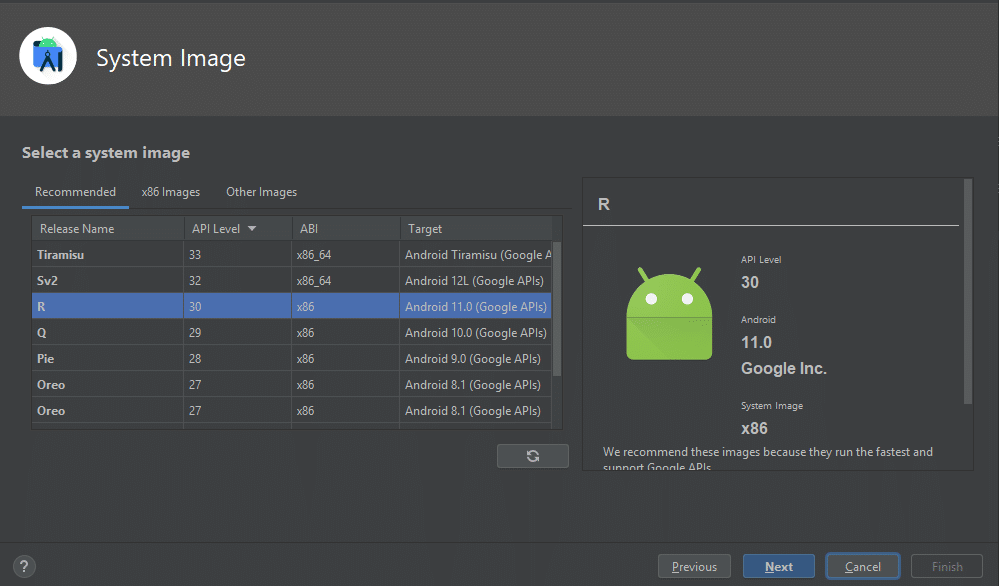
Once you’ve selected the device, click on Next. Now, you get to specify which operating system you want to run on that device. Here I recommend going for Android R. If you haven’t installed that OS yet, do so. This might take anywhere between 5 to 10 minutes. Once done, click on the Next button.
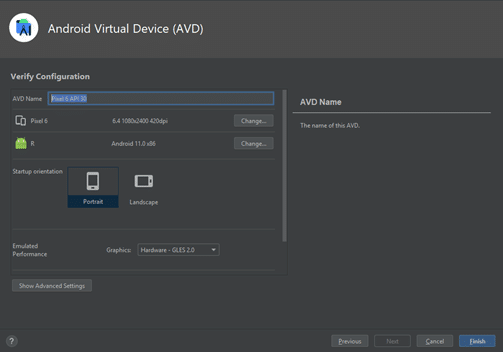
Now, we get to the option to change the virtual device’s name. The most important thing here is to choose hardware for the graphics (hardware – GLES 2.0). This way, we’ll be able to use the computer’s graphics card for faster rendering, which will vastly speed up the Android Emulator. Now we’re all done, and we can click on Finish.
You will see this newly created emulator in the Device Manager window listed under Virtual Devices now.
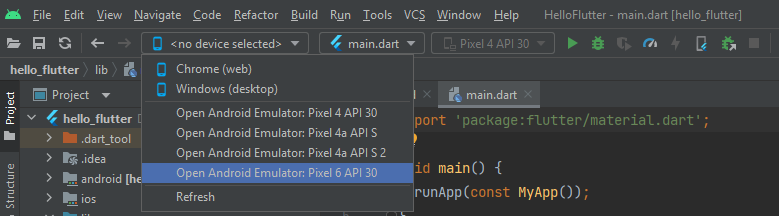
In order to launch it, all you have to do is click on the Play button. Alternatively, you can click on the Device Selection drop-down in the toolbar to launch the device.
Once it’s done launching, we have a brand new Pixel device as seen in Figure 8.
Now let’s run the Flutter application created by the Android Studio by clicking on the Play button available in the toolbar. But before doing that, make sure you have selected the correct virtual device.
Congratulations!! You have built your very first Flutter app and all it does is keep count of how many times you push this button.
This also demonstrates that we’ve actually got our Android Studio, Flutter SDK, and Android Emulator installed, set up, and running.
Now that we have everything set up and running, let’s build our Hello Flutter app. For that, you can create a new Flutter project, or you can update the earlier created application. I’m using the existing app for this article. Let’s open the main.dart file and delete everything except the first few lines. Your file should look like what’s given below:
import ‘package: flutter/material.dart’;

void main() {
runApp (const MyApp());
}
So now we get a little error here, and you see it in Dart Analysis as well, where it says ‘error: The name ‘MyApp’ isn’t a class.’. Well, that’s because MyApp was the Flutter team’s app, and it doesn’t exist anymore because I just deleted it.
Let’s create a blank MaterialApp. Material design is a design style or a concept created by Google. Now your code should look like this:
void main() {
  runApp(const MaterialApp());
}
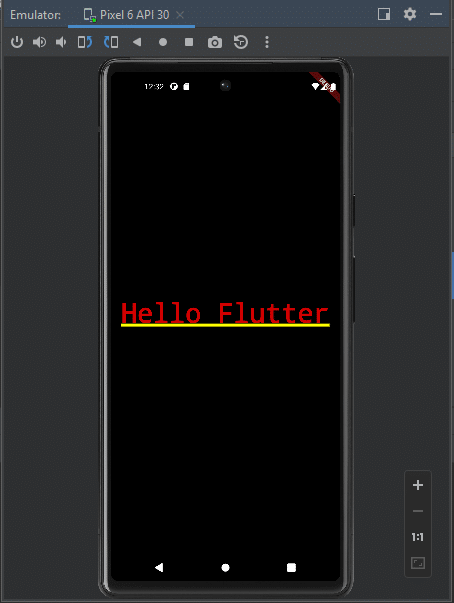
Let’s go ahead and build the widget tree. The most important thing is to set the home inside the MaterialApp. Let’s set it to a text widget that says ‘Hello Flutter’. If you run the application at this moment, you’ll notice that it displays ‘Hello Flutter’ on top of the screen. Let’s align it to the centre of the screen with the help of the centre widget.
The centre widget will be our home now, and it will take the text widget as a child.
void main() {
  runApp(const MaterialApp(
    home: Center(
      child: Text(“Hello Flutter”),
    ),
  ));
}
Let’s run the application and see the result, as shown in Figure 9.
That’s great. Isn’t it? We have built our Hello Flutter app from scratch. I recommend reading more about the different types of widgets. You can create a beautiful-looking app with only one codebase using Flutter and Dart. Happy learning!!


