


HashiCorp Packer is an open source tool that helps to create identical machine images for multiple platforms from a single source template. This article shows how to use this tool to build Amazon machine images or AMIs.
Everyone knows that a virtual machine or a VM is not a physical machine. Instead, it is created using software that runs on a physical machine to emulate the functionality of another physical computer. The machine on which the VM runs is called a host and the machine it emulates is called a target. In other words, we can just launch a VM on a host to get the functionality of a target.
Many organisations have moved their functionality to VMs running on cloud infrastructure since it is hassle-free and works out cheaper. For example, being a popular cloud provider, AWS offers a facility to launch VMs on a vast number of their host machines. This service is called Elastic Compute Cloud or EC2 for short. You can build your entire computing infrastructure just by launching the required VMs on the AWS EC2 service.
To help you in building the VMs, AWS offers a few ready-to-be-launched target machine images or AMIs (AWS machine images). An AMI is a deployment unit that includes an operating system, utilities, and other resources. AWS offers AMIs to build Ubuntu VMs, Windows VMs, etc, to name a few. These are all general-purpose images.
In most cases, you may want to launch a custom VM for your special needs. Such a VM may be based on a specific version of an operating system, with a specific provisioning.
There are two ways of achieving this.
Mutable VM: In this approach, you launch the VM from a suitable AMI, install other utilities, and provision the ports and other resources. AWS offers a nice web interface to accomplish this. However, the problem with this approach is that you have to repeat the process for all the instances that you want to launch, which is both time taking and error-prone.
Immutable VM: In this approach, you build your own custom AMI with all the special needs and then launch the instance. Once the custom AMI is ready, you can launch any number of instances quickly without any intervention. If you need a VM with another set of requirements, you repeat the process of building another custom AMI and launch the instances. AWS offers special tooling such as AWS CLI for building custom VMs.
So far so good, as long as you want all your computing infrastructure only on AWS. However, AWS is not the only player in this market. Other cloud providers like Google Cloud, Azure Cloud, etc, also offer images to launch VMs on their cloud. Your organisation may want to deploy different apps on different clouds.
In such a case, your DevOps team needs to use different tools to build machine images for different clouds. Though it is not impossible to live in such an environment, it definitely calls for a uniform way and toolset to build identical images for different cloud platforms. That’s where the Packer tool from HashiCorp comes into the picture.
According to their website, Packer is an open source tool that lets you create identical machine images for multiple platforms from a single source template. All you need is to develop a Packer template using their HashiCorp Configuration Language (HCL) and ask the Packer tool to build an AMI based on the template. In other words, Packer helps you in practising IaaC or Infrastructure as a Code.
This article explains the way to build an image using the Packer tool.
Installing Packer
The Packer tool is available on most of the popular platforms, and installing it is easy and simple.
The following commands install Packer on any Linux platform:
curl -fsSL https://apt.releases.hashicorp.com/gpg | sudo apt-key add -
sudo apt-add-repository “deb [arch=amd64] https://apt.releases.hashicorp.com $(lsb_release -cs) main”
sudo apt-get update
sudo apt-get install packer
In case your DevOps team is using Mac, then the Homebrew can be used to install Packer. All you need is to run the following commands after installing the latest version of Homebrew.
brew tap hashicorp/tap
brew install hashicorp/tap/packer
Once Packer is installed, you can verify if the installation is proper by running the following command on the command prompt:
packer
The result of running the above commands appears in Figure 1. It suggests the correct syntax and lists the available commands.

You may want to try the easiest command:
packer version
In my case, I found that Packer version 1.8.6 is running on my Mac.
Building an AMI using Packer
To demonstrate the Packer tool, let us build an AWS machine image or AMI. AWS offers a free-tier account, using which you can build AMIs and launch small VMs.
As the first step, visit https://console.aws.amazon.com/ to create an AWS account and make a note of the security credentials. Packer communicates with AWS using these credentials over SSH. You may either specify the credentials in the Packer template or store them on the machine, which Packer can locate whenever it needs.
Obviously, the latter approach is much more convenient and secure. To this end, use the AWS CLI to store the AWS security credentials securely. For example, use the following command on a Mac to install AWS CLI:
brew install awscli
Once AWS CLI is installed, use the following command to store the AWS security credentials:
aws configure
The command prompts for AWS access key ID and AWS secret access key like in Figure 2. Supply the details accordingly. You may also supply the default region name.

Packer template
We are all set to write the Packer template. The previous versions of Packer supported JSON for templating. However, the current version recommends using HCL instead. HCL can be used to write templates not only for Packer but also used in other tools of HashiCorp like Terraform.
An HCL template file uses .hcl as the extension. In the case of Packer, the file name uses .pkr.hcl as the extension. Let us name our template file ami.pkr.hcl. The following is the initial template.
source “amazon-ebs” “glarimy-ubuntu” {
region = “us-east-1”
source_ami = “ami-007855ac798b5175e”
instance_type = “t2.micro”
ssh_username = “ubuntu”
ami_name = “glarimy-ubuntu”
}

build {
sources = [
“source.amazon-ebs.glarimy-ubuntu”
]
}
The above template consists of two blocks, namely, source and build. An HCL block also contains arguments inside the curly braces. The arguments vary depending on the kind of block.
The Packer source block describes the base image from which a new AMI is to be built. In our case, the source block specifies the type of source, namely, ‘amazon-ebs’. It implies that we are going to use an AMI of EBS type, provided by Amazon. Packer detects this information and tries to interact with AWS. The source block also has a label ‘glarimy-ubuntu’. This is just to refer to the block locally in other parts of the template. Together, this block can be referred to uniquely as source.amazon-ebs.glarimy-ubuntu.
The source block usually expects us to specify the base image and other basic information.
In our case, we specified that ami-007855ac798b5175e is to be used as the base AMI and use the t2.micro type of EC2 instance to build the new AMI. We also specified that ‘ubuntu’ is to be used as the user name for connecting to the instance for further provisioning, if any. Though we specified the region, Packer can actually detect this information along with the AWS security credentials from the local store that we already created. These credentials are required for the Packer to connect to AWS. Finally, the ami_name indicates the name that we want to give to the new AMI.
So, in summary, Packer connects to AWS using the security credentials, spins a t2.micro instance, deploys ami-007855ac798b5175e on it, and builds the new AMI named glarimy-ubuntu. Though the new AMI is in no way different from the source AMI, it is a good starting point.
The other block in our template is the build block. It does not have any type or label associated with it. It has only one argument, namely, sources. Though we specified only source.amazon-ebs.glarimy-ubuntu as the source, this argument takes a list of any number of sources. Packer builds the AMIs based on these sources.
Building the AMI
Once the packer template file is ready, run the following command in the folder where the template file is located. It downloads any plugins that are required.
packer init
We can also verify if the template file is valid.
packer validate ami.pkr.hcl
A valid template file can be formatted properly according to HCL style using the following command:
packer fmt ami.pkr.hcl
Fine! After initialisation and validation, we are all set to build the actual images.
packer build ami.pkr.hcl
The command given above takes a few minutes to finish as it involves interaction with AWS, spinning a new EC2, deploying the source AMI, and building the new AMI. See Figure 3 to understand the steps involved in the whole process.
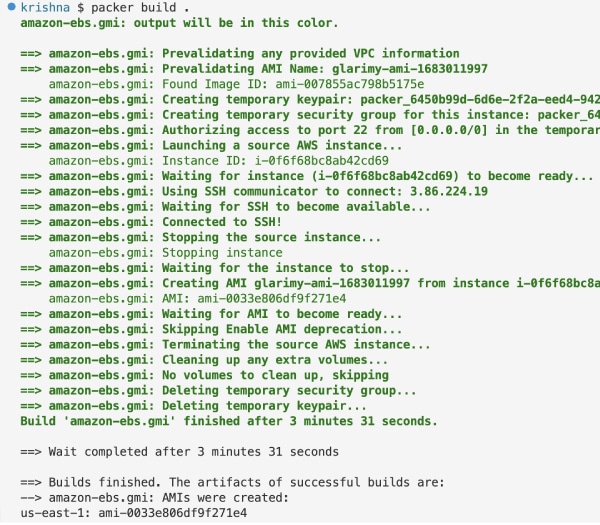
In my case, a new AMI with ID ami-058213aa644fe1b60 in the us-east-1 region is created.
It will be listed under the My AMI tab on the AWS AMI console page.
Using variables
The Packer HCL template files can also define and use variables for reusability. For example, the ssh_username in the following template is referred to a variable named var.uname.
source “amazon-ebs” “glarimy-ubuntu” {
ssh_username = var.uname
ami_name = “glarimy-ubuntu-{{timestamp}}”
...
}
...
Where is this variable defined and initialised? The variables can be defined in the same template file or in a separate file. The latter is a better approach for obvious reasons. The default name of such a file is variables.pkr.hcl. Packer automatically locates this file locally.
In our case, the variables.pkr.hcl file has the following block:
variable “uname” {
type = string
default = “ubuntu”
}
As you can see, the file contains a definition for a variable named uname. The arguments specify that the uname is a string and ‘ubuntu’ is its default value. You can also supply validation rules and descriptions.
Once the variables are defined, you can initialise them. There are multiple ways to do this. You may use environmental variables, command line arguments, etc. In our case, we don’t do anything as we are happy with the default value.
Another interesting argument in the above source file is the way we name the new AMI. Instead of giving a static name like ‘glarimy-ubuntu’, we are using the current timestamp as the prefix. That way, every time Packer runs this template as part of the CI/CD routine, it creates a new AMI with a unique name, which we can refer to later.
Validating, formatting, and building the above template should happen smoothly. Note that the command syntax to build the image should be changed to the following, as Packer needs to locate multiple files for building.
packer build .
In the above, we replaced the template file name with a dot to tell Packer to locate all the .pkr.hcl files in the current folder.
Selecting base AMI dynamically
Another feature of Packer is that it can dynamically locate the source image from a named data source. For example, our templates so far specify a particular AMI with ID ami-007855ac798b5175e as the source. This may not always be helpful, especially in automated CI/CD processes. What if you want to pick up the latest Ubuntu AMI automatically as the source, no matter what its ID? Let’s enhance our template for that purpose.
data “amazon-ami” “ubuntu” {
region = “us-east-1”
filters = {
virtualization-type = “hvm”
name = “*ubuntu-xenial-*”
root-device-type = “ebs”
}
owners = [“amazon”]
most_recent = true
}

source “amazon-ebs” “glarimy-ubuntu” {
source_ami = data.amazon-ami.ubuntu.id
...
}
...
The revised template has a new block named data. It defines a data source. We specified ‘amazon-ami’ as the data source type and ‘ubuntu’ as the label. This block uses several filters such as virtualization-type, name expression, and root device type. You may use any number of filters to narrow down the search. Packer will be connecting to the AWS AMI Registry to find all matching AMIs. The argument ‘most-recent=true’ selects the latest AMI among them and returns its ID and other information.
In the source block, we are referring to the selected ID dynamically with the following argument:
source_ami = data.amazon-ami.ubuntu.id
Run this template to see the results. Here are a few output lines of interest for us.
Prevalidating any provided VPC information
Prevalidating AMI Name: glarimy-ubuntu-1683014188
Found Image ID: ami-0b0ea68c435eb488d
You can observe from the above output that Packer found ami-0b0ea68c435eb488d as the source image matching our filters.
Customising the AMI
So far, we have just cloned the source AMI to build our own AMI. But this is not of good use. The real reason for us to use Packer is to build custom images. We have already talked about the immutable VMs. In this approach, we build a new AMI with all the required provisioning.
As you know, Ubuntu does not come with a Docker engine installed. Let us make our new images Docker-ready. For this, we need to add provisioning in the template file. Keep the data block and source blocks as they are, and edit the build block as follows in the ami.pkr.hcl file.
build {
sources = [
“source.amazon-ebs.glarimy-ubuntu”
]
provisioner “shell” {
inline = [“while [ ! -f /var/lib/cloud/instance/boot-finished ]; do echo ‘Starting’; sleep 1; done”]
}
provisioner “shell” {
scripts = [“docker.sh”]
}
}
As you can observe, the build block has two provisioner blocks of type ‘shell’. It tells the Packer to run certain shell commands after deploying the source AMI on the instance and before creating the snapshot for the new AMI.
The shell commands can be supplied inline or in a separate file. For example, in the above template, the first provisioner is supplied with an inline command. This command essentially waits till the booting is complete so that we can run the other commands.
The second provisioner is supplied with a file named ‘docker.sh’. A file with that name must be present for the Packer to run. The content of the file has commands to install Docker.
sudo apt update
echo “Y” | sudo apt install docker.io
Running the above template gives an output from which certain lines are presented here.
Prevalidating any provided VPC information
Prevalidating AMI Name: glarimy-ubuntu-1683016633
Found Image ID: ami-0b0ea68c435eb488d
Launching a source AWS instance...
Instance ID: i-07c012aa3a2bcaee2
Waiting for instance (i-07c012aa3a2bcaee2) to become ready...
Using SSH communicator to connect: 3.90.36.190
Waiting for SSH to become available...
Connected to SSH!
Provisioning with shell script: /var/folders/ly/02f312xx3q5_gqwlk82m1c7h0000gn/T/packer-shell1060700513
Starting
Starting
Starting
Starting
Provisioning with shell script: docker.sh
Unpacking docker.io (18.09.7-0ubuntu1~16.04.7)
Setting up docker.io (18.09.7-0ubuntu1~16.04.7)
Adding group `docker’ (GID 116)
Done.
Builds finished. The artifacts of successful builds are:
AMIs were created:
us-east-1: ami-05f11967dcc85276f
As you can see, both the shell provisioners are run before building the AMI. Also, it can be found from the output that Packer logged into the instance using SSH, and ran the scripts to install dockers.
We can verify if the provisioning is done properly. For that, log in to the AWS console, launch an EC2 instance using the newly built AMI with a key pair, and note down the public IP address. Download the key pair as a .pem file onto the local machine.
Run the following commands. Replace the .pem file and IP address appropriately. In my case, the .pem file is named glarimy, and the IP address is 52.23.169.102.
chmod 400 glarimy.pem
ssh -i glarimy.pem ubuntu@52.23.169.102
sudo docker images
Notice that the newly launched EC2 instance is equipped with a Docker engine and you can interact with it.
Handling the artifacts
Well! We have covered good ground. We now know how to select a source AMI, how to clone it, how to provision it, and how to create a new AMI. In the Packer jargon, the newly generated files such as AMIs are referred to as artifacts. Packer also helps in handling these artifacts. For instance, Packer can help you in registering an AMI with a different registry, or move to a different place, etc. Such artifact handling is achieved using post processors.
In the following example, it simply creates a file on the local machine with the details of the newly created artifact.
Add a manifest post-processor to the build block in the ami.pkr.hcl. This entry directs the packer to create a file named ‘glarimy-ubuntu.json’ with the manifest details of the newly built AMI artifact.
build {
...

post-processor “manifest” {
output = “glarimy-ubuntu.json”
}
}
Running the updated template generated the following manifest in my case, in the glarimy-ubuntu.json.
{
“builds”: [{
“name”: “glarimy-ubuntu”,
“builder_type”: “amazon-ebs”,
“build_time”: 1683021300,
“files”: null,
“artifact_id”: “us-east-1:ami-0903822880fb16d20”,
“packer_run_uuid”: “9f755e3c-7321-679d-8f95-f57256125039”,
“custom_data”: null
}],
“last_run_uuid”: “9f755e3c-7321-679d-8f95-f57256125039”
}
In this article, we have seen the usage of Packer in building an AWS AMI. The source code used in this article can be found at https://bitbucket.org/glarimy/glarimy-university/src/master/glarimy-packer The whole process is summarised in Figure 4.
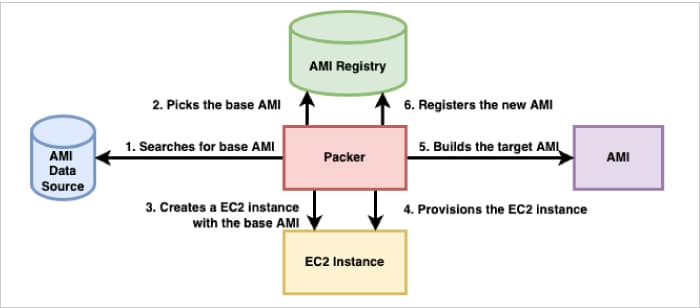
HashiCorp Packer is a powerful and easy-to-use tool to build identical images targeting multiple platforms. Using similar steps, images can be created in Azure, Google Cloud, and Docker, to name a few.


