


Tacker is an essential component of OpenStack and simplifies the deployment and management of virtualized network functions (VNFs). Here’s a step-by-step guide to installing OpenStack with Tacker.
OpenStack is a cloud computing platform that provides virtual servers and other resources to users; it functions as a cloud operating system that controls large pools of computing, storage, and networking resources throughout a data centre. All resources are managed and provisioned through APIs with common authentication mechanisms, and a dashboard is available for administrators to control the system. This makes it an attractive option for businesses looking to employ cloud resources provided by a third party or build and manage their cloud computing infrastructure using OpenStack.
Tacker, as an essential component of OpenStack, provides a framework for creating and managing virtualized network functions (VNFs) and the infrastructure necessary to support them. With Tacker, operators can define and deploy complex network topologies and services, such as virtual routers and load balancers, with ease. This is especially important for businesses that require NFV (network function virtualization) services, as Tacker’s orchestration capabilities automate the deployment and management of VNFs, which helps organisations optimise their networks and improve the efficiency of network operations. Overall, Tacker’s integration with OpenStack allows businesses to leverage NFV technology to optimise their cloud computing infrastructure, making it a valuable component for OpenStack users.
In addition to its orchestration capabilities, Tacker also provides features for automating the scaling and healing of VNFs. For example, if a VNF is experiencing high demand, Tacker can automatically scale up the resources allocated to that VNF to ensure that it can handle the increased load. Likewise, if a VNF fails or becomes unavailable, Tacker can automatically initiate the healing process to restore service as quickly as possible.
Here we outline a step-by-step guide to installing OpenStack with Tacker, an orchestrator designed to simplify the deployment and management of VNFs and enable complex network topologies. We have divided this work into two parts: this first part covers the installation of OpenStack with Tacker, while the second part next month will focus on VNF deployment on OpenStack, and Tacker’s crucial role in managing NFV and SDN technologies.
Benefits of OpenStack
There are several benefits of using OpenStack as a platform for building and managing cloud computing infrastructure.
- OpenStack is highly scalable, making it easy for users to add and remove resources as required.
- It supports a variety of use cases, including bare metal servers, containers, and traditional virtual machines. Additionally, it is highly adaptable, allowing customers to customise the platform to meet their unique requirements.
- It is designed to work with different software programs and hardware, making it simple to integrate with existing infrastructure.
- Since OpenStack is open source software, users can utilise the platform and all its components without any cost. This can result in significant cost savings when compared to private cloud platforms.
- It has a large and active community of developers and users, providing easy access to help and resources.
- It is vendor-neutral, independent of any one provider of hardware or software, giving users more options and flexibility when creating and maintaining their cloud infrastructure.
OpenStack components
The components of OpenStack are crucial to the platform’s functionality.
Nova: This component schedules and manages computing resources such as virtual machines and containers. It is a prerequisite for any OpenStack implementation as it provides the foundation for establishing and monitoring cloud computing infrastructure.
Neutron: This service manages networking resources such as virtual networks, load balancers, and firewall rules. It is a software-defined networking project responsible for providing IP addresses to virtual machines, subnets, topologies, and traffic routing. Neutron manages all networking facets for the virtual networking infrastructure (VNI) and the access layer aspects of the physical networking infrastructure (PNI) in the OpenStack environment.
Glance: This component manages and distributes virtual machine images. Users can manage the metadata associated with their images, and store and retrieve them using Glance.
Keystone: This component is responsible for handling user authentication and permission. It offers a mechanism for managing access tokens, which are needed to authenticate users when they access the OpenStack deployment, as well as a central directory of users and the resources they are permitted to access.
Cinder: This component handles block storage devices in OpenStack. It provides APIs to users that manage and consume block storage on their virtual instances, offering volumes to Nova virtual machines, bare metal hosts, containers, and more while ensuring high availability, fault tolerance, recoverability, and open standards.
Image: This service is provided by the Glance project, and allows users to upload and discover data assets such as images and metadata definitions that are meant to be used with other services. Glance manages virtual machines’ disk images, provides image delivery to virtual machines, and provides snapshot (backup) services.
Swift: This project provides object-level storage via a RESTful API. Swift is a highly available, distributed, eventually consistent object/blob store. Organisations can use Swift to store lots of data efficiently, safely, and cheaply.
Dashboard: This project provides administrators with a graphical user interface to administer OpenStack and its various components. The horizon is the canonical implementation of OpenStack’s dashboard, which provides a web-based user interface to OpenStack services, including Nova, Swift, Keystone, and more.
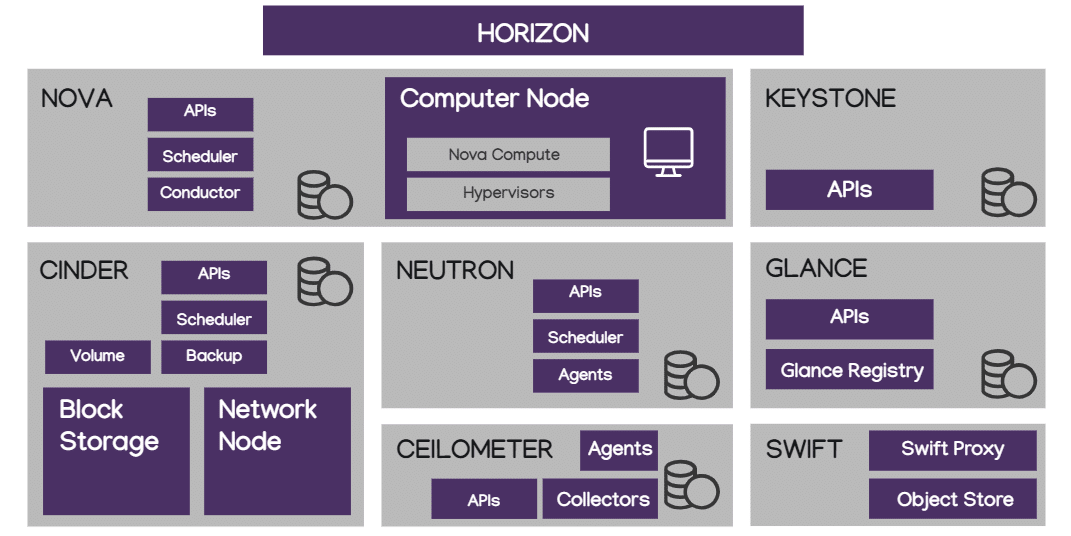
OpenStack architecture
The OpenStack architecture is designed in a way that the compute, network, and storage components are exposed through APIs, which allow applications and users to interact with them. These components communicate internally with each other to provide the necessary services to the applications and users. This modular architecture makes it possible to scale and customise the OpenStack infrastructure according to the needs of the users. The overview of OpenStack architecture is shown in Figure 1.
DevStack is an Ubuntu-based minimal installation of OpenStack (https://docs.openstack.org/devstack/latest/). It follows a certain template and installs all the components and services.
Step-by-step instructions for installing OpenStack and troubleshooting
The system configuration we have used for this experiment is as follows:
RAM: 8GB
Storage: 50GB
OS: Ubuntu 22.04
Kernel version: 5.15
OpenStack version: Yoga
DevStack version: 2023.1
Step 1: Install git as follows:
$ sudo apt-get install git
Step 2: Give the following command:
$ git clone https://opendev.org/openstack/devstack;
A folder with the name ‘devstack’ will be created.
Step 3: The output of ‘cd devstack’ will look like what’s shown in Figure 2.

Step 4: Create a new file named local.conf in the DevStack directory.
Step 5: In this file, copy the contents of the file present in the link https://docs.openstack.org/tacker/latest/install/devstack.html. The configuration file for OpenStack installation will contain several important parameters that are required for successful deployment, including:
- Admin user and password: These credentials will be used for authenticating and accessing the OpenStack dashboard.
- MySQL password: OpenStack uses MySQL as a database to store all its configuration and operational data. A strong MySQL password should be set to ensure security.
- RabbitMQ password: RabbitMQ is an open source message broker software used by OpenStack services for communication. The password for RabbitMQ should be set securely.
- Identity service (Keystone): It configures the domain name, authentication method, token expiration time, etc.
- Compute service (Nova) configuration: It contains details of hypervisor type, network configuration, and other compute-related settings.
- Network service (Neutron) configuration: It holds the network types (VLAN, VXLAN, GRE), the network address ranges, and other network-related settings.
- Block storage service (Cinder) configuration: This includes the storage backends, volume types, and other block storage-related settings.
By configuring these parameters in the OpenStack installation configuration file, the OpenStack deployment will be tailored to meet the specific needs and requirements of the user. Then, we can start the installation to execute the stack.sh script.
If an error pops up as ‘cannot import spawn from distill’ then edit the worlddump.py file from ‘distutil from spawn’ to ‘import shutil at line 22’, and then remove the (line 79) ‘spawn.find_executable’ with ‘shutil’ (Figures 3 and 4).


The error occurs because the distutil library will be removed in Python 3.12.
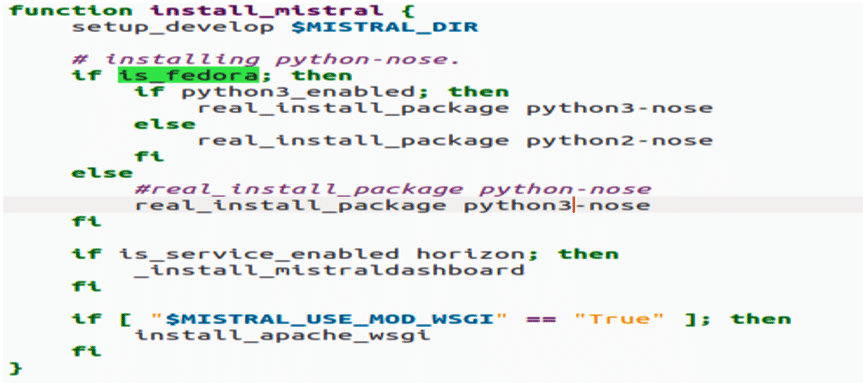
If the error ‘unable to install Python Nose’ persists, it is because the system has not yet been configured to use Python as an alias for Python 3, and thus the code given in Figure 5 must be added. Go to ‘opt/stack/mistral/devstack/plugin.sh’ and update ‘python-nose’ to ‘python3-nose’ at line 138.
If there are errors with library dependencies, run ‘$ sudo apt-get install aptitude’ to help deprecate some libraries and avoid library inconsistencies.
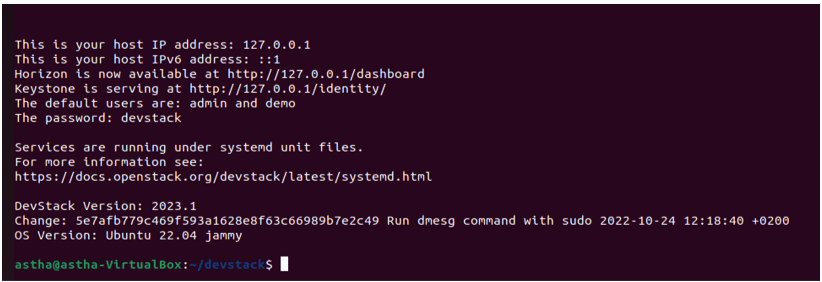
Step 6: After all the errors have been rectified, run the stack.sh script again. This will install OpenStack with Tacker, and the terminal will show successful installation as in Figure 6.
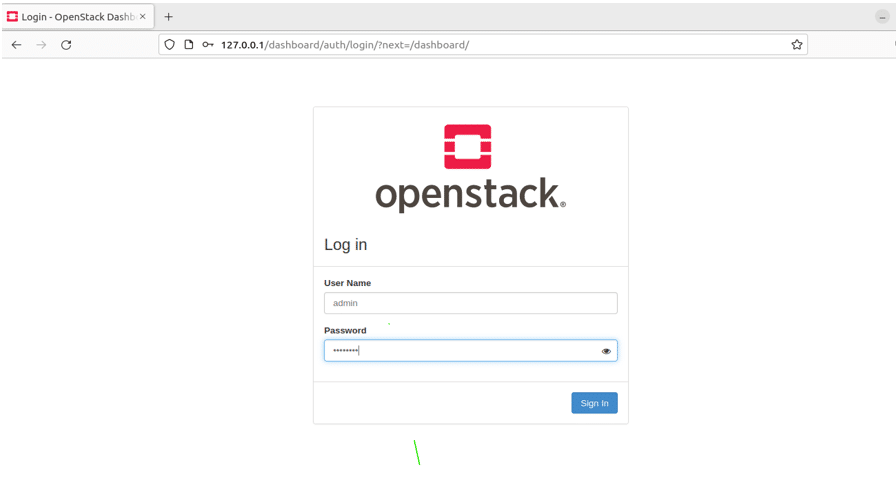
Step 7: Launching the browser at 127.0.0.1/dashboard will ask for authentication as shown in Figure 7.
On successful login, we get the dashboard with Tacker installed as shown in Figure 8.
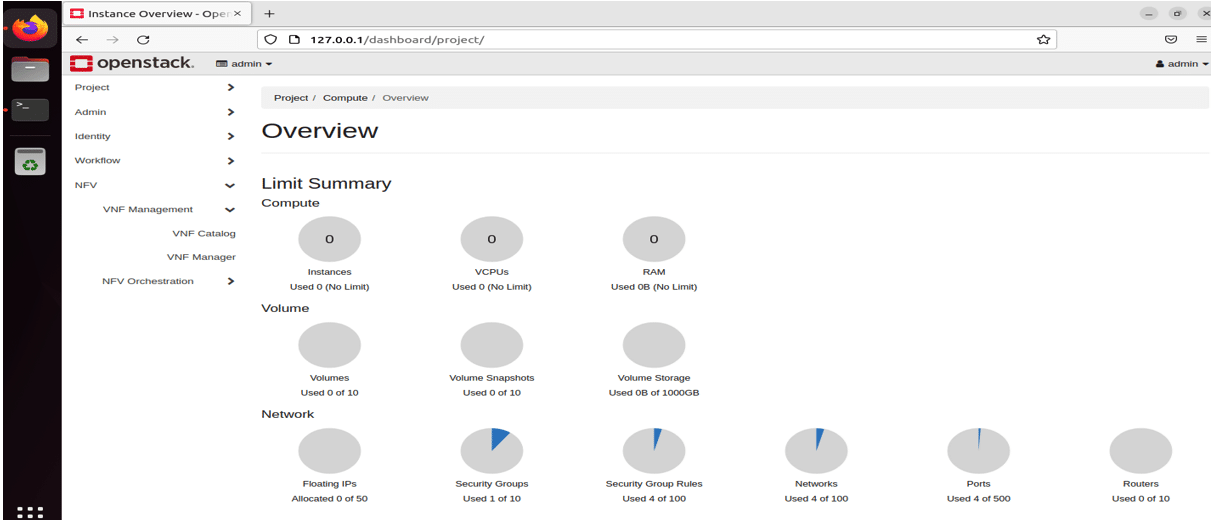
The dashboard will show the networks, volumes attached, instances launched, etc.
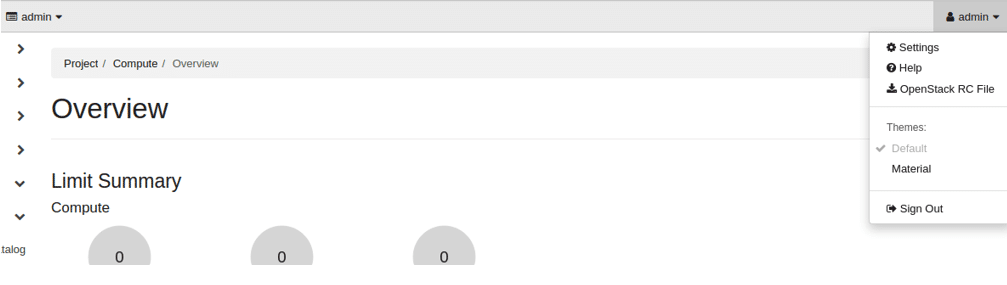
Step 8: If you want to access the CLI of OpenStack in case you do not use the dashboard, download the OpenStack rc file as shown in Figure 9.
Step 9: Once you have successfully downloaded the rc password, which in my case is devstack, run OpenStack commands from the terminal. Figure 10 shows the successful OpenStack authentication.

In this article, we have covered how to download and configure OpenStack on a machine. Troubleshooting steps were also provided to resolve any errors that might occur during the installation phase. After successful installation, one can deploy an instance by defining the configuration from the OpenStack dashboard.
In the next article we will discuss how OpenStack can be leveraged to deploy and use virtual network functions. We will further explore how network operators can route packets specific to their clients’ needs based on software-defined networking. Throughout these services, we will see how Tacker plays an important role in orchestrating the VNFs.


