


FFmpeg is not just for video editing or video conversion. It’s a versatile toolkit that has a world of creativity waiting at your fingertips. Try out some of its advanced tricks.
Did you know that FFmpeg also includes a media player? Did you know that it can apply FFmpeg filters and play the output in real-time?
Early this year, my FFmpeg book was published by Apress. Interestingly, I continue to discover new FFmpeg tips and tricks every month. Here are some new ways with which I now use FFmpeg to automate my multimedia tasks.
FFplay
FFmpeg is a massive project. It is not just one executable. The FFmpeg project provides several executables for end users and several libraries for software developers. ffmpeg, ffplay, and ffprobe are the most popular programs for end users. Some other tools such as ffescape and ffeval appear to be available only for Windows users.
ffplay is a barebones media player. It does not have any main menu or context menu. Users must employ certain keys and mouse actions to control playback.
| Action | Function |
| SPACE bar | Play or pause playback |
| LEFT and RIGHT | Fast-forward or rewind by 10 seconds |
| UP and DOWN | Fast-forward or rewind by 1 minute |
| Double-click | Toggle between windowed and full screen view |
| Right-click | Move forward or backward using an invisible playback slider |
Like ffmpeg, ffplay displays a huge banner and generates numerous text messages on the console. You can hide them using some switches:
ffplay -hide_banner -nodisp -autoexit \
   Nightfall-Stone-Ship.mp3
Even with this arrangement, ffplay is not entirely quiet because it also writes to standard error. For a clean console, try:
ffplay -loglevel quiet \
Nightfall-Stone-Ship.mp3
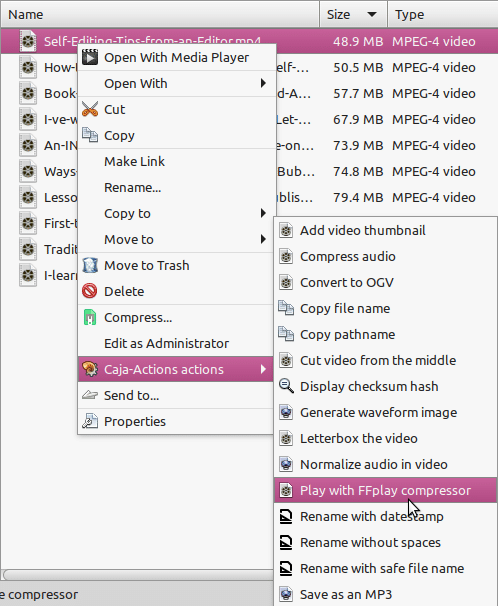
FFmpeg integration with Caja file manager
Instead of GNOME 3, I use the user-friendly and customisable Mate desktop. The Mate project has forked the Nautilus file manager (from GNOME 2) and created a replacement called Caja. In Caja, I use Caja Action Configurations to create my custom menus for various multimedia file types. These custom menus make it easy to perform FFmpeg-related tasks on multimedia files.
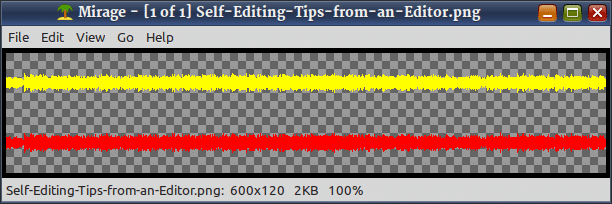
Generating waveforms of audio streams
FFmpeg can create a variety of real-time graphics after analysing the waveforms of audio streams. To use the showwavespic filter, follow this script:
sInputFileName=”$*”
sOutputFileName=”${sInputFileName%.*}.png”
ffmpeg -i “${sInputFileName}” \
-lavfi “[0:a:0]showwavespic=s=600x120:
split_channels=1:
colors=yellow|red:
scale=sqrt” -update 1 \
“${sOutputFileName}”
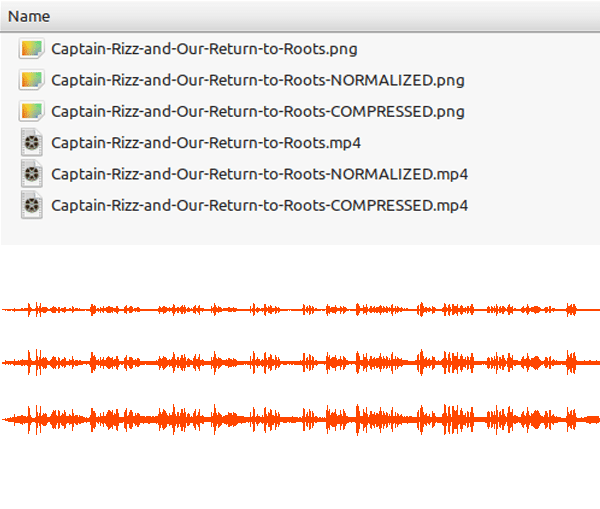
Audio normalisation and compression
Some multimedia files suffer from low audio volume. Rather than blindly increasing the volume, you should first use the ‘volumedetect’ filter to detect the highest decibel level and then use the ‘volume’ filter to expand or maximise the waveform accordingly.
ffmpeg -i low.mp3 -af “volumedetect” \
-f null -
ffmpeg -i low.mp3 \
-af ‘volume=17dB’ -f ogg \
normalized.ogg
In this example, the ‘volumedetect’ filter found that the maximum volume was at -17dB. To bring it to 0dB, you can set the ‘volume’ filter to 17dB. This expands the waveform to the maximum safe level. If we expand the waveform beyond the maximum value (17dB) identified by the ‘volumedetect’ filter, some of the peaks of the waveform will start to get chopped off. Chopped-off waveform means a permanent loss of some audio content.
Normalisation may not always raise volume levels. Imagine a conversation recorded on a microphone placed on a desk. If someone jerks the desk, the microphone will wobble and introduce high-volume spikes into the recording. Since these spikes set the bar, the recording software will encode the conversation with low volume. Imagine another case where there is a speaker who is close to the microphone and his voice is recorded normally while that of someone in the audience is barely discernible. The low-volume sections caused by the audience member cannot be expanded unless the audio of the first speaker is compressed.
Rather than considering the entire audio and not being able to normalise it, the smarter approach would be to take smaller chunks of the audio and dynamically expand or compress their waveforms. This is known as dynamic audio normalisation and dynamic audio compression, respectively.
The ‘dynaudnorm’ filter can perform both functions but the default is normalisation. When the ‘guasssize’ filter option is set at the lower end of 3, it behaves like a typical compressor. At the other end of 300, it becomes a traditional normaliser.
ffmpeg -i train-trip.mp3 \
-filter:a dynaudnorm=gausssize=3 \
train-trip-normalized.mp3
Do not use the filter indiscriminately. Dynamic audio compression is also known as dynamic range compression. It is the bane of popular music today. It makes the recording very boring. In Carl Orff’s composition of O Fortuna or Ryuichi Sakamoto’s score for the end-credits of the movie Femme Fatale, the music starts on a low note, builds slowly in a steady crescendo and abruptly drops off a high cliff. Compressing such an audio will ruin the composer’s intent.
Using FFplay and ‘dynaudnorm’
Despite having a fibre internet connection, its challenging to play online videos on my PC, let alone stream them to my TV. To address this, I have written a browser script (www.opensourceforu.com/2016/03/the-utility-of-user-scripts-js-and-user-styles-css) that automatically detects online videos and displays their location (URL). Using this script and a download manager, I mass-download videos and see them offline.
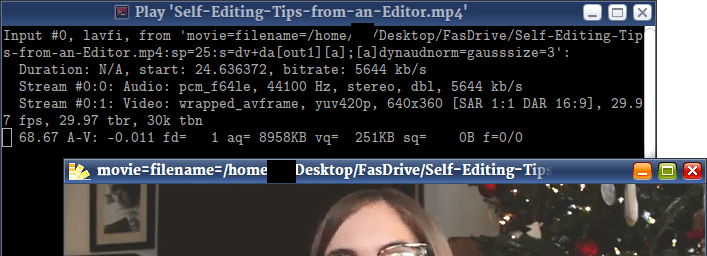
Another problem with the videos (recorded mostly by other writers) is that they have very loud intro music and the useful content is recorded with low volume. Rather than fiddle with volume control for every video, I use a Caja Action that uses the ‘dynaudnorm’ filter and ‘ffplay’. In addition to files, ‘ffplay’ can play the processed output of filters in real-time. I use the ‘-f lavfi’ option for this.
sFile=Self-Editing-Tips-from-an-Editor.mp4
ffplay -hide_banner -autoexit -f lavfi \
“movie=filename=${sFile}:sp=25:s=dv+da[out1][a];
[a]dynaudnorm=gausssize=3”
The ‘movie’ filter plays the video. Its ‘sp’ option skips the first 25 seconds. The ‘dynaudnorm’ dynamically compresses the remaining audio.
I am listening to other authors talking about their books. It is not classical music or some symphony orchestra. Compressing such videos is entirely justified.
Some online video creators use a microphone with an active compressor. Their videos have a constant volume. For content creators who mix intro or outro music, I recommend processing their videos with the ‘dynaudnorm’ filter before uploading the output.


