


CircuitPython and Raspberry Pi Pico can together transform everyday devices into smart wonders. This short tutorial will help you write a simple program for using CircuitPython and upload it to Raspberry Pi Pico.
The Internet of Things (IoT) refers to a network of devices capable of communicating with each other and the internet using unique identifiers. These devices have processing capabilities, high computing power, sensing units, and powerful embedded systems, allowing for applications as varied as ‘smart devices’, ‘smart cities’, and ‘smart schools’. IoT connects everyday objects like lights, monitors, cars, and doors to the internet, enabling the exchange of data and information among people, processes, and things. This data and information find applications in fields like healthcare, education, and agriculture. For instance, IoT can help monitor farming environments, prevent theft by tracking home activities, control machines in factories, and report power outages.
Some of the most popular IoT devices are Alexa and smartwatches, which are used for home automation and healthcare. These devices rely on hardware components called microcontroller units (MCUs) and microprocessor units (MPUs) to perform complex tasks. For example, Alexa uses the NXP i.MX RT106A MCU, enabling it to run the Alexa voice service directly on the device. It also incorporates the MediaTek MT8516 MPU, which supports voice assistants and machine learning applications.
Raspberry Pi Pico, the high-performance MCU
In this article, we will explore an MCU called Raspberry Pi Pico based on the RP2040 microcontroller chip by Raspberry Pi, and learn how to write a sample code for blinking an LED using CircuitPython. Raspberry Pi Pico is a low-cost, high-performance MCU board that uses the RP2040 chip. This chip boasts a dual-core ARM Cortex-M0+ processor, 264KB of SRAM, and 2MB of flash memory. Additionally, it offers 26 GPIO pins, three analogue inputs, and support for I2C, SPI, and UART protocols. Raspberry Pi Pico can run Python or C/C++ codes, making it remarkably easy to program and customise. Let me guide you through setting up your development environment, writing a simple firmware program, and uploading it to your Raspberry Pi Pico board.
Exploring Python for IoT
Python is a widely-used and versatile programming language with applications spanning various domains, including the Internet of Things (IoT). One of the devices that can be used for IoT projects is the Raspberry Pi Pico, as this low-cost microcontroller board can run Python code. To program the Pico with Python, we will use CircuitPython, a Python variant optimised for microcontrollers and embedded systems.
CircuitPython has many built-in libraries and modules that simplify the coding and interfacing with hardware components. To power our Pico device, we will need a power source that can provide 5V and 2A current source. Options include a battery pack or a power adapter with a micro-USB connector. For this article, I have used an Adafruit adapter, which is a USB wall charger compatible with the Pico board. You can also use any other power adapter that meets the specifications and has a micro-USB port.
Circuit connections
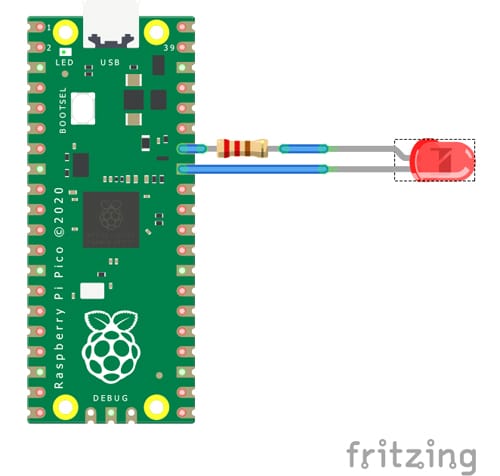
Here is a sample of a digital circuit that I created. It connects GPIO pin 22 to a resistor with a minimum resistance of 500 ohms. For a green LED circuit, you can use a 220-ohm resistor. This is because the frequency of red light is the highest in the visible light spectrum, and according to the following equation, energy is directly proportional to frequency:
Energy = h * frequency
This means that red LED bulbs heat up much faster than green LED bulbs. To prevent this, high-resistance resistors are needed. The other end of the resistor connects to the positive terminal of the LED bulb, marked by the LED’s smaller leg. The negative end is connected to the GND (ground) pin of the Raspberry Pi Pico.
Software configuration
To program the Raspberry Pi Pico with CircuitPython, follow these steps:
- Download the latest version of CircuitPython for Pico from the official website.
- Connect the Pico to the PC by holding down the BOOTSEL button while inserting the USB cable. This puts the Pico in bootloader mode, and a drive named RPI-RP2 will appear on the screen.
- Drag and drop the adafruit_circuitpython_etc.uf2 file downloaded in step 1 to the RPI-RP2 drive. This installs CircuitPython on the Pico, and the drive disappears.
- A new drive called CIRCUITPY appears, which contains the files and folders that are required for CircuitPython to run on the board.
The main file we will use is code.py, which is the default CircuitPython code file executed when the board is powered on or reset. The lib folder contains the libraries or modules for our code.
Writing and running the code
To write and run our code, we can use any text editor or IDE supporting CircuitPython. In this case, we will use Thonny IDE, a simple and beginner-friendly IDE with a built-in CircuitPython interpreter. To use Thonny IDE, we need to select the CircuitPython interpreter from the Tools menu and choose Raspberry Pi Pico as the device.
In Thonny IDE, we can write our code in the editor window and save it as code.py on the CIRCUITPY drive. For example, we can write code to blink an LED light connected to pin 22 of the Pico board with a 0.5 second interval, as shown here:
Blink.py
1 import time
2 import board
3 import digitalio
4
5 led = digitalio.DigitalInOut(board.GP22)
6 led.direction = digitalio.Direction.OUTPUT
7
8 while True:
9    led.value = not led.value
10  time.sleep(0.5)
11  led.value = not led.value
12  time.sleep(0.5)
13
In this article, we have learned how to program the Raspberry Pi Pico with CircuitPython. We covered downloading and installing CircuitPython, using Thonny IDE to write and run code, and demonstrated how to blink an LED light connected to the Pico board.
CircuitPython is a powerful and user-friendly programming language that empowers us to create a wide range of IoT projects using the Pico board and other hardware components.


