


Interested in building a custom digital clock on your mobile device? This short tutorial will make use of App Inventor to help you do just that.
App Inventor is used to develop Android applications that are compatible with both mobile phones and tablets. It is free and cloud-based. To begin your App Inventor journey, you need a Gmail account to log in to the server and store your files. For uploading and testing the applications, your mobile device and computer must be connected to the same Wi-Fi network. If you are using a laptop, consider using a bigger external monitor for the best development experience.
In this article, we will learn to make a digital clock for Android mobile devices. It will show the time, date and day, which you can custom format according to your preferences. I have chosen this topic as an ideal starting point to learn how to use App Inventor.
App Inventor uses a block-based, drag and drop approach for designing apps. It is fun, especially for youngsters and novice users. Ideally, it will be easier to use if the developers have prior experience with a programming language. However, this article is aimed at beginners, who have no past experience with App Inventor.
Logging into the server
Open your preferred web browser and type ‘MIT App Inventor Login’ in the address bar. From the list of results, select ‘MIT App Inventor Login’. Enter your email address and password, then click ‘Login’.
You will be greeted with a welcome screen. Click on ‘Continue’ and then on the ‘Close’ button. This will take you to the screen as shown in Figure 1.
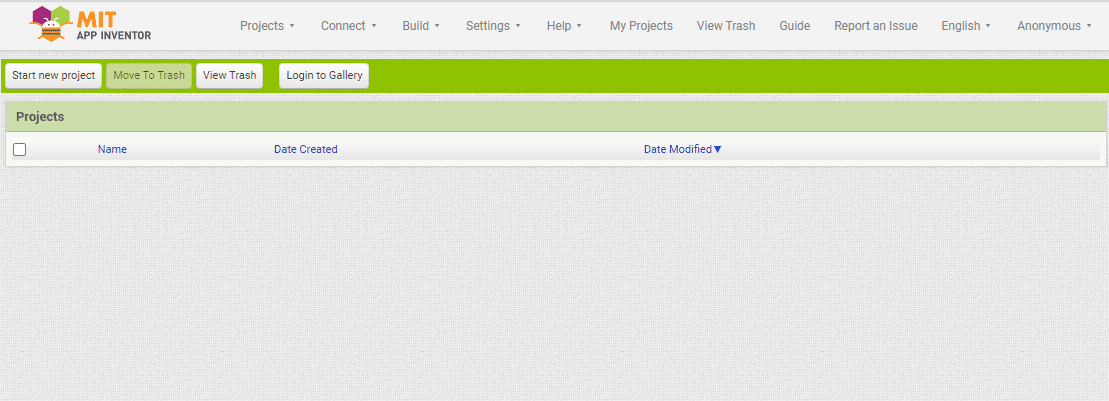
On the rightmost side you will find your email ID. When you click on it, it will show a ‘Sign Out’ menu.
Next, click on Start new project and assign it a project name, such as ‘Digital_Clock’. Click ‘Ok’. In the next screen, you will see four panes: Palette, Viewer, Components and Properties.
Within the Palette pane, you will discover several options. Select Label and drag it into the Viewer pane (which contains the mobile device image).
In the Viewer screen, this will appear as ‘Text for Label1’. In the Components pane, it will be labelled as ‘Label1’ and in the Properties pane as ‘Label1’. The label serves the purpose of displaying text, and your screen will now resemble Figure 2. Note that there is a vertical scroll bar at the right edge.
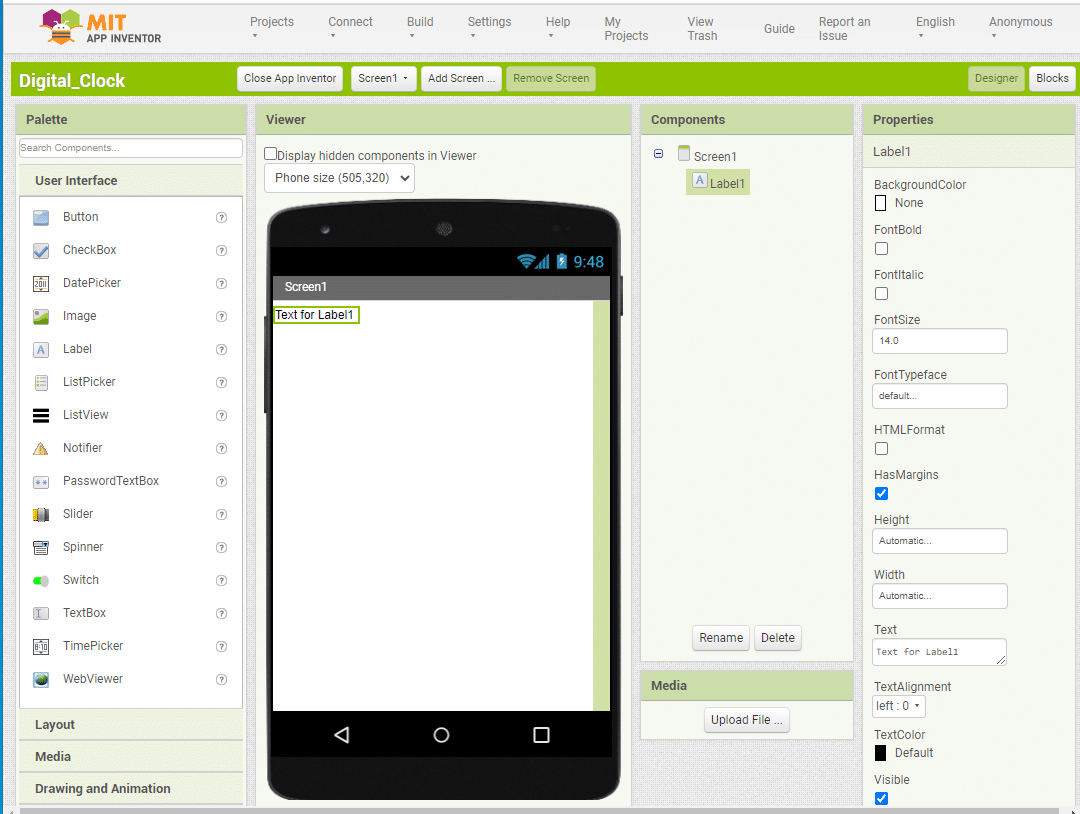
In the Components pane, under Screen1, you can see the name ‘Label1’. Use the Rename button to change it to ‘Clock_Label’. You will notice that it updates to the same name in the Properties pane as well. In this pane, you can set the properties of the ‘Clock_Label’. Modify the BackgroundColor to black (you can change it to any colour), set the FontSize to 40, and adjust the Height and Width to Fill parent.
Remove the ‘Text for Label1’ to leave the ‘Text’ property blank. Change ‘TextAlignment’ to ‘Center : 1’ and TextColor to White. Make sure that Visible property is checked, and leave other items at their default values. You can get more information by clicking the question mark in the Palette against each item.
In the Palette, click on Sensors and drag ‘Clock’ into the screen area in the Viewer. This will appear as a non-visible component at the bottom of the Components pane, listed as Clock1 below Clock_Label. Make sure that in the Properties pane, under Clock1, TimerAlwaysfires and TimerEnabled are checked. Set the ‘TimerInterval’ to 1000, so the timer event triggers every 1000 milliseconds (1 second). This setup will result in a screen resembling Figure 3.
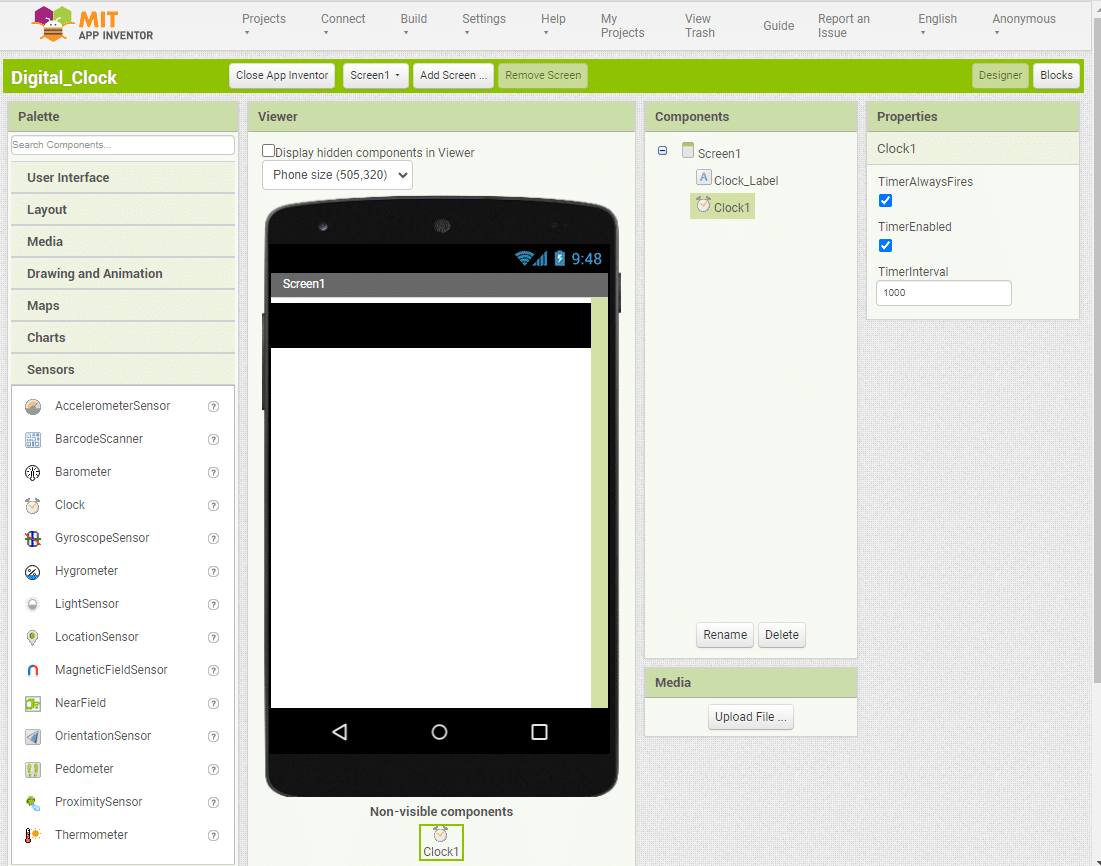
In Figure 3, just below your email ID, there are two tabs – Designer and Blocks. Up to this point, you have been operating in Designer mode. Now switch to ‘Blocks’. In the Blocks mode, you will find two panes – Blocks and Viewer. This Viewer is different from the Viewer in the Designer mode.
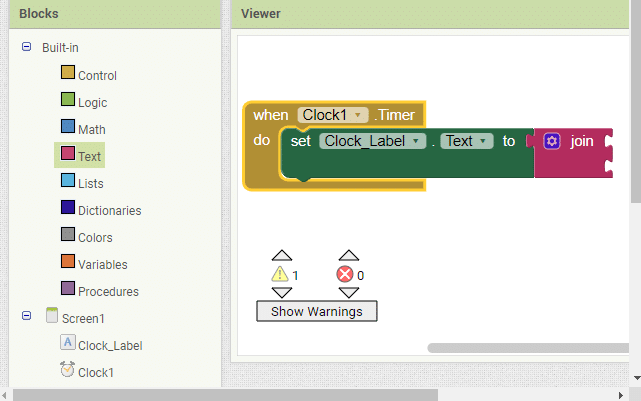
In the Blocks pane, you will see the ‘Clock_Label’ and ‘Clock1’, created in the Designer mode. Click on ‘Clock1’. You will get a number of blocks in the Viewer pane. Select the ‘when Clock1.Timer’ block. Similarly, click on ‘Clock_Label’ in the Blocks pane and select the ‘set Clock_Label .Text to’ block. Drag this block into the ‘when Clock1.Timer’ block to create a seamless connection. Your screen should now resemble Figure 4.
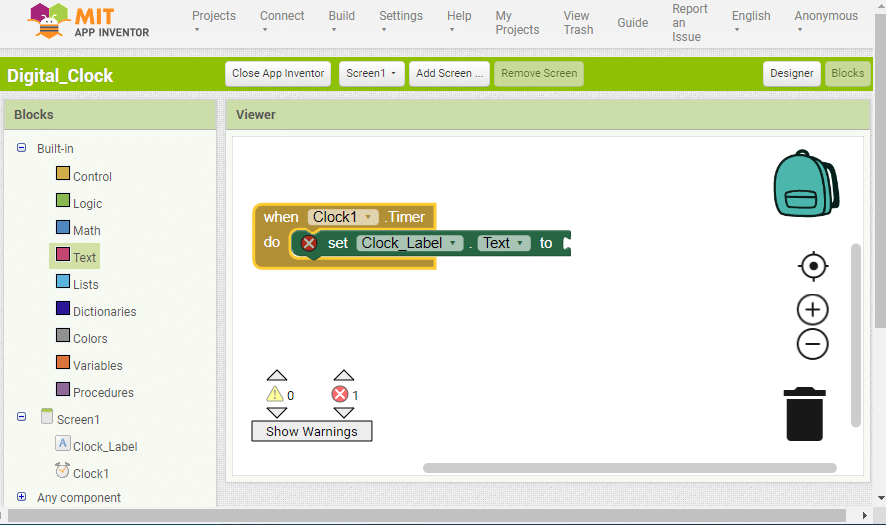
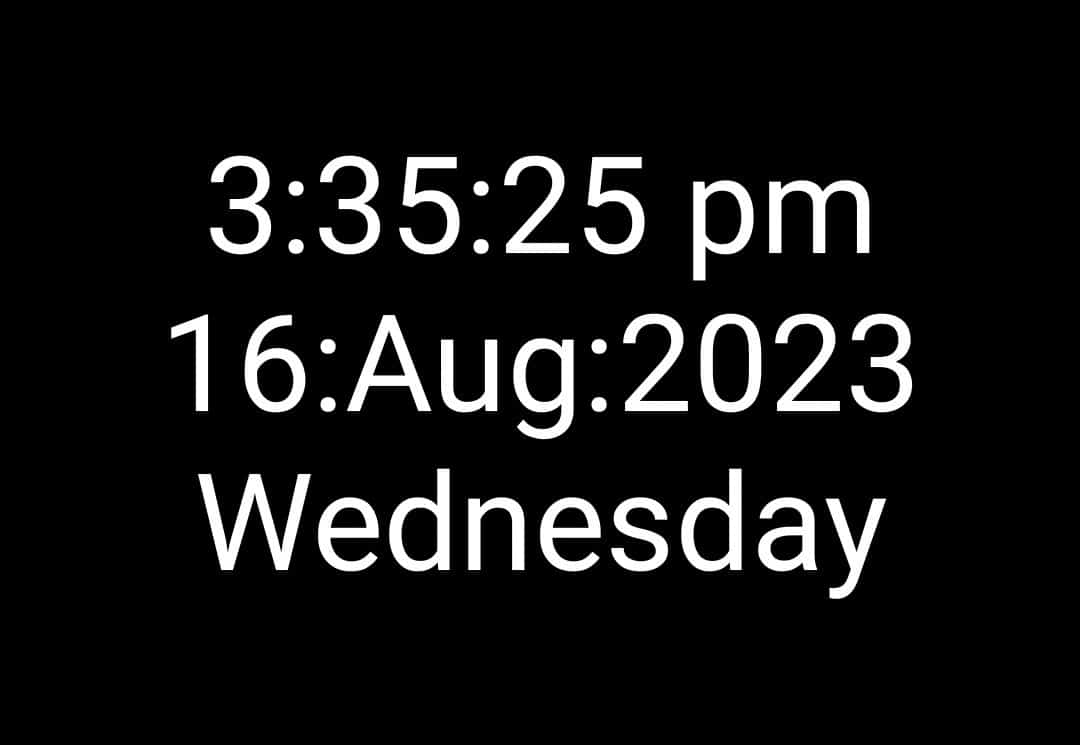
Notice the cross mark in the ‘set Clock_label.Text to’ block. This is because this block is not completely filled up. You can see the open end. Also notice the ‘Show Warnings’ message indicating one error. Remember we have set the ‘Timer Interval’ to 1 second. So, the ‘Clock1.Timer’ will be triggered every second, and we have to display the time and date as the ‘Label’ text. Figure 5 demonstrates the desired final output.
Adding strings
The final output consists of three lines, so our ‘Clock_Label.Text’ will consist of three strings.
In the ‘Blocks’ pane, under ‘Built-in’, locate ‘Text’ and select it. In the Viewer you will find a ‘join’ block which can be used for combining strings. Drag and connect this block to the open end of ‘Clock_Label.Text to’ as shown in Figure 6.
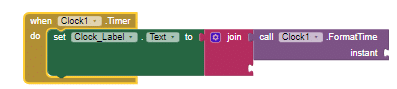
The first string we will add is the time. Click on ‘Clock1’ (in the Blocks pane) and drag ‘call Clock1.FormatTime’ to attach it to the first socket of the ‘join’ block as shown in Figure 7.
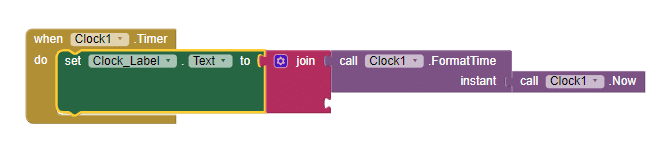
Similarly, click on ‘Clock1’ again and drag ‘call Clock1.Now’ to connect to the ‘instant’.
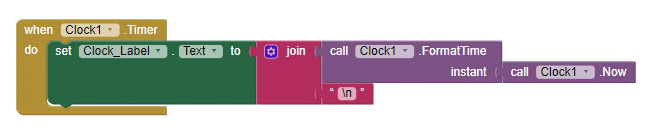
With the time string complete, proceed to add the date string on the next line. To achieve this, we have to add a new line character. Click on ‘Text’ (in the Blocks pane) and drag the empty block (the topmost one) to link with the ‘join’ socket. In the empty block, type ‘\n’.
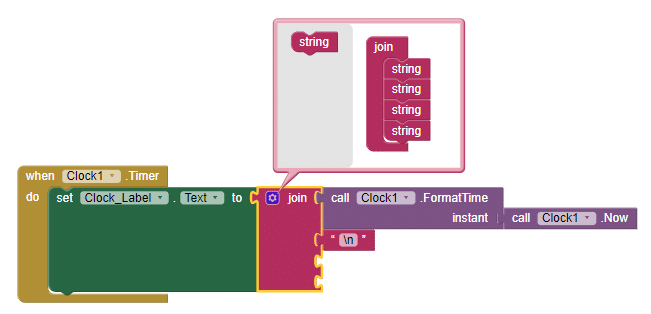
Next, incorporate the date string. For this we have to add more slots in the ‘join’ block. In this block, you can see a blue icon similar to that of Settings. Click on it and you will see the screen as shown in Figure 10.

On the right half of the new popped up window, you will see a ‘join’ block with two ‘string’ blocks already connected. Drag one of these ‘string’ blocks from the left half to the bottom of the ‘join’ block to ensure a proper connection. Repeat this step once more, resulting in two open sockets in the ‘join’ block as shown in Figure 11.
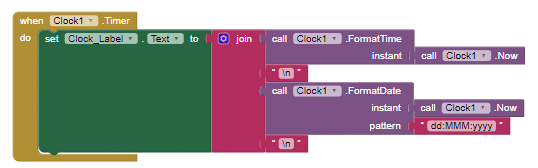
Go to Blocks, click on ‘Clock1’, drag ‘call Clock1.FormatDate’ block to attach to the ‘join’ block. Modify the pattern to dd:MMM:yyyy. Drag the ‘call Clock1.Now’ block to link with the ‘instant’ open socket as done before. Also connect the second open socket to the empty ‘Text’ block filled with ‘\n’.
Create another socket in the ‘join’ block to display the day. Introduce an additional open socket in the ‘join’ block. Drag ‘call Clock1.WeekdayName’ and connect it to the open socket. As before, pair the ‘instant’ with ‘call Clock1.Now’. This concludes the programming side of the project.
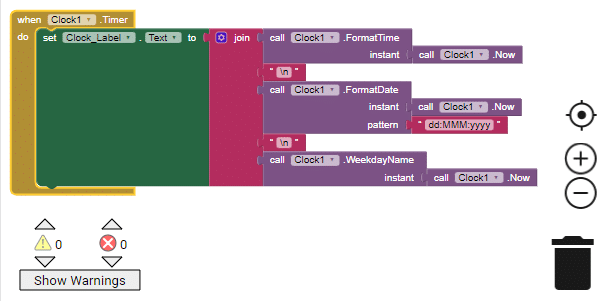
Note the Trash bin at the bottom-right corner. You can use it to remove any unused elements. Simply drag these to the Trash bin and they will disappear.
It is now time to install the application on your mobile device. Go to the Play Store, download and install ‘MIT AI2 Companion’. Go back to your browser and from the Menu bar select ‘Connect’. From the resulting drop-down menu choose ‘AI Companion’. This action will generate a QR code. Use your mobile to open ‘MIT AI2 Companion’ and scan the QR code. The app will be installed in the mobile, with a limited validity of only a few hours.
If you want to permanently install the app, return to your web browser, select ‘Build’ and click ‘Android App(.apk)’. After compilation a QR code will appear. Scan it using the mobile as before and follow the screen instructions. The app will then be installed permanently.
Adding an extension
We are not finished yet. One problem with the above code is the screen’s tendency to enter sleep mode after the set time. To maintain the screen’s continuous operation, we need to use an extension. The preferred extension for this purpose is ‘TaifunTools’ from https://puravidaapps.com. Download the extension and save it to a folder. Return to the browser, and log in if you have already logged out. Switch to ‘Designer’ mode and in the Palette, you will find the last item is ‘Extension’. Click on it to expand and reveal the ‘Import extension’. Click again and select Choose File, specifying the path and file name of the extension and import.
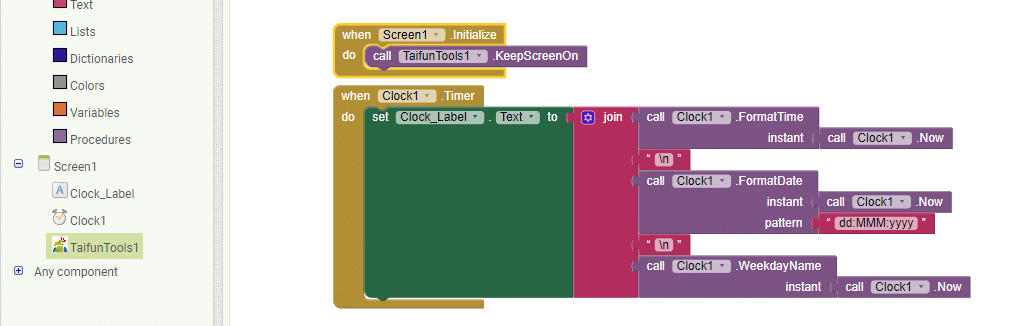
Drag ‘TaifunTools’ into the Viewer, where it will appear as a non-visible component. Switch to Blocks mode and in the Blocks pane, select ‘Screen1’. Drag the ‘when Screen1.Initialize’ block into the Viewer. Click on ‘TaifunTools1’ and drag ‘call TaifunTools1.KeepScreenOn’ to connect to ‘when Screen1.Initialize’.
Figure 14 shows the final version of the app, which will keep the screen always on. You can compile and install the same, as described earlier.


