Android is an open source stack of software that includes an operating system with a Linux kernel for handheld devices. It includes device drivers and a Java-based user interaction layer with the kernel/OS. Android is built with an aim to provide a free robust OS to all mobile and handheld devices, and a modular platform to build applications that can leverage the power of a Linux kernel in handheld devices.
The modularity in the entire stack of Android helps develop applications that can interact with the phone book, SMS driver, GPRS communication channel, etc, in a much easier fashion than possible with alternatives. Also, because it is free, it can decrease the TCO (total cost of ownership) of the phone. Given that Android works from within an open community initially formed by OHA (Open Handset Alliance) and now by Google, the abundance of freely available software for handheld devices, or rather Android-based devices, should increase once it is launched in the market.
Architecture overview
Android has a layered architecture with the total abstraction of the kernel/drivers from the application programs. The stack mainly consists of four layers. The bottom-most layer consists of the Linux kernel and device drivers. The kernel communicates with the libraries layer. The second layer is the libraries layer, which is made up of the various libraries of Android like standard graphics libraries (OpenGL), SSL, SQLite (a database library), etc.
Apart from the libraries, this layer also contains the most important part of the stack, commonly known as the Android Runtime or the DVM (Dalvik Virtual Machine). Just like the JVM, DVM abstracts applications programs from the kernel. This results in platform independency, so an application once written for Android can be run on any handheld device running Android, whatever hardware it may be running on.
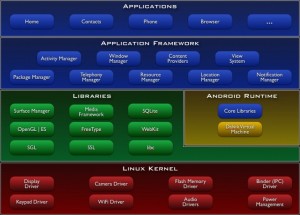
The third layer is the application framework layer, which has pre-written modules for the phone, like an activity manager, window manager, telephony manager, notification manager, location manager, etc. If we draw an analogy to the Java world, Android runtime can be extended to the JVM, and application framework can be extended to the JRE library (Java Runtime Environment). The application framework is responsible for exposing the API for application development.
On top of all these three layers is the final layer—the applications themselves. For example, a phone dialler is an application that uses the telephony management API from the application framework layer. This, in turn, will use a core library of the stack and, in turn, the serial device driver from the Linux kernel to make a call using serial commands to communicate with the GSM-based SIM card.
An architecture diagram of Android is available on Google’s site for Android at code.google.com, which has been reproduced here in Figure 1 for easy reference.
Pre-requisites
Instead of going into the depths of each library, we will focus on developing an application on the Android platform. We will focus on running the application on a simulator.
We will need the following pre-installed on a PC for the exercise:
- JDK 1.5
- Eclipse 3.3/3.4 with JDT and WST plug-ins
- The Android SDK
- Android development tools (optional)
We are carrying out the exercise on a Ubuntu 8.10 using Sun Java 1.6 and Eclipse 3.4 (Ganymede). And we used apt’ed sun-java6-bin for a Java installation. You can alternatively download JDK 1.6 for Linux from java.sun.com.
We downloaded Eclipse 3.4.1 (Ganymede) for Linux 32-bit from Eclipse.org. We also downloaded Android SDK. Installation instructions can be found at code.google.com.
Once Android SDK and Eclipse are installed (you can follow the document help.ubuntu.com/community/EclipseIDE) on Ubuntu, we started Eclipse and installed the ADT on the Android Development Toolkit. We installed it as an Eclipse plug-in from Help—>Software Updates—>Available Software—>Add—>Site—>https://dl-ssl.google.com/android/eclipse/—>Install.
Once done, you need to restart Eclipse.
Simulator and the Android Eclipse plug-in
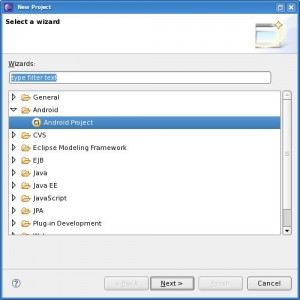
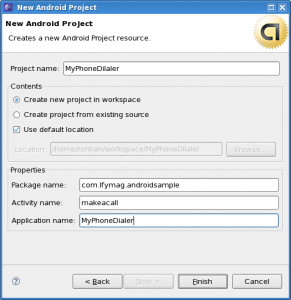
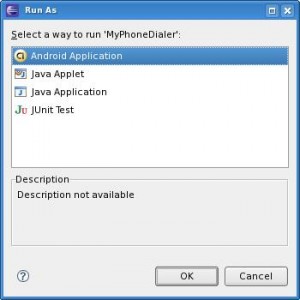
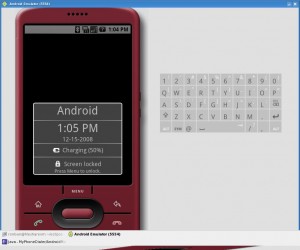
Once everything is ready, we can do some development on the Android platform. Before that we need to run the Android simulator. Figures 2, 3, 4 and 5 are some screenshots to help you get started with the Android simulator from within Eclipse.
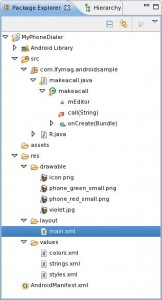
Now that we know how to run a simulator, we will go through the basics of an Android Project in the Eclipse IDE. Figure 6 shows the project hierarchy.It contains the src directory, the Android library, the resource bundle directory and the Android manifest.
Most of the work that concerns the UI of the application is contained in the resource bundle folder called res. It has three sub-directories: drawable contains all pictures/icons/photos; layout has the layout of the application screens; and values holds the language file called strings.xml, a colour definition file called colors.xml, and styles.xml, which contains all the styles of the UI components on the screen.
The AndroidManifest.xml is the manifest file or something equivalent to a deployment descriptor, which has information about the application—both descriptive and security information.
The source folder has all the sources related to the activities, viz., events on what action will be taken when buttons are clicked, etc.
Building the application
First, to build a dialler we need to create a dial pad and a place-holder for the numbers in it. Also, we have to place two buttons that will represent the dial and the cancel activities. We will group both these events under one activity called ‘makeacall’.
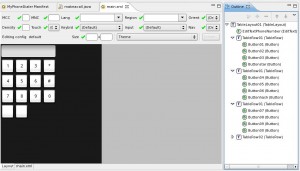
Now let’s build the UI with the layout manager. If you open the main.xml file within the res/layout/ directory in the project, it will automatically open the layout manager. There should be a visual representation of the UI as shown in Figure 7.
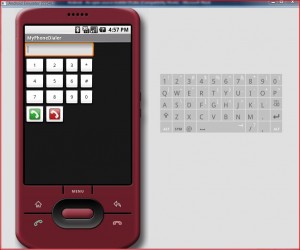
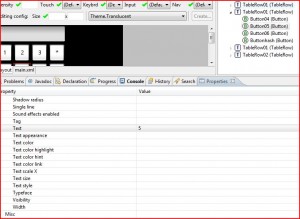
Just like AWT or Swing in Java, Android also has something called different layouts. Here, the most relevant layout for a dial pad is a TableLayout. As per the diagram, the place holder for the number is an EditText component and there are four rows represented by a layout called TableRow. Each row has four buttons represented by a component called Button. The last row contains two ImageButtons, which represent the dial and cancel buttons.Once the layout is done, we will configure a few properties for these objects (Figure 8), beautify the contents of the buttons and make them look like a real dial pad.
Once all the properties are configured, the dialler will look something like the image in Figure 9.
The last step is to write the activities. Our activity ‘makeacall’ will look like the code presented below:
package com.lfymag.androidsample;

import android.app.Activity;
import android.content.ActivityNotFoundException;
import android.content.ContentUris;
import android.content.Intent;
import android.net.Uri;
import android.os.Bundle;
import android.widget.Button;
import android.widget.EditText;
import android.util.Log;
import android.view.View;
import android.view.View.OnClickListener;

public class makeacall extends Activity {

EditText mEditor;
/** Called when the activity is first created. */
@Override
public void onCreate(Bundle savedInstanceState) {
super.onCreate(savedInstanceState);
setContentView(R.layout.main);
mEditor = (EditText) findViewById(R.id.EditTextPhoneNumber);

/**
* A call-back for when the user presses the number buttons.
*/
OnClickListener mDialPadListener = new OnClickListener() {
public void onClick(View v) {
StringBuffer previousNumber = new StringBuffer(mEditor.getText().toString());
CharSequence phoneDigit = ((Button)v).getText();
mEditor.setText(previousNumber.append(phoneDigit));
}
};
/**
* A call-back for when the user presses the call button.
*/

OnClickListener mPhoneCallListener = new OnClickListener() {
public void onClick(View v) {
call(mEditor.getText().toString());
}
};

// Hook up button presses to the appropriate event handler.
((Button) findViewById(R.id.Button00)).setOnClickListener(mDialPadListener);
((Button) findViewById(R.id.Button01)).setOnClickListener(mDialPadListener);
((Button) findViewById(R.id.Button02)).setOnClickListener(mDialPadListener);
((Button) findViewById(R.id.Button03)).setOnClickListener(mDialPadListener);
((Button) findViewById(R.id.Button04)).setOnClickListener(mDialPadListener);
((Button) findViewById(R.id.Button05)).setOnClickListener(mDialPadListener);
((Button) findViewById(R.id.Button06)).setOnClickListener(mDialPadListener);
((Button) findViewById(R.id.Button07)).setOnClickListener(mDialPadListener);
((Button) findViewById(R.id.Button08)).setOnClickListener(mDialPadListener);
((Button) findViewById(R.id.Button09)).setOnClickListener(mDialPadListener);
((Button) findViewById(R.id.Buttonstar)).setOnClickListener(mDialPadListener);
((Button) findViewById(R.id.Buttonhash)).setOnClickListener(mDialPadListener);

((Button) findViewById(R.id.ImageButtonDial)).setOnClickListener(mPhoneCallListener);

}

private void call(String phoneNumber) {
try {
Intent callIntent = new Intent(Intent.ACTION_CALL);
callIntent.setData(Uri.parse(“tel:”+ phoneNumber));
startActivity(callIntent);
} catch (ActivityNotFoundException activityException) {
Log.e(“dialing-example”, “Call failed”, activityException);
}
}
}
Run it and we have a custom dialler on a phone.
Going forward with Android
Just like the dialler, Android supports multiple other APIs including some interesting GIS/GPS to work in cohesion with Google Maps. The modular architecture of Android differentiates the hardware functions and software applications in such a seamless manner that building applications on niche technology areas like GPS, VoIP, etc, is easily achievable by every developer with minimal efforts.
After doing a little bit of Android development, you might be interested in knowing about the award-winning application on Android called “CompareEverywhere” written by Jeffrey Sharkey from Montana State University, who won $250,000 for it. So start building your applications today and who knows, it might be you who bags the award the next time.



Fail, you do not interrupt the call because it is imposible xD
Fail, you do not interrupt the call because it is imposible xD
Is Eclipse really this buggy? Every time I follow instructions like the above, I run the risk (about 1 out of 3 times) of gettins Eclipse stuck in this loop, where it complains that it can't resolve 'R.layout.main' nor R.id.*, but if I allow the quick fix, it pulls in the WRONG R.
The only workaround I have found for this is clearly unacceptable: delete the project, exit eclipse and start all over again. Then I may still get the error message, but it will at least launch the Emulator, re-read main.xml, and find R.layout.main, successfully completing the build.
private void call(String phoneNumber) {
try {
Intent callIntent = new Intent(Intent.ACTION_CALL);
callIntent.setData(Uri.parse(“tel:”+ phoneNumber));
startActivity(callIntent);
} catch (ActivityNotFoundException activityException) {
int dialing;
int example;
Log.e(“dialing-example”, “Call failed”, activityException);
this part is giving me and error. how do i fix
}