Before we look at KVM, let’s go over what virtualisation is, in the context of the technologies available and then move on to what makes KVM different and how easy it is to use.
‘Virtualisation’ means the simulation of a computer system, in software. The virtualisation software creates an environment for a ‘guest’, which is a complete OS, to execute within this created world. This means that the view that should get exported to the guest should be of a complete computer system, with the processor, system peripherals, devices, buses, memory and so on. The virtualisation software can be strict about what view to export to the guest—for example, the processor and processor features, types of devices, buses exported to the guest—or it can be flexible, with the user getting a choice of selecting individual components and parameters.
There are some constraints to creating a virtualised environment. A set of sufficient requirements noted by Popek and Goldberg in their paper on virtual machine monitors are:
- Fidelity: Software that is running in a virtualised environment should not be able to detect that it is actually being run on a virtualised system.
- Containment: Activities within a virtual machine (VM) should be contained within the VM itself without disturbing the host system. A guest should not cause the host, or other guests running on the host, to malfunction.
- Performance: Performance is crucial to how the user sees the utility of the virtualising environment. In this age of extremely fast and affordable general-purpose computer systems, if it takes a few seconds for some input action to get registered in a guest, no one will be interested in using the virtual machine at all.
- Stability: The virtualisation software itself should be stable enough to handle the guest OS and any quirks it may exhibit.
There are several reasons why one would want virtualisation. For data centres, it makes sense to run multiple servers (Web, mail, etc) on a single machine. These servers are mostly under-utilised, so clubbing them on one machine with a VM for each of the existing machines, makes way for fewer machines, less rack-space and lower electricity consumption.
For enterprises, serving users’ desktops on a VM simplifies management, IT servicing, security considerations and costs by reduced expenditure on desktops.
For developers, testing code written for different architectures or target systems becomes easier, since access to the actual system becomes optional. For example, a new mobile phone platform can be virtualised on a developer machine rather than actually deploying the software on the phone hardware each time, allowing for the software to be developed along with the hardware. The virtualised environment can also be used as validation for the hardware platform itself before going into production to avoid costs arising later due to changes that might be needed in the hardware.
There are several such examples that can be cited for any kind of application or use. It’s not impossible to imagine a virtualised system being beneficial anywhere a computer is being used.
Now is a good time to get acquainted with some terms (the mandatory alphabet soup) that we’ll be using throughout the article:
- VM: Virtual Machine
- VMM: Virtual Machine Monitor
- Guest OS: The OS that is run within a virtual machine
- Host OS: The OS that runs on the computer system
- Paravirtualised guest: The guest OS that is modified to have knowledge of a VMM
- Full virtualisation: The guest OS is run unmodified in this environment
- Hypervisor: An analogous term for a VMM
- Hypercall: The medium that a paravirtualised guest and the VMM communicate on
Types of VMM
There are several virtual machine monitors available. They differ in various aspects like scope, motivation, and method of implementation. A few types of monitor software are:
- ‘Native’ hypervisors: These VMMs have an OS associated with them. A complete software-based implementation will need a scheduler, a memory management subsystem and an IO device model to be exported to the guest OS. Examples are VMWare ESX server, Xen, KVM, and IBM mainframes. In IBM mainframes, the VMM is an inherent part of the architecture.
- Containers: In this type of virtualisation, the guest OS and the host OS share the same kernel. Different namespaces are allocated for different guests. For example, the process identifiers, file descriptors, etc, are ‘virtualised’, in the sense a PID obtained for a process in the guest OS will only be valid within that guest. The guest can have a different userland (for example, a different distribution) from the host. Examples are OpenVZ, FreeVPS, and Linux-Vserver.
- Emulation: Each instruction in the guest is emulated. It is possible to run code compiled for different architectures on a computer, like running ARM code on a PowerPC machine. Examples are qemu, pearpc, etc. qemu supports multiple CPU types, and runs ARM code under x86 as well as x86 under x86, whereas pearpc only emulates the PPC platform.
Hardware support on x86
Virtualising the x86 architecture is difficult since the instruction and register sets are not compatible with virtualisation. Not all access to privileged instructions or registers raises a trap. So we either have to emulate the guest entirely, or patch it at run-time to behave in a particular way.
With the two leading x86 processor manufacturers, Intel and AMD, adding virtualisation extensions to their processors, virtualising the x86 platform seamlessly has become easier. The ideas in their virtualisation extensions are more or less the same, with the implementation, instructions and register sets being slightly different.
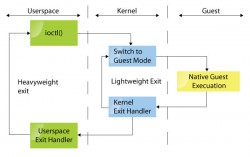
The new extensions add a new mode, ‘guest mode’, in addition to the user-mode and kernel-mode that we had (ring -1 in addition to the rings 0-3, with the hypervisor residing in ring -1). The implementations also enable support for hiding the privileged state. Disabling interrupts while in guest mode will not affect the host-side interrupts in any way.
The KVM way
For KVM, the focus is on virtualisation. Scheduling of processes, memory management, IO management are all pieces of the puzzle that were already available. It didn’t make sense writing all those components again, especially since the software available was in wide use, was very well tested (hence stable), and written by experts in the field.
The way KVM solves the virtualisation problem is by turning the Linux kernel into a hypervisor. Scheduling of processes and memory management is left to Linux. Handling IO is left to qemu, which can run guests in userspace and has a good device model. A small Linux kernel module has been written and it introduces the ‘guest’ mode, sets up page tables for the guest and emulates some instructions.
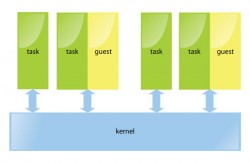
This fits nicely into the UNIX mindset of doing one thing and doing it right. So the kvm module is all about enabling the guest mode and handling virtualised access to registers. From a user’s perspective, there’s almost no difference in running a VM with KVM disabled and running a VM with KVM enabled, except, of course, the significant speed difference (Figure 1).
The philosophy also extends to the development and release philosophy Linux is built on: release early and often. This allows for fast-paced development and stabilisation. Developers can track the latest and greatest codebase and keep enhancing it.
The latest stable release is part of Linux 2.6.x, with bug fixes going in 2.6.x.y. The KVM source code is maintained in a git tree. To get the latest KVM release or the latest git tree, head to kvm.qumranet.com for download details.
Using KVM
First, since KVM only exploits the recent hardware advances, you should make sure you have a processor that supports the virtualisation extensions. This can be quickly found out by using the following command:
egrep ‘^flags.*(vmx|svm)’ /proc/cpuinfo
If there’s any output, it means the necessary capability to run KVM exists on the CPU. If you have a CPU that’s less than three years old, you’re set.
You now need to run a recent 2.6 Linux kernel. If you already run a recent Linux kernel with KVM either compiled in the kernel or compiled as modules, you can work with it if you don’t want to compile the modules yourself. All the distributions these days ship kvm modules by default, so getting KVM is just a matter of fetching the necessary packages from your distribution’s site if they’re not already installed.
There are two parts to KVM: the kernel modules and the userspace support, which is a slightly modified version of qemu.
You can also download the KVM sources from kvm.qumranet.com/kvmwiki/Downloads.
Building the userspace utilities from the tarball needs to have a few libraries present. The detailed list and instructions are given at kvm.qumranet.com/kvmwiki/HOWTO.
Once you have the kernel module and the userspace tools installed (either by building or installing from your distribution packages), the first thing to do is create a file that will hold the guest OS. We have previously seen how to do that using the virt-manager GUI in January. If you like using the command prompt, which is my preferred way of doing it, here’s a quick tutorial:
$ qemu-img create -f qcow debian-lenny.img 10G
This will create a file called debian-lenny.img of size 10G in the ‘qcow2’ format. There are a few other file formats supported, each with their advantages and disadvantages. The qemu documentation has details.
Once an image file is created, we’re ready to install a guest OS within it. First, insert the kvm kernel modules in the kernel if they have been compiled as modules.
$ sudo modprobe kvm
$ sudo modprobe kvm-intel
…or:
$ sudo modprobe kvm-amd
On Debian-based systems you can add yourself to the ‘kvm’ group:
$ sudo adduser user kvm
Logout and login again, and you can then start the VMs without root privileges.
$ qemu-system-x86_64 -boot d -cdrom /images/debian-lenny.iso -hda debian-lenny.img
On Fedora, this is:
# qemu-kvm -boot d -cdrom /images/debian-lenny.iso -hda debian-lenny.img
This command starts a VM session. Once the install is completed, you can run the guest with the following command:
$ qemu-system-x86_64 debian-lenny.img
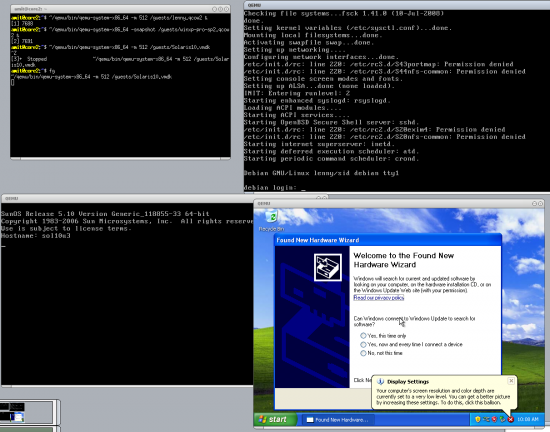
You can also pass the -m parameter to set the amount of RAM the VM gets. The default value is 128 M.
Recent KVM releases have support for swapping guest memory, so the RAM allocated to the guest isn’t pinned down on the host.
Troubleshooting
There will be times when you run into some bugs in VMs with KVM. In such cases, there will be some output in the host kernel logs. That can help you search for similar problems reported earlier and any solutions that might be available. In most cases, upgrading to the latest KVM release and running it might fix the problem.
In case you don’t find a solution, running the VM by passing the -no-kvm command line to qemu will start it without KVM support. If this also doesn’t solve the problem, it means the problem lies in qemu itself.
Another thing to try out might be to pass the -no-kvm-irqchip parameter while starting a VM.
You can also ask on the friendly #kvm IRC channel at Freenode, or on the kvm at vger.kernel dot org mailing list, and someone will help you out.
qemu monitor
The qemu monitor can be entered by typing the Ctrl+Alt+2 key combination when the qemu window is selected, or by passing -monitor stdio to the qemu command line. The monitor gives access to some debugging commands and those that can help inspect the state of the VM.
For example, info registers show the contents of the registers of the virtual CPU. You can also attach USB devices to a VM, change the CD image and do other interesting things via the qemu monitor.
Migration of VMs
Migrating VMs is a very important feature for load-balancing, hardware upgrades, and software upgrades for zero or very minimal downtime. The guests are migrated from one physical machine to another, and the original machine can then be taken down for maintenance.
The advantage in the KVM approach is that the guests are not involved at all in the migration. Also, nothing special needs to be done to tunnel a migration through an SSH session, to compress the image being migrated, etc. You can even pass the image through any program you want before it’s transmitted to the target machine. The UNIX philosophy holds good here as well. Also, unless specific hardware or host-specific features are enabled, the migration can be made between any two machines. Moreover, stopped guests can be migrated as well as live guests. We add the migration facility within qemu, so no kernel-side changes are needed to enable it. The device state-syncs to achieve migration, and the VM state is seamlessly provided and managed within userspace.
On the target machine, run qemu with the same command-line options as was given to the VM on the source machine, with additional parameters for migration-specific commands:
$ qemu-system-x86_64 -incoming <protocol://params>
Example:
$ qemu-system-x86_64 -m 512 -hda /images/f10.img -incoming params
On the source machine, start migration using the ‘migrate’ qemu monitor command:
(qemu) migrate <migration-protocol://params>
An example of the source qemu monitor command:
(qemu) migrate tcp://dst-ip:dst-port
…while the command-line parameter of the target qemu migration is:
-incoming tcp://0:port
Migration support in qemu is currently being overhauled to a newer, simpler version, and more functionality is being added. Support for some previously-supported functionality, like migration via SSH or via a file isn’t added yet in the new infrastructure—could be an interesting area for people looking to contribute to explore.
Advantages of the KVM approach
There are several advantages in doing things the Linux way: we reuse all the existing software and infrastructure available, and no new commands need to be learned and not many need to be introduced. For example, kill(1) and top(1) work as expected on the guest task on the host system. The guests are scheduled as regular processes. As we saw in Figure 1, each guest consists of two parts: the userspace part (qemu) and the guest part (the guest itself). The guest physical memory is mapped in the task’s virtual memory space, so guests can be swapped as well. Virtual processors in a VM are merely threads in the host process.
When KVM was initially written, the design parameters were to support x86 hosts, focus only on full virtualisation (no modifications to guest OS) and with no modifications to the host kernel. However, as KVM started gaining developers and interesting use-cases, things changed. Because of the simple and elegant solution, developers took a liking to the approach and new architecture ports for s390, PowerPC and IA-64 were added within months of starting the ports. Paravirtualisation support also has been added, and pv drivers for net and block devices are available. If a guest OS can communicate with the host, several activities can be speeded up, like network activity or disk IO. Also, modifications to the host OS (Linux) that improve scheduling and swapping, among other things, were proposed and accepted.
KVM seamlessly works across all machine types: servers, desktops, laptops, and even embedded boards. Let’s look at each, one by one.
- Servers: There’s the distinct advantage of being able to use the same management tools and infrastructure as Linux uses. KVM integrates with the Linux scheduler, IO stack, all available filesystems and supports live migration; it has ready support for NUMA and 4096-processor machines.
- Desktops/laptops: KVM works on anything Linux works on. The normal desktop doesn’t change. You can suspend/resume work as expected, even while virtual machines are running.
- Embedded: Linux already supports lots of boards, architectures and machine types. Real-time scheduling is supported. And if you’re wondering why one would want to use virtualisation on an embedded machine, here are a few of the many reasons: to sandbox untrusted code, reliable remote kernel upgrades, uniprocessor software on multiprocessor cores, running legacy applications, etc.
All this highlights the differences between KVM and some of the other virtualising solutions.
There’s a lot of ongoing work to stabilise KVM and improve the performance of the block and net paravirtualised drivers. There is also some development activity in the regression test suite framework that’s ongoing. If you’re looking to contribute to KVM, these areas are waiting for you!


