
Before installing iSCSI (Internet Small Computer Systems Interface) on Openfiler, let’s cover some of its basics.
The SCSI standard is used to connect high-speed peripherals (especially hard disks) to computers. It can connect up to seven devices to a single controller. Over a period of time, the requirements have changed to connect various devices on a network rather than on an individual computer. This required the SCSI protocol to be mapped to network transport protocols.
iSCSI enables SCSI packets to be transferred over TCP/IP (Ethernet). Just think about it — iSCSI enables access to disks across the network — not only to the local network, but even across the Internet. iSCSI requires an initiator (the client system, in this case, a desktop PC) and a target (the storage device — here, Openfiler).
SCSI data is transferred via an iSCSI session in five layers. The bottom three layers, Transport (TCP), Internet (IP) and Network Interface (Link) belong to the TCP/IP stack. iSCSI sits between the SCSI and transport layer, encapsulating and de-encapsulating packets.
Consider a case of a write cycle — the iSCSI initiator will send SCSI packets through the SCSI layer down to the Link layer. After data transfer to the target, it will go up from the Link layer to the SCSI layer to be written on the disk. The many important benefits of iSCSI are:
- It uses standard Ethernet devices and works on TCP/IP
- It eliminates distance limitations; remote replication over the Internet is possible
- It is documented in RFC3720 by the IETF (Internet Engineering Task Force)
- It is supported by Intel, Cisco, various Linux flavours and other OSs
Creating an iSCSI target
Let’s now proceed to the installation of an iSCSI target in Openfiler. Open the Openfiler Web interface; proceed to Services –> iSCSI Target Server and enable the service. To create an iSCSI volume: Volume –> Add Volume –> Volume Name iSCSI1 –> 100000 MB –> Volume type –> iSCSI. Add a new iSCSI target from Volumes –> Target. (See Figure 1; I used the default target name, you can edit and change it, if required.)

The target now needs to be mapped to a LUN (Logical Unit Number) used to identify a SCSI disk, from a stack of a maximum of seven disks. Click the MAP button to complete this step (Figure 2).

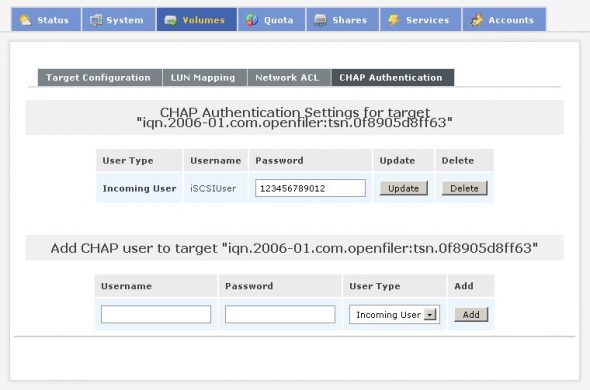
Under Network ACL, allow access to the required network subnet. Complete the setup by assigning the CHAP Authentication username and password (Figure 3).
The Openfiler iSCSI set-up is now complete.
The client setup
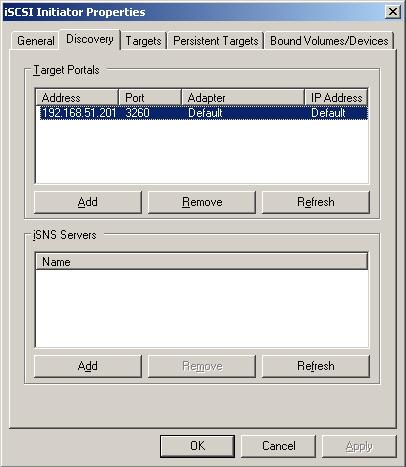
Download and install iSCSI Initiator on your client box. Go to the Discovery tab and add a target portal (the IP address and default port 3260). See Figure 4.
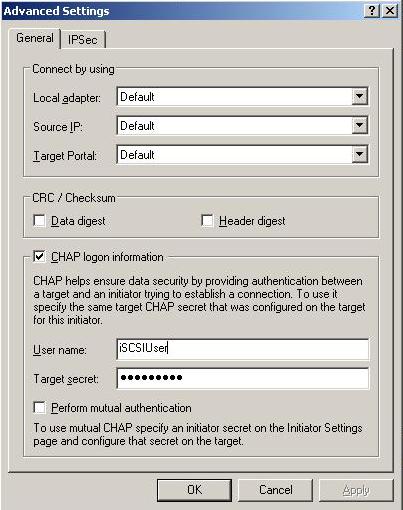
Proceed by clicking on Targets –> Logon –> Advanced –> CHAP logon information –> User name and Password as defined earlier in iSCSI target setup in Openfiler (see Figure 5).
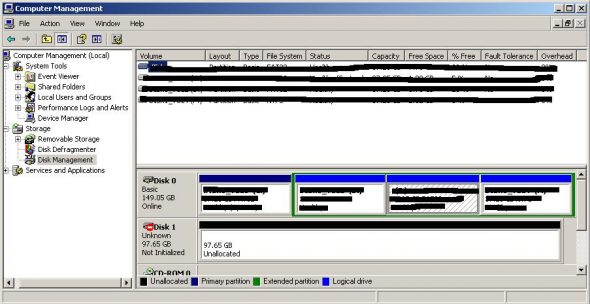
You should see the new device detected. Format the device, make partitions, format them, and start using your Openfiler iSCSI drive as if it were a local machine drive.
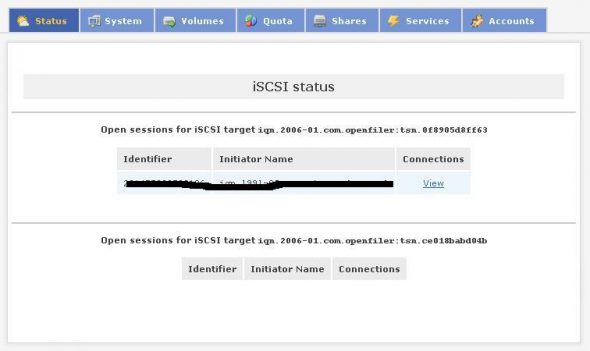
You can check open sessions in Openfiler by selecting Status –> iSCSI targets (Figure 7).
In a nutshell, Openfiler provides an excellent iSCSI target, usable by various client operating systems as local storage. The various deployment scenarios detailed on the Openfiler website are:
| Storage Area Networking | Network Attached Storage |
|
|
To sum up, Openfiler is a great file server, and supports various configurations including:
- Various access methods such as FTP, NFS, CIFS, HTTP/DAV, rsync, etc.
- Network access controls.
- Group- and user-based quota allocation.
- Various RAID levels to improve data reliability.
- Bonded interfaces to increase network throughput/Ethernet redundancy.
- Intuitive Web interface for configuration.
- Uses the full potential of 64-bit CPUs for excellent performance (the latest release is only for 64-bit CPUs).
- Scalability to a capacity of more than 60 TB.
- Last, but not the least, it is open source, with great community support.
The latest stable release of Openfiler is 2.99; one of the most important additions is GUI-based configuration for High-Availability (HA) clusters. Keep a watch on this column for more articles on various Linux distros!




[…] Storage Management using Openfiler, Part 4 […]
These lessons fill a great need. I am so grateful. Thank you very much. I have used Openfiler as a iSCSI target for my VMware ESXi study. I passed the cert exam. These four tutorials were a small part of what helped me become a VCP 5.1. Many Thanks. Jim in Dallas