The first article in this series discussed the basic installation and configuration of IPCop 1.4.21. Subsequent articles discussed five important add-ons used to enhance IPCop’s functionality: Advanced Proxy, URL Filter, Update Accelerator, Calamaris and Block Outgoing Traffic. Here, we will look at how to extend IPCop to incorporate a site to host OpenVPN, using the Zerina add-on.
Before we begin, let us try to understand some of the basics about Virtual Private Networks (VPNs). There are two basic types of VPNs:
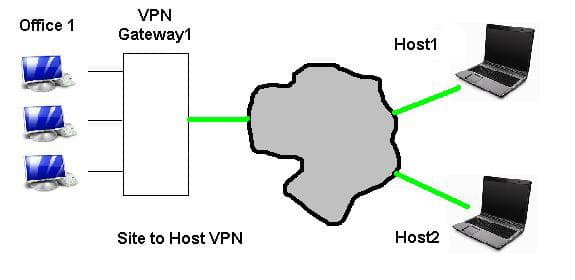
- Transport mode VPN: Consider one remote host (notebook) that requires to communicate with the office network using a public Internet connection. To ensure confidentiality and integrity of the communication, all traffic must be encrypted. This functionality is provided by a VPN gateway, typically configured on a firewall. Transport mode VPN is primarily used to establish secure host-to-network communication (and sometimes between two hosts). Refer to Figure 1. In a transport mode VPN, the host initiates the connection to the VPN gateway, negotiates various protocols and establishes a secure connection. The connecting external hosts are aware that traffic to the office network is through a VPN.
- Tunnel mode VPN: IPSec VPN tunnel mode is primarily used to establish connections between two sites, though it can also be used for host-to-network connections. We’ll discuss more about IPSec VPN tunnels in another article.

GNU implementation of VPN
OpenVPN is open source VPN software. And as described on the project website, it enables you to:
- tunnel any IP sub-network or virtual Ethernet adapter over a single UDP or TCP port;
- configure a scalable, load-balanced VPN server farm using one or more machines, which can handle thousands of dynamic connections from incoming VPN clients;
- use all of the encryption, authentication and certification features of the OpenSSL library to protect your private network traffic as it transits the Internet.
OpenVPN is available in repositories of most Open Source distros, such as Debian, Ubuntu, Fedora, FreeBSD and Maemo. The OpenVPN client is available for MS Windows, Mac OS and Android (it works on rooted devices).
With the basics covered, let’s move on to Zerina!
Zerina
The Zerina add-on adds an OpenVPN server functionality to IPCop. Let’s set it up and access the office network using a Windows-based client.
Download the latest Zerina binaries; SCP them to the IPCop box; log in via SSH (don’t forget: TCP port 222); and then extract the Zerina gzip file in a new folder. Note that these binaries were developed long ago for IPCop 1.4.15. To install on IPCop 1.4.21, we need to tweak the installer. Edit the install file using any text editor. Find the if condition line with “1.4.15” (see Figure 2) and change it to “1.4.21”. Save and quit.

Run ./install, which adds an OpenVPN menu under VPNs in the IPCop Web GUI (HTTPS, port 445). Navigate here and the first step is to click the “Generate Root/Host Certificates” button. Fill up the required fields and generate the certificate.
Proceed to “Roadwarrior Client status and control” and add a client certificate for the desired host. Enter a complex password here; you will need it to establish the VPN connection. Now, the VPNs –> OpenVPN page will show the completed configuration including root certificates, client certificates and buttons, and we can start/stop the OpenVPN server. Click Start. The OpenVPN server listens on UDP port 1194 for possible incoming connections from remote hosts. Figure 3 shows the running server’s status page.

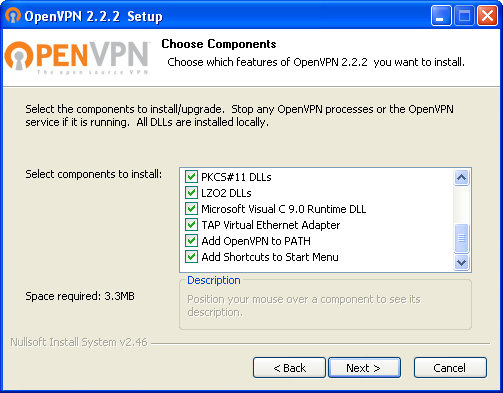
This completes Zerina’s installation. Next, let’s install and configure an OpenVPN client on a Windows desktop. Download the latest stable release installer for your OS (I used 32-bit Windows). Run the installer and complete the installation steps, including choosing all options, as in Figure 4.

From the IPCop Web GUI, download the earlier-generated OpenVPN client certificate’s zip file (Figure 5), and extract its contents (two files, with extensions .p12 and .ovpn) in the C:\Program Files\OpenVPN\Config folder.

Initiate a VPN connection by right-clicking the OpenVPN system-tray icon and choosing Connect. Enter the client certificate password to establish the VPN connection. You can verify the connection using a simple ping command to any office host’s IP address.
View established VPN connections in the IPCop Web GUI — roadwarrior client status (Figure 6) is ‘OPEN’. OpenVPN’s connection statistics (Figure 7) show the last activity and data transfer details.


Real-life story
A company planned 75 VPN clients for its field personnel. After seeking a proposal from a commercial firewall vendor, they found that the client licensing cost was more than Rs 100,000. Here, installing OpenVPN-enabled IPCop was practically free! The IPCop was installed as a VPN gateway, BlockOutgoing Traffic was used to allow only OpenVPN traffic.
Tips for OpenVPN installation
Client side:
- On client systems, configure desktop firewalls to allow OpenVPN traffic.
- Run the OpenVPN installer, as well as start OpenVPN, as the administrator — for Windows Vista and later versions.
Server side:
- If your VPN connection drops intermittently, visit VPNs –> OpenVPN in the IPCop Web GUI. Stop the VPN server, configure Advanced Server Options with keep-alive and ping/ping-restart with 10 and 60 seconds respectively. Save the options and start the OpenVPN server again.
- Typically, VPN requires static IP address on server side. IPCop supports DynDNS service, which can be leveraged to setup VPN server on dynamic IP addresses.
Feature image courtesy: Ivan Hernández. Cropped and reused under the terms of CC-BY 2.0 License.


