
A combination of the power of Hadoop and the speed of Lustre bodes well for enterprises. In this article, the author shows how Hadoop can be set up over Lustre. So those who love to play around with software, heres your chance!
Hadoop is a large-scale, distributed, open source framework for the parallel processing of data on large clusters built out of commodity hardware. While it can be used on a single machine, its true power lies in its ability to scale to hundreds or thousands of computers, each with several processor cores. Hadoop is also designed to efficiently distribute large amounts of work across a set of machines.
Hadoop is built in two main partsa special file system called Hadoop Distributed File System (HDFS) and the MapReduce Framework. HDFS is an optimised file system for distributed processing of very large data sets on commodity hardware. HDFS stores data on the compute nodes, providing very high aggregate bandwidth across the cluster. Hadoop implements a computational paradigm named MapReduce, by which the application is divided into many small fragments of work, which can each be executed or re-executed on any node in the cluster. Both MapReduce and the HDFS are designed so that node failures are automatically handled by the framework.
Hadoop runs on the master-slave architecture. An HDFS cluster consists of a single Namenode, a master server that manages the file systems namespace and regulates access to files by clients. There are a number of DataNodes, usually one per node in a cluster. The DataNodes manage storage attached to the nodes that they run on. HDFS exposes a file systems namespace and allows user data to be stored in files. A file is split into one or more blocks and a set of blocks are stored in DataNodes. DataNodes serve read and write requests, and perform block creation, deletion and replication upon instruction from Namenode.
Lustre, on the other hand, is an open source distributed parallel file system. It is a scalable, secure, robust and highly-available cluster file system that addresses I/O needs such as low latency and the extreme performance of large computing clusters. Lustre is basically an object-based file system. It is composed of three functional components: metadata servers (MDSs), object storage servers (OSSs) and clients. An MDS provides metadata services. It stores file system metadata such as file names, directories and permissions. The availability of the MDS is critical for file system data. In a typical configuration, there are two MDSs configured for high-availability failover. Since an MDS stores only metadata, the storage or metadata target (MDT) attached to the file system need only store hundreds of gigabytes for a multi-terabyte file system. One MDS per file system manages one MDT. Each MDT stores file metadata, such as file names, directory structures and access permissions.
Why Lustre and not HDFS?
The Hadoop Distributed File System works well for general statistical applications, but it might exhibit performance bottlenecks for complex computational applications like HPC or high performance computing-based applications that generate large, even increasing outputs. Second, HDFS is not POSIX-compliant, which means it cannot be used as a normal file system, which makes it difficult to extend. Also, HDFS has a WORM (write-once, read-many) access model, so changing even a small part of a file requires that all file data be copied, resulting in very time-intensive file modifications. Hadoop implements a computational paradigm named MapReduce, where the Reduce node uses HTTP to shuffle all related big Map Task outputs before the real task begins. This consumes a massive amount of resources and generates a lot of I/O and merge spill operation.

Setting up the Metadata server
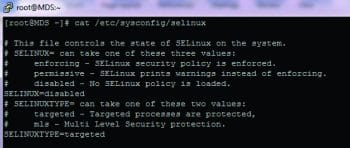
I assume that you have CentOS/RHEL 6.x installed on your hardware. I have RHEL 6.x available and will be using it for this demonstration. This should work for CentOS 6.x versions too. The firewall and SELinux both need to be disabled. You can disable the firewall using the iptables command, whereas SELinux can be disabled by changing it in the file /etc/sysconfig/selinux
SELINUX=disabled
Next, lets install Lustre-related packages through the Yum repository.
#yum install lustre
Reboot the machine to boot into the Lustre kernel. Once the machine is up, verify the Lustre kernel through the following command:
#uname -arn
Linux MDS 2.6.32-279.14.1.el6_lustre.x86_64 #1 SMP x86_64 x86_64 x86_64 GNU/Linux
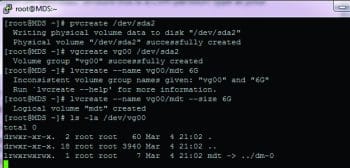
Create a LVM partition on /dev/sda2 (ensure this is a LVM partition type at your end). Refer to Figure 3.
#pvcreate /dev/sda2 #vgcreate vg00 /dev/sda2 #lvcreate name vg00/mdt size 6G #ls -al /dev/vg00
Run the mkfs.lustre utility to create a file system named Lustre on the server including the metadata target and the management server.
Now, create a mount point and start the MDS node as shown below:
# mkdir /mdt
# mount -t lustre /dev/vg00/mdt /mdt
Run the mount command to verify the overall setting:
# mount
Ensure the MDS related services are enabled:
[root@MDS ~] # modprobe lnet
[root@MDS ~] # lctl network up
[root@MDS ~] # lctl list_nids
192.168.1.185@tcp
This completes MDS configuration.
Setting up the Object Storage Server (OSS1)
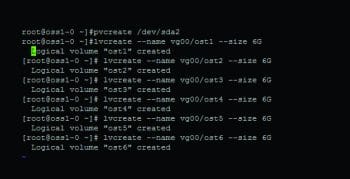
An Object Storage Server needs to be set up on a separate machine. I assume Lustre has been installed on a separate box and booted into the Lustre kernel. As we did earlier for MDS, we need to create several logical volumes, namely, ost1 to ost6, as shown in Figure 4.
Use the mkfs.lustre command to create the Lustre file systems as shown below:
[root@oss1-0 ~] # mkfs.lustre --fsname lustre --ost --mgsnode=192.168.1.185@tcp0 /dev/vg00/ost1
Run the above command for ost1 to ost6, in a similar way. Verify the various logical volumes created, as shown below:
#mount t lustre /dev/vg00/ost1 /mnt/ost1 mkfs.lustre --fsname lustre --ost --mgsnode=192.168.1.185@tcp0 /dev/vg00/ost2 mkfs.lustre --fsname lustre --ost --mgsnode=192.168.1.185@tcp0 /dev/vg00/ost3 mkfs.lustre --fsname lustre --ost --mgsnode=192.168.1.185@tcp0 /dev/vg00/ost4 mkfs.lustre --fsname lustre --ost --mgsnode=192.168.1.185@tcp0 /dev/vg00/ost5 mkfs.lustre --fsname lustre --ost --mgsnode=192.168.1.185@tcp0 /dev/vg00/ost6
Its time to start the OSS by mounting the OSTs to the corresponding mount point:
#mount t lustre /dev/vg00/ost2 /mnt/ost2 #mount t lustre /dev/vg00/ost3 /mnt/ost3 #mount t lustre /dev/vg00/ost4 /mnt/ost4 #mount t lustre /dev/vg00/ost5 /mnt/ost5 #mount t lustre /dev/vg00/ost6 /mnt/ost6
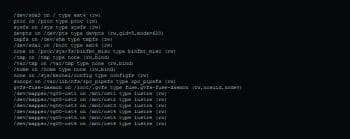
Finally, the mount command will display the logical volumes, as shown in Figure 5.
# mount
Verify the relative device displays as shown:
# cat /proc/fs/lustre/devices
This completes the OSS1 configuration.
Follow similar steps for OSS2 (as shown above). It is always recommended that you perform the striping over all the OSTs by running the following command on Lustre Client:
#lfs setstripe -c -1 /mnt/lustre

Setting up Lustre Client #1
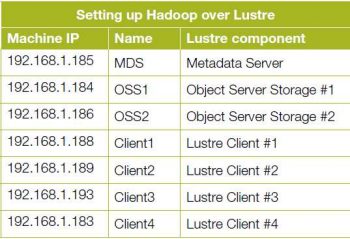
All clients mount to the same file system identified by the MDS. Use the following commands, specifying the IP address of the MDS server:
#mount t lustre 192.168.1.185@tcp0:/lustre /mnt/lustre
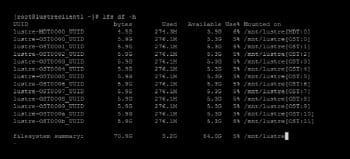
You can use the lfs utility to manage the entire file system information at the client system (as shown in Figure 6).
The figure shows that the overall file system size of /mnt/lustre is around 70GB. Striping of data is an important aspect of the scalability and performance of the Lustre file system. The data gets striped over the blocks of multiple OSTs. The stripe count can be set on a file system, directory or file level.
You can view the striping details by using the following command:
[root@lustreclient1 ~] # lfs getstripe /mnt/lustre
/mnt/lustre
Stripe_count:  1 stripe size:   1048576 stripe_offset:  -1
The Lustre set-up is now ready. Its time to run Hadoop over Lustre instead of HDFS.
I assume that Hadoop is already running with one name node and four data nodes.
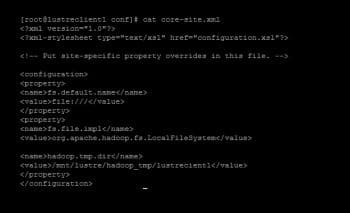
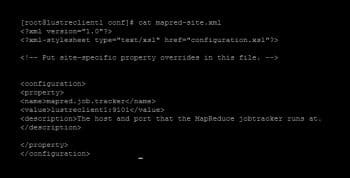
On the master node, lets perform the following file configuration changes. Open the files /usr/local/hadoop/conf/core-site.xml and /usr/local/hadoop/conf/mapred-site.xml in any text editor and make changes as shown in Figures 7 and 8.
On every slave node (data nodes), lets perform the configuration changes as done above.
Once the configuration is done, we are good to start the Hadoop-related services.
On the master node, run the mapred service without starting HDFS (since we are going to use only Lustre) as shown in Figure 9.
You can ensure the service runs through the jps utility as follows:
[root@lustreclient1 ~]# jps
20112 Jps
15561 Jobtracker
[root@lustreclient1 ~]#
Start the tasktracker on the slave nodes through the following command:
[root@lustreclient2 ~]# bin/hadoop-daemon.sh start tasktracker
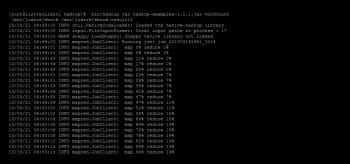
You can now just run a simple hadoop word count example (as shown in Figure 10).
References
[1] http://hadoop.apache.org/docs/r1.1.1/mapred_tutorial.html
[2] http://wiki.lustre.org/index.php/Configuring_the_Lustre_File_System
[3] http://wiki.lustre.org/images/1/1b/Hadoop_wp_v0.4.2.pdf




Good one Ajeet. However, being an SME in HPC arena, I do understand that
performance of lustre comes with its own set of problems.. We have
issues like the OSTs becoming readonly and sometimes the hang is not
released until the entire cluster is rebooted. Although, intel has tried
to fix a number of problems associated with older versions not sure these problems were fixed.
[…] monitoring and analytics. Being an extensible platform, the project integrates elements from Apache Hadoop and enables rapid detection and response using machine learning and traditional […]