This is the last article in the series on ns-3 and I would like to use Winston Churchills quote from an entirely different context: Now this is not the end. It is not even the beginning of the end. But it is, perhaps, the end of the beginning. He was referring to the second battle of El Alamein, Egypt, when the Allied army defeated the Axis powers. Yes, the series is ending but our endeavour to master ns-3 continues. Over the past issues, I tried to give you an overview of ns-3. This tutorial is not complete, but the material I have covered is sufficient to initiate you into the intricacies of ns-3. Before we wind up, lets try to tie up a few more loose ends.
Python in ns-3
I have mentioned that the use of Python is not mandatory in ns-3. But I need to explain the significance of Python in ns-3, because those who are familiar with Tcl in ns-2 expect a similar role for Python in ns-3. This is a misconception. The ns-3 and ns-2 simulators are independent of each other and the way Python interacts with ns-3 is entirely different from the way Tcl interacts with ns-2.
So what is the relationship between Python and ns-3? Are they mere acquaintances, friends or brothers? A technique called Python bindings is used in ns-3 to write ns-3 simulation scripts in Python. Python binding is a general technique used to access libraries in other programming languages from Python. For example, it is possible to create a binding to access C++ libraries from Python. But we already know how to simulate ns-3 scripts directly using C++. Then why is a second language like Python used to replicate the same results? Well, right now, thats all Python is offering. The interaction between Python and ns-3 is still a work in progress. But when Python bindings in ns-3 are complete, as predicted, we will have the ability to create new prototype models in ns-3, using Python alone. For example, we might have the ability to simulate a new routing protocol using Python without modifying the C++ source files of ns-3. But until then, the use of Python in ns-3 is not highly recommended for beginners.
Anyway, lets discuss how Python bindings help us execute ns-3 (the source code of which is in C++) with Python code. In this aspect, the use of Tcl in ns-2 and Python in ns-3 have some similarity. But the main difference is that the execution of an ns-2 simulation is possible only with Tcl scripts, whereas the execution of an ns-3 simulation is possible even without using Python scripting. The Python script shown below called pythonscript.py executes C++ based ns-3 simulation. This is a slightly modified version of a Python script available in the standard set of examples provided with ns-3. You can download the file pythonscript.py and all the other files mentioned in this article, from https://www.opensourceforu.com/article_source_code/October2015/ns3.zip.
import ns.applications import ns.core import ns.internet import ns.network import ns.point_to_point ns.core.LogComponentEnable(UdpEchoClientApplication, ns.core.LOG_LEVEL_ALL) ns.core.LogComponentEnable(UdpEchoServerApplication, ns.core.LOG_LEVEL_ALL) nodes = ns.network.NodeContainer( ) nodes.Create(2) pointToPoint = ns.point_to_point.PointToPointHelper() pointToPoint.SetDeviceAttribute(DataRate, ns.core.StringValue(10Mbps)) pointToPoint.SetChannelAttribute(Delay, ns.core.StringValue(1ms)) devices = pointToPoint.Install(nodes) stack = ns.internet.InternetStackHelper( ) stack.Install(nodes) address = ns.internet.Ipv4AddressHelper( ) address.SetBase(ns.network.Ipv4Address(192.168.100.0), ns.network.Ipv4Mask(255.255.255.0)) interfaces = address.Assign(devices) echoServer = ns.applications.UdpEchoServerHelper(5000) serverApps = echoServer.Install(nodes.Get(1)) serverApps.Start(ns.core.Seconds(2.0)) serverApps.Stop(ns.core.Seconds(8.0)) echoClient = ns.applications.UdpEchoClientHelper(interfaces.GetAddress(1), 5000) echoClient.SetAttribute(MaxPackets, ns.core.UintegerValue(1)) echoClient.SetAttribute(Interval, ns.core.TimeValue(ns.core.Seconds(1.0))) echoClient.SetAttribute(PacketSize, ns.core.UintegerValue(512)) clientApps = echoClient.Install(nodes.Get(0)) clientApps.Start(ns.core.Seconds(3.0)) clientApps.Stop(ns.core.Seconds(8.0)) ns.core.Simulator.Run( ) ns.core.Simulator.Destroy( )
The Python script pythonscript.py simulates a network similar to the one we have simulated with the ns-3 script simulation1.cc, which has two nodes connected by a point-to-point link, and a UDP echo server and client as applications. Please refer to Part 3 (OSFY, July 2015) of this series to refresh your knowledge about the simulation script simulation1.cc. There are two different types of Python bindings in ns-3. These are the monolithic bindings that provide API definitions for all the modules and can be found in the directory ns/ns-allinone-3.22/ns-3.22/bindings/python, and the modular bindings which provide API definitions for individual modules and can be found in the respective modules themselves.

The ns-3 APIs are included into a namespace by Python bindings. Earlier, Python bindings used to generate API definitions for ns-3 modules into a namespace called ns3. Later on, Python bindings started generating API definitions for ns-3 modules into a namespace called ns. You can observe that in the script pythonscript.py, the namespace called ns is used. The rest of the Python script is similar to the ns-3 script simulation1.cc. The Python script creates two nodes connected by a point-to-point link. Then the data rate and delay associated with the link is set. IPv4 addresses are assigned to the two nodes with the following line of code:
address.SetBase(ns.network.Ipv4Address(192.168.100.0), ns.network. Ipv4Mask(255.255.255.0))
This convoluted statement to assign IPv4 addresses to nodes is necessary due to another drawback of Python bindings. Some of the conversion constructors in the C++ source of ns-3 are yet to be supported by Python bindings. Thus, we have to use explicit constructors like the one shown in the previous line of code. After assigning an IP address on both the nodes, a port number is assigned on the node containing the UDP echo server application. The port number assigned to the server application is 5000. After this, a UDP echo client is set up on the second node. UDP echo client parameters like the maximum number of packets sent, the packet size, packet sending intervals, etc, are defined next. The starting and stopping times of both the server and client applications are also set. The lines of code ns.core.Simulator.Run( ) and ns.core.Simulator.Destroy( ) start and stop an instance of the ns-3 simulator.
Copy the file pythonscript.py to your system for execution. I have copied the file into the directory ns/ns-allinone-3.22/ns-3.22/scratch. Now open a terminal in the directory ns/ns-allinone-3.22/ns-3.22 and execute the following command:
./waf --pyrun scratch/pythonscript.py
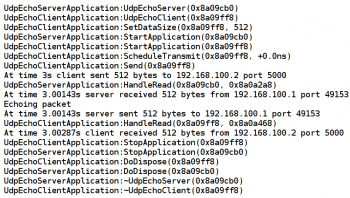
Please note that the directory scratch is not the default location to save Python scripts and hence it is not mandatory to save Python files in this directory. Also remember to use the path starting from the directory ns/ns-allinone-3.22/ns-3.22 to the directory containing the Python script. Since I have copied the Python script into the directory scratch, the path in the command is scratch/pythonscript.py. We have used the option LOG_LEVEL_ALL in the simulation script. Thus all the log information is displayed on the terminal. Figure 1 shows the terminal displaying the log information from the Python script.
The Python bindings feature is a work in progress and there are some problems associated with it. One is the insufficient coverage of ns-3 C++ source files. There are many ns-3 APIs yet to be supported by Python bindings. Newly created modules in ns-3 will not be supported by Python bindings. A tool called pybindgen is used to generate Python bindings for ns-3 source code written in C++. If you feel that all this fuss about the use of Python in ns-3 is unnecessary, then you can simply disable Python in ns-3. Open a terminal in the directory ns/ns-allinone-3.22/ns-3.22 and execute the following command:
./waf configure --disable-python
On execution of this command, Python will be disabled in ns-3, and you can continue executing ns-3 simulation with the help of C++ simulation scripts as discussed in the previous parts of this series.

Tracing with pcap
We have earlier discussed ASCII based tracing in ns-3. But the ASCII trace file format is not the only one available in ns-3. It is possible to obtain a pcap trace file from an ns-3 simulation. An application programming interface for capturing network traffic is called pcap. A clear advantage of pcap tracing over ASCII tracing is that pcap trace files need not be processed manually. A lot of information can be obtained from pcap trace files with the help of utilities like tcpdump, Wireshark, etc.
If pcap tracing is such a treasure trove of information, why did I hide it till the end? Well, for the simple reason that pcap trace files are processed by third party utilities. It took me a long time to start discussing ns-3 in this series. So then, I thought it was not the right time to discuss pcap tracing and introduce yet another utility. But since we are about to wind up this series, I now believe the time is ripe to learn pcap tracing. In Linux, pcap is implemented in the libpcap library. To discuss the features of pcap tracing I will again use the simulation script simulation1.cc with which we are quite familiar. I have renamed the simulation script as pcapsim.cc. The only significant change made in the script pcapsim.cc is the addition of the following line of code:
<em>pointToPoint.EnablePcapAll(pcapsim);</em>
It enables pcap tracing in the ns-3 script. The extension of pcap trace files is .pcap. But the name of the pcap trace file generated is not pcapsim.pcap because naming conventions for pcap trace files and ASCII trace files are different. Unlike ASCII tracing, multiple trace files are generated in pcap tracing depending on the number of nodes in the simulation and the number of devices installed on these nodes. For example, if the simulation contains four nodes with each node having three devices installed on them, then a total of 12 pcap trace files will be generated. Thus, the number of pcap trace files generated equals the total number of devices in the simulation. In pcap tracing, the name given inside the function EnablePcapAll( ) in double quotes is just a suffix for the different pcap trace files generated. The name of each pcap trace file will be as follows: file_name_suffix-node_number-device_number.pcap.
In the simulation script pcapsim.cc there are only two nodes, and each has just one device installed on it. So, on execution, the simulation script will generate two pcap trace files named pcapsim-0-0.pcap and pcapsim-1-0.pcap. The execution of the simulation script pcapsim.cc is no different from the execution of all the other C++ simulation scripts in ns-3. Copy the file pcapsim.cc in the directory scratch and open a terminal in the directory ns/ns-allinone-3.22/ns-3.22. Execute the commands ./waf and ./waf – – run pcapsim on the terminal. This will generate the two pcap trace files mentioned above. By default, the pcap trace files will be saved in the directory ns/ns-allinone-3.22/ns-3.22.
The pcap trace files will not give you any information if opened in a text editor. To elicit information, you have to process these files with a packet-analysing utility like tcpdump or Wireshark. First, let us see how to use tcpdump to extract information from the pcap trace files. The utility tcpdump is a packet analyser that runs in the command line. It has the ability to generate pcap trace files as well as analyse it. Since pcap trace files are already generated by ns-3, tcpdump is used only for analysis. Open a terminal in the directory ns/ns-allinone-3.22/ns-3.22 and execute the following command:
tcpdump -nn -tt -r pcapsim-0-0.pcap
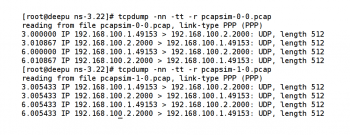
This command will process the pcap trace file pcapsim-0-0.pcap. Figure 2 shows the output of applying tcpdump on the two pcap trace files pcapsim-0-0.pcap and pcapsim-1-0.pcap.
The option tt instructs tcpdump to print unformatted time on each line of the tcpdump output. The option r instructs tcpdump to read and process an input file. As mentioned earlier, tcpdump has the ability to observe a network and produce a pcap data file. But here, pcap trace files are already available and hence the option r is used. The option nn instructs tcpdump not to convert the IP address to the hostname or the port number to the port name. For example, the IP address 64.233.166.94 will be converted to google.co.in and port number 80 will be converted to HTTP (remember, port number 80 is the well known port for HTTP) if the option nn is not used in tcpdump. If you use the option n instead of nn, then the port number will be converted to the corresponding port name. Assume that UDP echo server port number was 80 in the script pcapsim.cc, then the command tcpdump -n -r tt pcapsim-1-0.pcap will give the following output on the terminal:
3.005433 IP 192.168.100.1.49153 > 192.168.100.2.http: UDP, length 512

3.005433 IP 192.168.100.2.http > 192.168.100.1.49153: UDP, length 512

6.005433 IP 192.168.100.1.49153 > 192.168.100.2.http: UDP, length 512

6.005433 IP 192.168.100.2.http > 192.168.100.1.49153: UDP, length 512
As you can see, port number 80 is replaced by the port name http. Since tcpdump is a very powerful utility, a lot of information can be extracted from pcap trace files by using the different options of tcpdump. But many new users of Linux and ns-3 feel a general aversion towards tcpdump because it is a command line utility. If you, too, feel the same way about command line utilities then Wireshark is the solution to your problems.
Wireshark is a packet analysis utility with a graphical front-end (GUI interface). You can open the pcap trace files in Wireshark and view the results on a window. Figure 3 shows the Wireshark window showing the pcap trace file pcapsim-0-0.pcap. In the figure, you can observe the fact that registered port number 2000 is identified with the port name cisco-sccp by Wireshark. A lot of options for filtering and analysis are available with Wireshark, which can be used to extract lots and lots of useful information from pcap trace files. A detailed discussion about Wireshark is beyond the scope of this tutorial but you can find a number of Wireshark related documents at www.wireshark.org/docs/.

A few words about the ns-3 source code
We have used many built-in classes of ns-3 to simulate different networks. What about the source code of these built-in classes? We have already discussed Doxygen and how it helps to maintain the documentation of ns-3. You can find the ns-3 documentation at www.nsnam.org/doxygen/. You can get details regarding ns-3 modules, namespaces, classes, etc, from there.
But what is the importance of ns-3 source code? We know for a fact that many network protocols and network related concepts can be simulated in ns-3. But what if your research project involves the creation of a new network protocol? Then you need to alter the source code of ns-3 to incorporate your new protocol into the existing structure of ns-3. So it is absolutely essential to go through the source code of ns-3. But remember, there are hundreds of thousands of lines of code in ns-3 and it is not humanly possible to go through all of it alone. So you must identify the ns-3 source files relevant to your research, have a deeper understanding of the code in them, and finally modify them. Once you have made changes to the ns-3 source code, you should rebuild the entire source code so that the modified code will have its effect on future simulations. If you have successfully altered the source code of ns-3 to create a new protocol, please share it with the others so that they, too, can have a better solution to their research problemjust like the efforts of countless individuals who developed ns-3 helped us.
I would now like to mention a few topics that didnt make it into this series of articles on ns-3. The one that comes to my mind first is PyViz, a live simulation visualiser. It doesnt require any trace files to generate the animation. PyViz is mostly written in Python, but works with both Python scripts and C++ scripts. It is mostly used for debugging purposes. With it, we can check the working of mobility models and the time at which packets are dropped. PyViz will not work without Python bindings. So we have one point in favour of Python bindings.
Another area I skipped altogether is the installation of ns-3 using Cygwin (a utility which helps Linux applications to run on Windows). Over the years, I have faced the following question many times. Is it possible to install ns-2 and ns-3 on Microsoft Windows operating systems? Yes. It is possible to do so. But the question is, why? Cygwin based ns-3 installation is a tedious task. There might be compatibility issues between POSIX APIs and Win32 system calls. You might come across unexpected errors frequently. People hope that by installing ns-3 on Windows, the whole process of network simulation will become easier. This is a false hope; whether the installation is on Linux or Windows makes no difference to ns-3.
Another area I havent covered is third party contributions to ns-3. Many research groups have contributed to the code base of ns-3. For example, cognitive radio extension for ns-3 called CRE-NS3 is maintained as contributed code by third party developers. There might be other interesting topics from ns-3 left out in this series for want of space. Out there is an ocean and I have just provided a cupful, so do forgive me.
You can find many useful ns-3 documents at www.nsnam.org/documentation/. Before concluding, a word about the way this series was organised. I havent explained the finer details of ns-3; for that you have a tutorial available in the above mentioned location. I havent elaborated much about the complex structure of ns-3; for that you have the manual available in the same location. My intention was to present the case for ns-3, guide every one through the installation process, familiarise every one with the different tools associated with ns-3 and, finally, warn you about a few traps and pitfalls in ns-3 most of which I myself have fallen prey to.


