


This article is a continuation of a previous one called “Developing a basic GUI application using JavaFX in Eclipse” by the same author. We recommend that those unfamiliar with JavaFX read the earlier article carried in the June 2017 issue of Open Source For You.
Scene Builder is a GUI based standalone tool, using which developers can rapidly design and develop JavaFX interfaces with a simple-drag-and-drop operation. Various UI components are available in the library section, which can be dragged and dropped in the working area for quick development and the corresponding code gets generated automatically in the project in your IDE. The best part of using Scene Builder is that you can also make use of stylesheets to load your interface with attractive visual effects.
Scene Builder will automatically create an FXML file for your interface in its background, which is the core of the JavaFX application. FXML is just like XML, which was developed by Oracle, with which we can design the interface of the JavaFX application. It was created to provide better readability of code and to separate the UI components from the application logic. Let’s have a look at some of the features of Scene Builder that have made it a favourite in the developer community.
- Easier UI design: Controls, containers, shapes, charts, menus, etc, can all be added very easily just by dragging them from the container library. Animations can also be applied effortlessly to complicated interfaces.
- Editor for FXML: The FXML file gets created automatically for the designed UI, which can be viewed and edited very easily. Even the FXML files created by other users can be seen and modified.
- Preview option: There is a ‘Preview’ option in Scene Builder, which lets you preview what your interface will look like at any time during the development process. This is very useful since you get to know the actual progress of your UI.
- Configurable with any IDE: Scene Builder has been developed to get easily configured with any IDE. The integration process is also very simple and any changes in the FXML get automatically updated in Scene Builder, and vice versa.
- Support for CSS: Visual effects can also be added to the application being developed by applying stylesheets, which can be defined at the control level instead of the application level. This really helps to improve the look and feel of the interface. Configuring the CSS file is as simple as configuring a CSS file in HTML. You only have to create a .css file in your IDE or text editor and point that file to your component in Scene Builder. The other advantage is that you can also preview how your components will be affected by changing the CSS values.
- Cross-platform: The most interesting thing about Scene Builder is that it is written as a self-contained JavaFX application and supports the Windows, Mac and Linux operating systems.
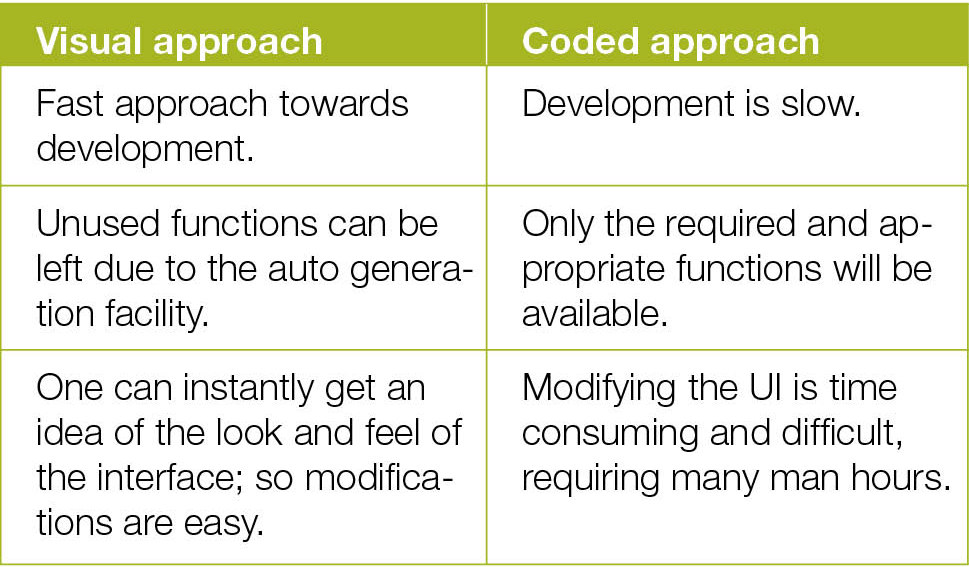
Beginners can benefit a lot from Scene Builder because it reduces the effort required to build user interfaces considerably. So time and energy can be more productively focused on the application logic, and on its look and feel. Table 1 lists some of the differences between the visual approach and the coded approach for building a UI.
 Sections of Scene Builder
There are different sections within Scene Builder, each with its own functionality. Broadly, it can be divided into four sections, as listed below.
1. Library section: This is the section from where we can drag and drop different widgets to the interface. It contains a search text box, where one can search for different controls, shapes, etc. All the widgets are classified into the following seven areas:
- Containers – This contains different panes such as AnchorPane, VBox, HBox, BorderPane, etc. These are mainly used to store the different controls.
- Controls – This contains the main components used to build your application such as buttons, checkboxes, drop down menus, date pickers, etc.
- Menu – This area contains different menu items such as CheckMenuItem, ContextMenu, MenuItem, etc.
- Miscellaneous – Canvas, Tool tip, etc, are the widgets present in this area.
- Shapes – This area is used to draw different shapes, like a circle, arc, ellipse, etc.
- Charts – Various types of charts can be dragged from this area such as AreaChart, BarChart, etc.
- 3D – This area is mainly used if you are working with 3D objects in your application.
2. Document section: This contains two areas—hierarchy and controller. The former contains the hierarchy of your components in your interface, and the latter is used to connect your Scene Builder to the controller class in your project. We will explore controller class and its usage later.
3. Centre section: This is the working section, where you drop the dragged components and view your application interface.
4. Inspector section: This section contains three areas—properties, layout and code. In the properties area, we can define the different properties of our components; the layout area deals with the positioning of components in the interface, and the code area contains the logic behind each component.

Downloading and configuring Scene Builder
The Scene Builder project was started by Oracle so that organisations could move to JavaFX quickly and installers could be downloaded from Oracle’s website. But after the 40th update of Java 8, Oracle stopped development and declared that Scene Builder would only be available as source code and no installers would be provided. Then an organisation named Gluon came to the rescue of the developer community and started providing installers for Scene Builder. Though Oracle’s version is still available under archive projects, it’s Gluon’s Scene Builder that is popular due to its regular updates, and can be downloaded from Gluon’s website depending on the platform required. Also, those already using Oracle’s Scene Builder needn’t worry, since it will be automatically updated.
Now let’s take a look at how Scene Builder can be configured with Eclipse. First, you should have Scene Builder and the Eclipse IDE downloaded on your system.
Configuring Scene Builder
1. Scene Builder will be downloaded as an .exe file, and you have to install it by double-clicking it. Follow the steps 2 to 10 given below and Scene Builder will be installed within minutes. After the installation is complete, an instance will be opened. Though Scene Builder has been installed, it has not yet been configured with your IDE, so you can close this instance for now.
2. You must be wondering where Scene Builder has been installed, because during the installation process you were not asked for the installation directory. Actually, it is installed by default in the directory path C:\Users\<your computer name>\AppData\Local\SceneBuilder, but you can move its installation folder to any other location, depending on your convenience.
3. Now that this is done, let’s shift focus to the Eclipse IDE. Start Eclipse and create any JavaFX project in it. For example, I am naming the project I’m creating ‘MyFirstSceneBuilder’ for the purpose of this tutorial. If you are not aware of how to create a JavaFX project in Eclipse, then you can read my previous article on JavaFX. With the JavaFX project, the application package gets automatically created with Main.java class and the application.css file; so create one more package named application.view in the src folder, where we will create a file to provide a view to our application.
4. After the package has been created in your workspace, right-click on the application.view package and add a ‘New FXML document’ to your project. If it’s not available in the list, then you can find it under the Others > JavaFX tree section.
5. Provide a logical name to it, e.g., Main; then select Border Pane as the root element and click on ‘Finish’, which will add this FXML document to your project. You can view your FXML file, which will be just like an empty XML file with a <BorderPane> tag in it.
6. This FXML document that we have created can be opened with Scene Builder, and then we can start dragging and dropping to build our interfaces. But before that, we need to configure it with Eclipse.
7. For this, navigate to ‘Windows menu > Preferences’. In the Preferences dialogue box, search for JavaFX and select it. Now you will be able to see the SceneBuilder executable text box on the right-hand side.
8. Browse to the location where you have copied your installed folder in Step 2. In that folder, there must be a SceneBuilder.exe file; select it, and click OK. Click on Apply in the Preferences dialogue box to close it.
9. Now go to your Main.fxml file in the package explorer and right-click on it. You will be able to see the option ‘Open with Scene Builder’ in the Context menu. Select it and this file will be opened inside your Scene Builder.
10. As you can see, it will be an empty file with only ‘Border Pane’ as the root to it. We can add as many controls, containers or widgets to it as we please and simultaneously, in the background, the FXML file will get automatically updated.
Now Scene Builder has been configured with Eclipse. Let’s explore how to use it, and then create a simple interface to familiarise yourself with it. We will also integrate the application logic with the interface as we go along.
How to use Scene Builder
In the configuration section above, we have created a Main.fxml file in our JavaFX project ‘MyFirstSceneBuilder’. Continuing from there, let’s create a basic GUI application with the use of Scene Builder.
1. Open your Main.fxml file with Scene Builder. You will see an empty centre section because you have not specified the minimum length and breadth of your border pane. Select the border pane from the hierarchy area, and set the minimum height and minimum width as 400 and 150 pixels, respectively, from the layout area.
2. Now search for ‘textfield’ and ‘button’ from the library section, and add these to the ‘CENTRE’ and ‘RIGHT’ area of the border pane.
3. Select textfield and set the margin as 5 units from the layout area in the Inspector section. Repeat the same process for the ‘button’. Also, change the text of the button to ‘Click Me’.
4. Now the designing part is complete. So let’s write some logic for these controls. Return to Eclipse and create one class named MainViewController under the package application.view. This will be our controller class for FXML, which means that it will contain the logic for our controls.
5. Now copy the following code in the auto-generated Main.java and MainViewController.java classes.
Main.java

package application;

import javafx.application.Application;

import javafx.fxml.FXMLLoader;

import javafx.stage.Stage;

import javafx.scene.Scene;

import javafx.scene.layout.BorderPane;

public class Main extends Application {

private BorderPane mainLayout;

@Override

public void start(Stage primaryStage) {

try {

primaryStage.setTitle(“My First “);

primaryStage.show();

FXMLLoader loader = new FXMLLoader();

loader.setLocation(Main.class.getResource(“view/Main.fxml”));

mainLayout = loader.load();

Scene scene = new Scene(mainLayout);

primaryStage.setScene(scene);

primaryStage.show();

} catch(Exception e) {

e.printStackTrace();

}

}

public static void main(String[] args) {

launch(args);

}

}

MainViewController.java

package application.view;

import javafx.fxml.FXML;

import javafx.scene.control.Button;

import javafx.scene.control.TextField;

public class MainViewController {

@FXML private TextField textfield; //will be used in fx:id

@FXML private Button button; //will be used in fx:id

public void getText(){

System.out.println(“Text entered is “ + textfield.getText());

}

}
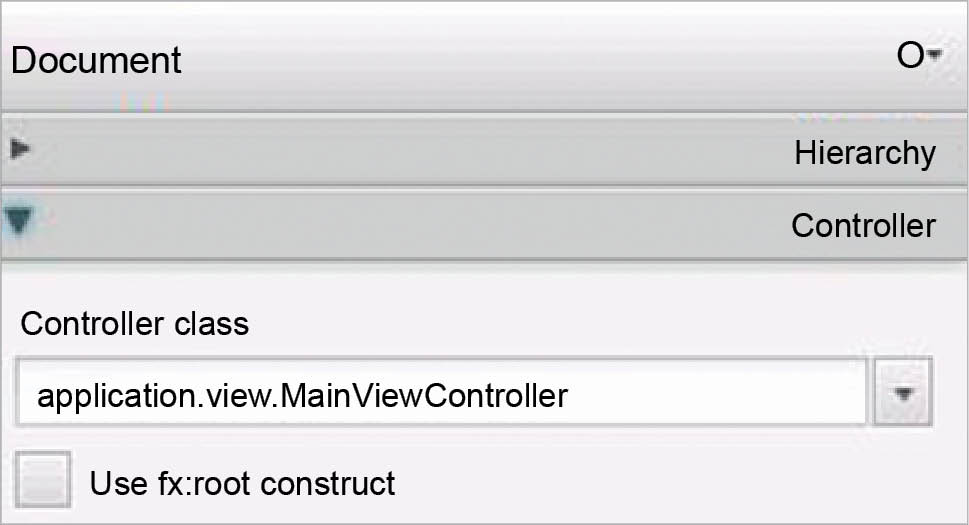
6. Now save the above two files and come back to Scene Builder. Go to the controller area under the Document section and select application.view.MainViewController from the Controller class drop down menu.
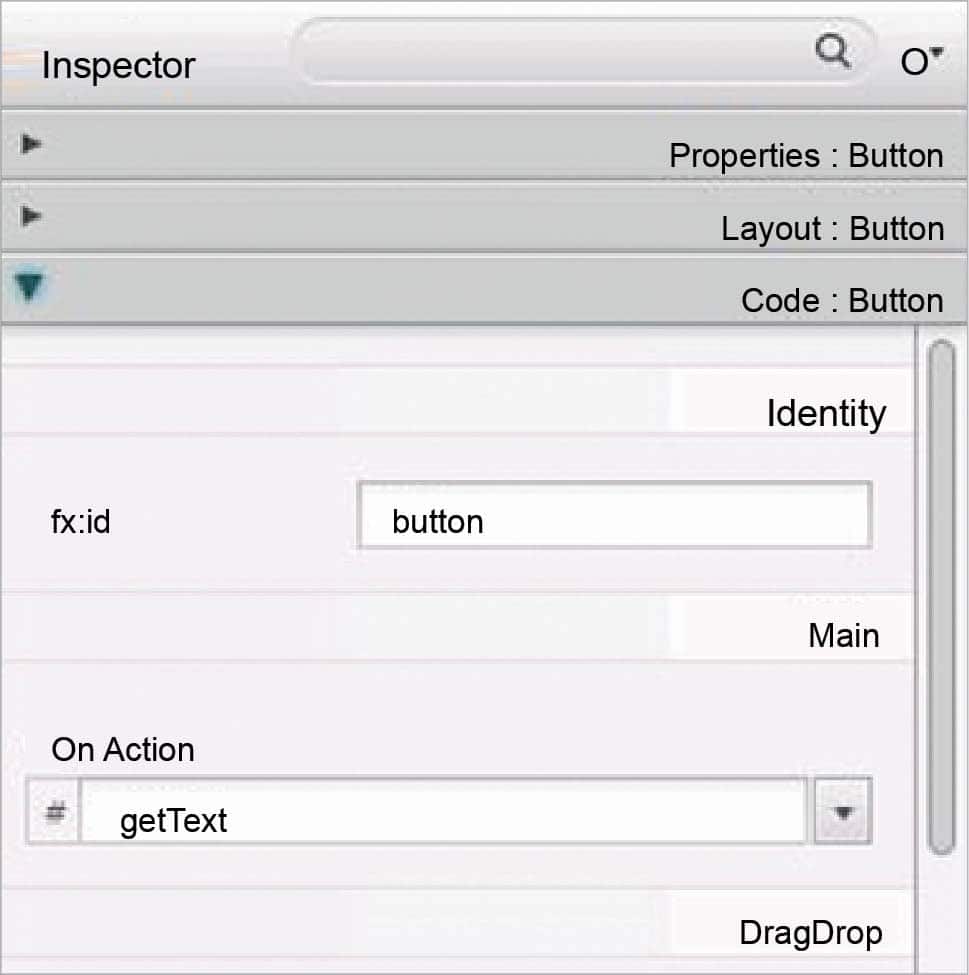
7. Open the hierarchy area again and select Button on the interface, then type ‘button’ in the fx:id field under the code area in the Inspector section. This is the ID that we have written earlier in the controller class. Through this ID, code will connect to this button on the interface. Also, select getText from the On Action drop down menu. This implies that on the click of this button, this action will be called from the controller class.
8. Repeat this step of assigning the fx:id to textfield control as done in step 3 for textfield.
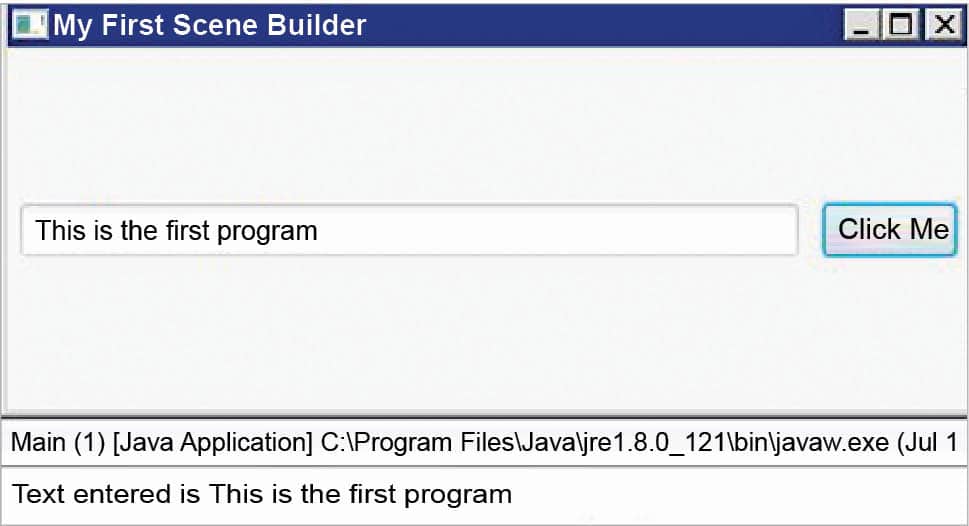
9. Now save everything and run your Main.java file as a Java application, type some text and click the button. The same text will be printed on the console window.
Try this with different combinations and have fun! In this way, you can create complex applications and interfaces with the help of Scene Builder without actually coding your controls.
Scene Builder has certainly given a boost to Java, which had begun losing popularity, and is definitely the future for developing enterprise applications. The main advantage of using Scene Builder is that it gets timely updates, which incorporate the latest controls in its library.


