


The microservices architecture allows the development of software apps as discrete, loosely connected modules. This article focuses on the role of API gateways in microservices—particularly on how the Kong API gateway and the AWS API gateway can be used to build microservices.
Designing a scalable and fault tolerant application is one of the major responsibilities of a software architect. An application can be scaled easily when the services are stateless and loosely coupled. Otherwise, it will create multiple problems. Distributing services across servers makes the application fault tolerant. The above two factors decide the stability and reliability of an application when it is being accessed by multiple users. In earlier days, even a complex application would run as a single service in an operating system. If the process or system went down, an enterprise would lose its customers during peak use of services. To overcome the issues in scaling and to reduce the risks of running an application as a monolith, enterprises such as Netflix, eBay, Twitter and Amazon have introduced us to the world of microservices. This concept enables the scaling of a specific component of an application rather than scaling the entire application when there is a demand for just a specific service.
Microservices
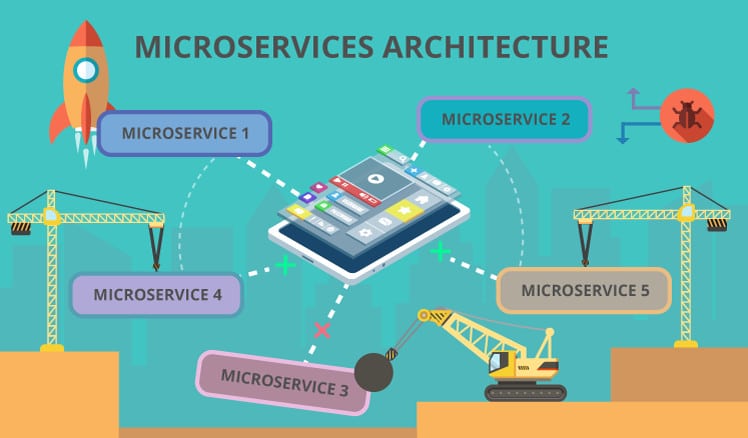
Microservices have an architectural style that structures an application as loosely coupled services. This reduces friction in the continuous deployment and continuous integration of complex and large applications. There are many advantages of choosing a microservices architectural style over monolithic architecture when developing a complex application. Complex applications that have many services, with each one having a dependency on another service, are really difficult to scale. It is better to design services that are not tightly coupled to each other.
Monolithic applications put all of their functionalities into a single process, whereas the microservices architecture puts each element of functionality into a separate service. So, if any service goes down in a monolithic application, the end users will be impacted more. But if the service is decoupled and distributed in different servers, then the impact is a lot less. Scaling an application through microservices is very easy.
Scaling a monolithic application is nothing but replicating a monolith on multiple servers. But scaling a microservices application is distributing different microservices across servers.
The advantages of microservices are:
- Services are loosely coupled.
- CI/CD process can be made easy.
- Scaling is very simple and robust.
- There’s no need to maintain a common codebase.
- Developers can develop and deploy the service independently.
- It is simpler to understand the functionality of a service.
- Since services are decentralised, faults can be detected easily.
The drawbacks are:
- It’s difficult to integrate an application when it contains a large number of services.
- More transactions will be involved.
- Increased system resource overhead. Each service communicates through APIs/remote calls. It consumes more network bandwidth and system memory resources.
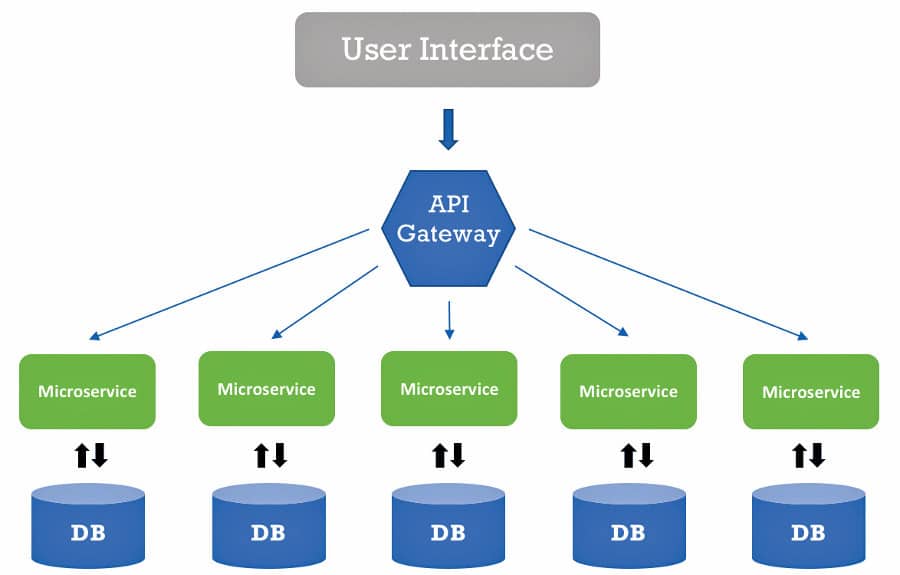
- API gateway, router or load balancer is needed to route the request from the client to the different microservices, and for them to respond back to the client.
However, the microservices architectural style brings about a drastic change in the application development and release process.
Choosing between REST and AMQP for implementing microservices
It is very important to decide how microservices should communicate with each other. JSON is the de facto data format for exchanging information between services. REpresentation State Transfer (REST) over Hyper Text Transfer Protocol (HTTP) or Advanced Message Queuing Protocol (AMQP) over Remote Procedure Call (RPC) can be used for communication.
There are several advantages and disadvantages of using either REST or AMQP. The security (whether synchronous or asynchronous) called between services has to be considered.
REST has several advantages like securing API endpoints with many third party authorisation plugins and can expose the API to the public. It is easy to document the REST API using tools like Swagger. The main drawback of using REST over HTTP is its blocking capacity. REST API communication is synchronous—while invoking a REST call one has to wait for the response from the server before processing another request. Here some actions are lost if a particular service is not reachable. The service is blocked and this impacts the performance of the application.
The performance of the microservices can be made efficient by using AMQP. Here the transactions are asynchronous. If a request is needed to be made to another service, a message can be sent on the topic and the next action can be performed immediately.
In an HTTP scenario, if a request is made and the callee is down, the connection will be refused and one will have to try again and again until it comes back up.
With message systems, requests can simply be sent and done with. If the callee cannot receive it, the broker will keep the message in the queue, and then deliver it when the callee connects back. The response will come back when it can and won’t need to be blocked or waited upon.

How to choose platforms for implementing microservices
- Choose the micro Linux platforms (lightweight operating systems in Linux) such as CoreOS, Atomic or Photon. These operating systems are optimised for running containers. There is no need to run full-featured operating systems like Ubuntu or Red Hat, since there is no need for all those functionalities that a typical OS should have. It will impact the system performance as well.
- It is better to choose a container environment rather than a virtual machine. When it comes to open source container platforms, Docker is the best choice.
- Swarm or Kubernetes can be used for scheduling and orchestrating container based applications.
- For orchestrating deployments, popular frameworks like Red Hat’s OpenShift may be used.
- Prometheus is a good option for monitoring the applications.
The role of an API gateway in microservices
An API gateway is the single entry point for all clients. It handles requests in one of two ways. Some requests are simply proxied or routed to the appropriate service. It handles other requests by fanning out to multiple services. There are a few open source and proprietary API gateways that are available in the market for implementing the microservices based architecture. Besides, the IaaS cloud providers have created a platform for managing APIs for microservices. An example is the AWS API Gateway.
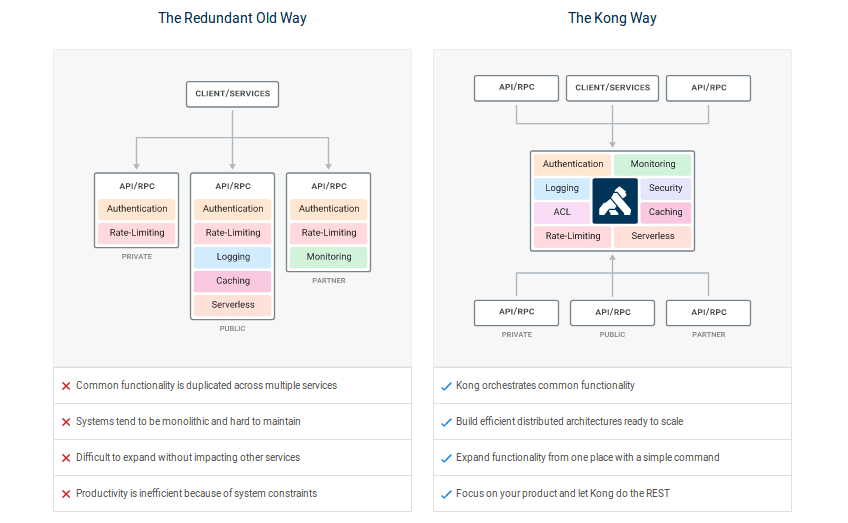
The Kong API gateway
The Kong API gateway acts as the middleware between computing clients and API-based applications. There are many advantages of using the Kong API gateway. It is extremely fast, RESTful and platform agnostic. Kong has many features and it can be extended by adding plugins for authentication, security, traffic control, logging, monitoring and analytics purposes. Kong is available as a community edition as well as an enterprise edition to address the need to build microservice API gateway platforms. Kong can be set up and scaled on any platform — on-premise, the cloud or on a hybrid one. It is very easy to set up in a local machine. If you wish to evaluate the product before using it, please spin up a VM using AMI from the AWS marketplace.
A typical Kong setup comprises two main components:
- Kong’s server based on the widely adopted Nginx HTTP server, which is a reverse proxy that processes clients’ requests to your upstream services.
- Kong’s data store, in which the configuration is stored to allow the horizontal scaling of Kong nodes. Apache Cassandra and PostgreSQL can be used to fulfil this role.
Kong needs to have both these components set up and operational.
The Kong community version supports CLI and the admin API for managing Kong instances. But it does not have an admin GUI for management. Third party tools such as the Kong dashboard support the GUI for managing Kong instances. The Kong enterprise version has full support including the admin dashboard.
The Kong admin API can be accessed by Port 8001. Let us create a service and add routes to access the service through the Kong API gateway. Here, the service is http://microservices.io/scripts/bootstrap.js. Instead of accessing the service directly, it should be registered to the Kong API gateway. It will create an upstream server in Nginx, the configuration for which is maintained in a data store.
A service is the name Kong uses to refer to the upstream APIs and microservices it manages. Before one can start making requests against the service, you need to add a route to it. Routes specify how (and if) requests are sent to their services after they reach Kong. A single service can have many routes.
#Create a service in Kong API Gateway

curl --header “Content-Type: application/json” \

--request POST \

--data ‘{“name”: “microservice0”, “host” : “microservices.io”, “port” : 80, “protocol”

: “http”, “path” : “/scripts/bootstrap.js”}’ \ --url http://18.212.88.185:8001/services/

#Add a route to access the service

curl --header “Content-Type: application/json” \

--request POST \

--data ‘{“hosts” : [“microservices.io”]}’ \

--url http://18.212.88.185:8001/services/microservice0/routes

#Access the resource and ensure Kong is properly forwarding request to the service.

curl --header “Content-Type: application/json” \

--header “Host: microservices.io” \

--request GET \

--url http://18.212.88.185:8000/

#List all registered services

curl --header “Content-Type: application/json” \

--request GET \

--url http://18.212.88.185:8001/services

#List all routes

curl --header “Content-Type: application/json” \

--request GET \

--url http://18.212.88.185:8001/routes

#Enable authentication to the service

curl --header “Content-Type: application/json” \

--request POST \

--data ‘{“name” : “key-auth”}’ \

--url http://18.212.88.185:8001/services/microservice0/plugins

#Ensure Kong API Gateway will throw an error for unauthorized access of resources

curl --header “Content-Type: application/json” \

--header “Host: microservices.io” \

--request GET \

--url http://18.212.88.185:8000/

#Create a consumer to access the service with authentication

curl --header “Content-Type: application/json” \

--request POST \

--data ‘{“username” : “rkkrishnaa”}’ \

--url http://18.212.88.185:8001/consumers

#Create a key for the consumer to access the service using apikey

curl --header “Content-Type: application/json” \

--request POST \

--data ‘{“key” : “rkkrishnaa123”}’ \

--url http://18.212.88.185:8001/consumers/rkkrishnaa/key-auth

#Ensure the consumer can access the resources with proper apikey

curl --header “Content-Type: application/json” \

--header “Host: microservices.io” \

--header “apikey: rkkrishnaa123” \

--request GET \

--url http://18.212.88.185:8000/
Similarly, one can perform multiple actions to add, update, list and delete services, routes and consumers. You can perform active and passive health checks against your endpoints. One can do load balancing and proxy the requests to different upstream servers.
Scaling a Kong node is very easy — just add new servers behind the load balancer. Each node in Kong is stateless and is independent of others while handling requests from microservices clients. Ensure the availability of a data store. It is the backbone of the API gateway. For production deployments, it is better to use Cassandra as a data store. The Cassandra database can be scaled very easily because of its distributed architecture.
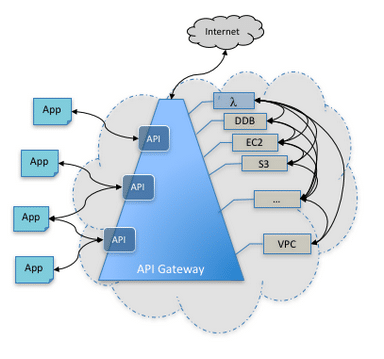
The AWS API gateway
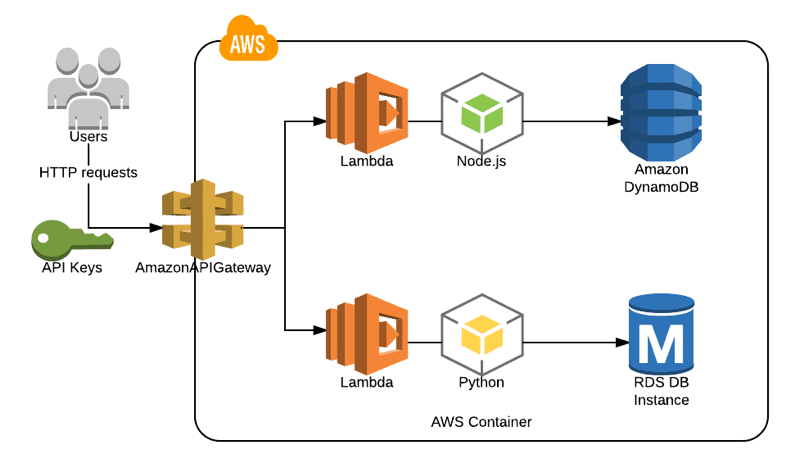
The Amazon API gateway is a fully managed service that makes it easy for developers to create, publish, maintain, monitor and secure APIs at any scale. With a few clicks in the AWS Management Console, one can create an API that acts as a ‘front door’for applications to access data, business logic, or functionality from back-end services, such as workloads running on Amazon Elastic Compute Cloud (Amazon EC2), code running on AWS Lambda, or any Web application.
The Amazon API gateway handles all the tasks involved in accepting and processing up to hundreds of thousands of concurrent API calls, including traffic management, authorisation and access control, monitoring and API version management.
Benefits of the AWS API gateway: This gateway has quite a few benefits, as listed below.
Low cost and efficient: The Amazon API gateway has no minimum fees or startup costs. You pay only for the API calls received and the amount of data transferred out.
Streamlines API development: One can simultaneously run multiple versions of the same API, allowing quick iteration, testing and releases of new versions.
Performance at any scale: One can integrate the API with cloudfront edge locations and cache the output of API calls to avoid calling backend systems unnecessarily.
Easily monitors API activity: After the API is deployed, the Amazon API gateway provides a dashboard for visually monitoring calls to services using Amazon CloudWatch; so one can see the performance metrics and information on API calls, data latency and error rates.
Runs APIs without servers: Amazon API gateway tightly integrates with AWS Lambda to allow the creation of completely serverless APIs. With this gateway, one can create REST APIs that mobile and Web applications can use to call publicly available AWS services through the code running in AWS Lambda.
Flexible security controls: The API gateway provides tools to authorise access to your APIs and control service operations. AWS administration and security tools, such as AWS IAM and Amazon Cognito, can be used to authorise access to your APIs. It supports OAuth tokens as well.
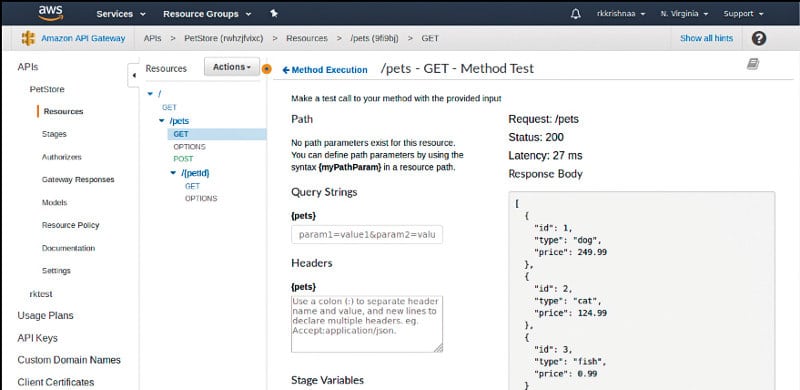
How to manage APIs in the AWS API gateway: We can use the AWS API gateway console, AWS SDK or CLI to create, configure, update, deploy and delete an API. These three tools call the API gateway REST API behind the scenes to make things happen. Instead, we can call the API gateway REST API directly to create, configure, update, and deploy an API in API Gateway. While creating a new API, different options are available such as Clone from existing APIs and Import from Swagger. You can create a custom API which should point to the Lambda function or any other external endpoints, and can proxy API requests in the API gateway.
It is possible to create a serverless environment with the API gateway and Lambda. You can use DynamoDB to act as a data store for persisting application transactions. Multiple versions of the same API can be managed at different deployment stages, and each version of the API can be pointed to a different back-end.
A custom domain can be created and SSL certificates used to access API endpoints. API keys can be created and imported to access API endpoints. You can also create VPC links from the API gateway to network load balancers. The performance of the API can be tracked easily with the help of Cloudwatch dashboards.
APIs can be easily documented from the management console. New APIs can be created through a a Swagger file. It is very easy to export or import REST APIs from one environment to another. You can generate client SDKs for the API to support platforms like Java, Android, iOS, JavaScript and Ruby.
API deployments can be facilitated by writing SAM templates. Here, you can define the stages and other dependencies as Swagger files.
An introduction to Swagger
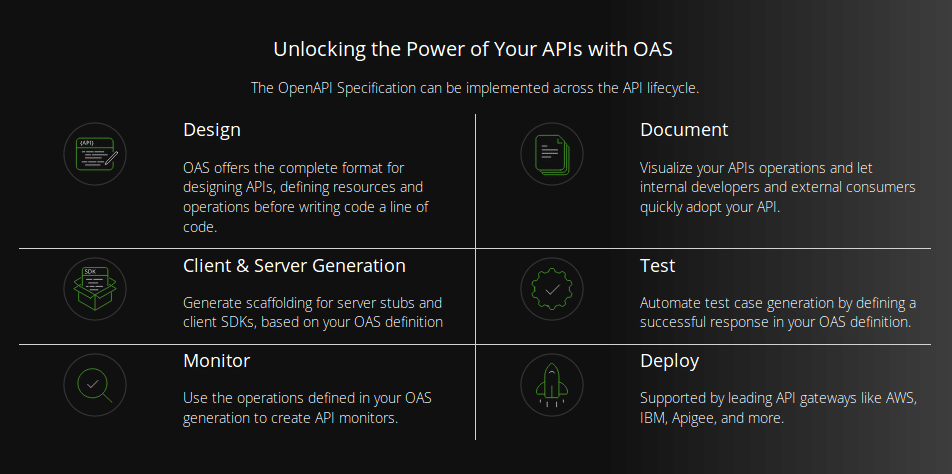
Swagger offers the most powerful and easy-to-use tools to take full advantage of the OpenAPI Specification. OpenAPI Specification (formerly Swagger Specification) is an API description format for REST APIs. An OpenAPI file allows us to describe an entire API, including the available endpoints (/users) and operations on each endpoint (GET /users, POST /users), operation parameter inputs and outputs, authentication methods, contact information, licences, terms of use and other information.
API specifications can be written in YAML or JSON. The format is easy to learn and readable for both humans and machines. Swagger is a powerful yet easy-to-use suite of API developer tools for teams and individuals, enabling development across the entire API lifecycle — from design and documentation, to test and deployment. It consists of a mix of open source, free and commercially available tools that allow anyone, from technical engineers to streetsmart product managers, to build amazing APIs that everyone loves.
The major Swagger tools include: Swagger Editor, Swagger UI and Swagger Codegen. Each tool can be used for different purposes. Swagger Editor allows you to write a spec for REST APIs and Swagger UI helps to create API documentation based on the Open API Specification. Swagger Codegen helps to generate client libraries in different programming languages. Swagger is available in both open source as well as proprietary versions.
The best example to get started with writing a Swagger schema for REST APIs, which can be expressed in the JSON or YAML format, is given at https://petstore.swagger.io/. This example implements the complete documentation of a pet store. This JSON definition covers all the information related to the API such as the version, description, title, licence, host, port, URL resources, scheme, request parameters, request data, response parameters, response data, response code and additional messages. A mock environment can be created to test the RESTful APIs.
The example given below explains how to create a simple movie store API with Swagger.
swagger: “2.0” # Swagger version

info: # This object provides metadata about the API.

version: 1.0.0

title: Movie Store

description: A simple Movie Store API

basePath: /api # Path relative to which all API calls will be made

paths: {} # This Object defines the paths/endpoints of your API

# The header we defined before will come here

paths:

/movies:

get:

description: Returns all movies from the system

operationId: findMovies

parameters:

- name: tags

in: query

description: Tags used to filter the result

required: false

type: array

items:

type: string

collectionFormat: csv

- name: limit

in: query

description: maximum number of results to return

required: false

type: integer

format: int32

responses:

‘200’:

description: A list of movies

schema:

type: array

items:

$ref: ‘#/definitions/Movie’

definitions:

Movie:

type: object

properties:

movie_id:

type: string

description: Unique identifier representing a specific Movie.

title:

type: string

description: Title of the movie.

description:

type: string

description: Description of the movie.

rating:

type: number

description: Rating of the movie.

price:

type: number

description: Price of the Movie at the store.

image:

type: string

description: Image URL containing the movie poster.

/movies/{movie_id}:

get:

description: Returns a single movie by its movie_id

parameters:

- name: movie_id

in: path

required: true

description: The movie’s movie_id

type: string

responses:

200:

description: A Movie

schema:

$ref: ‘#/definitions/Movie’

404:

description: The Person does not exists.

/movies:

post:

description: Add a new movie to the collection

operationId: addMovie

parameters:

- name: movie

in: body

description: The Movie JSON you want to post

schema:

$ref: ‘#/definitions/Movie’

responses:

‘201’:

description: Movie created successfully

schema:

$ref: ‘#/definitions/Movie’
Swagger is portable and handy to use. You can import it to the AWS API gateway as well.
Modern application development leverages containerisation and a software architecture style that reduces the risks of services crashing due to unexpected exits. It allows developers to put their code into lightweight, platform-agnostic packages that can be easily moved across the infrastructure. Developers get more benefits when they deploy a specific piece of an application independently, without having to bother about the entire system.


