This article covers the installation and setting up of Proxmox VE 5 on two physical servers, with ZFS for storage replication – one for a Microsoft Windows VM and another for a Linux VM.
For this fast track setup, we will use two identical servers with the following hardware configuration.
- CPU: 16 core Intel Xeon server 64-bit with VT enabled
- RAM: 32GB
- OS HDD: 73GB 15k enterprise HDD
- Data HDD: 600GB 15k enterprise HDD
- LAN: 1Gbps Ethernet port
Quickly installing Proxmox VE on two servers
Installing Proxmox VE 5 is rather simple and straightforward compared to other OSs.
We first need to download the Proxmox installer ISO from the link https://www.proxmox.com/en/downloads/item/proxmox-ve-5-3-iso-installer, and burn it on a CD.
Now follow the steps given below:
- Boot the system with the newly created bootable CD.
- At the welcome screen, choose Install Proxmox VE and hit Enter.
- Click on I agree to continue.
- At the next screen, use the automatic partition on the first 73GB HDD, and click on the Next button.
- Set the time zone and location by entering ‘India’ . The time zone will auto update.
- Provide a password for the root user, and enter a valid email address to get various updates and alerts about the server.
- Enter the host name, IP address, netmask, gateway and DNS. Provide all valid network details of the LAN to access the Proxmox VE Web-management configuration interface after installation.
Set up the network with the following settings for the LAN.

For the first server:
Host: pve01.technoinfotech.com
IP: 192.168.0.11
Netmask: 255.255.255.0
Gateway: 192.168.0.1
DNS: 192.168.0.1
For the second server:
Host: pve02.technoinfotech.com
IP: 192.168.0.12
Netmask: 255.255.255.0
Gateway: 192.168.0.1
DNS: 192.168.0.1
Now, the installation process will start to install all packages from the CD. Once the installation is done, remove the installation CD and hit the reboot button.
Accessing the Web management interface
After both the servers are ready, go to the desktop to manage them. On the desktop, open Mozilla Firefox or Google Chrome, and enter the following URLs: https://192.168.1.11:8006 in the address bar for the first server, and https://192.168.1.12:8006 in the address bar for the second server of another tab.
As the URLs are SSL enabled, allow the browser to process further for the first time. Enter ‘root’ and its password to log in. On logging in, a warning message for the subscription is displayed. Click on OK, since there is no valid support subscription from Proxmox yet, as it is just being set up.
Creating a cluster and a joining cluster
After logging in to both servers, first create a cluster on the pve01 server and join the pve02 server to it. This allows the management of both servers from any of the server panels and helps in building replication.
- Now on the first server, click on Datacenter in the navigation menu on the left.
- The right-side displays a list sub-menu, in which you can click on Cluster.
- Click on the Create Cluster button, enter the cluster name as pvecluster and click on Create.
- After the cluster is created, copy the joining encrypt key by clicking on Join Information. A popup window opens with the encrypt key. Click the Copy information button —this copies the code to the clipboard for pasting into the second server.
- Now on the second server, click on Datacenter, which is on the left side menu and go to a similar cluster section. Click on the Join Cluster button and paste the join information from the clipboard. The peer address and fingerprint section is auto-filled. Give the root password of the first server, and this then joins the second server to the first server.
- pve01 and pve02 will be seen on both servers’ Web-admin panel. You can close the admin panel of the second server pve02, as all activities will be carried out on the pve01 admin panel.
Create storage with the ZFS file system for replication between the servers
Let’s create the ZFS file system on both servers for a 600GB HDD, as this will be used for storing VM images.
- Click on pve01 from the left side navigation menu; a sub-menu on the right-side panel for the given server will show up.
- Clicking on Disk opens a sub-level menu. Scroll down and click on ZFS.
- Now, from the top menu, click on the Create ZFS button, and a pop-up window will ask for details.
- Enter the name as zfsdata, then select Single Disk for RAID, and leave the rest of the settings as they are. Select the 600GB HDD shown in the Device section, which is usually called /dev/sdb.
- After selection, click on the Create button. This creates storage on pve01. Follow the same process on the pve02 server to add ZFS with the same name, zfsdata.
- As ZFS storage is created with the same name zfsdata, it is now available for replication between the servers.

Uploading the ISO for the installation of VMs
As we are going to create various VMs, we need to first download the ISO and upload on pve01 local storage for use. We will create two VMs: one based on Windows 10 and another on the Ubuntu 18.04 Linux desktop. For download, refer to the links given below (ensure that you have an official Windows 10 licence-key ready):
- https://www.microsoft.com/en-in/software-download/windows10ISO
- http://releases.ubuntu.com/18.04.1/ubuntu-18.04.1-desktop-amd64.iso
Now we are going to upload this into a Proxmox cluster:
- Click on the down arrow before pve01 in the left-side navigation menu; this expands pve01 further and local(pve01) will be visible.
- Click on this storage local on the right-side and an option called Content will open up.
- Click on Content, and then on the Upload button, which will open a dialogue box. Select ISO Image and then choose Download ISO files one by one, and upload them here. Both Windows and Ubuntu ISOs are now shown in the Contents section.
Creating Windows and Linux VMs
Creating a VM is quite simple and straightforward.
- Click on the Create VM option given on the top-rightmost corner. It is highlighted in bright blue.
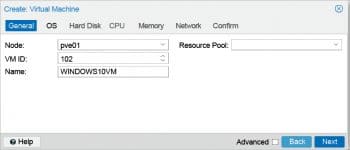
- Its first tab is general, asking you to give a name for the VM. For MS Windows, let the name be Windows10VM and when installing Ubuntu Linux, name it Ubuntu18VM. The remaining settings are auto generated, so let them be as they are.
- Next go to the OS tab and select the ISO image based on the operating system installation; in the Guest OS section, select Type as Microsoft Windows with 10/2016 in the Version drop-down menu. In Ubuntu Linux, we will select Type as Linux and choose 4.x/3.6/2.6 kernel in the Version drop-down menu. This selection helps in the auto selection of the type of storage interface in the next Hard Disk tab. If Microsoft Windows is selected, the default is the IDE interface and, if it is Linux, the default is VirtIO SCSI.
- In the Storage tab, select zfsdata as the storage location for both Windows10VM and Ubuntu18VM. Also allocate 100GB as Disk Size.
- In the next CPU tab, allocate two cores for the VM and in the Memory tab, allocate 4096, i.e., 4GB RAM.
- In the Network tab, let the defaults settings remain. Go to the Confirm tab, which shows a summary of what has been selected and click on the Finish button. Now in a few minutes, the VM gets created.
- Start the VM and access its console. Click on the Start button to start the VM and to access the GUI, click on the Console button. Here you can finish the OS installation as per standard MS Windows and Ubuntu Linux installation processes, including assigning IP, etc, as if it’s a part of the LAN setup.
- Once the VM is up, you can use it over your LAN via a remote desktop or the Proxmox Web-console interface.
- For Windows to perform better, one can add additional VM drivers and follow the best practices guidelines given by the Proxmox Wiki (https://pve.proxmox.com/wiki/Windows_10_guest_best_practices).
Steps to schedule replication
To replicate the VMs created, we need to configure the replication scheduler to replicate from the pve01 to the pve02 server.
- Click on the Replication section shown in each VM’s sub-menu. For example, click on the Ubuntu18VM VM from the left-menu and on the right-side panel you will see a sub-menu, which has an option called Replication, which you can click on.
- Then click the Add button at the top; a pop-up with the words Create:Replication job with target as pve02 will appear, as the existing VM is on pve01.
- Now select Every 30 min in the Schedule section and click on the Create button.
After creation, an entry is seen in the replication job list. Now select the job and click on Schedule, which will start taking a time copy to pve02, and the technical details will be seen in the Log section.
Migration from pve01 to pve02 and vice versa
After the replication setup is done, we can migrate the VMs from one server to another as follows:
- Click the Migrate button shown at the top section of the VM, next to the Console button, to migrate the VM from pve01 to pve02. The moment the VM is migrated to pve02, the replication target is also changed from pve02 to pve01. So, after a few days, we can move back to pve01.
- An IT admin can keep VMs running on pve01 for the first and third weeks of the month, and on pve02 for the second and fourth weeks of the month. Thus both pieces of hardware are used and VMs are switched between the servers.

Backup of VMs to external Windows Share drives
We now need to add Windows Share as the backup storage in the Storage section under Data centre.
- Click on the Add button under Storage, and you will be asked for many options. Select CIFS for using the Windows Share drive.
- A pop-up called Add: CIFS will open, asking you to enter a name in the ID section. Name it as winbackupdrive, and in Server, enter the IP address. In our case it is 192.168.1.2. Next, enter the user name and password.
- After that, it will populate Windows shares. Under the ‘Share’ dropdown, select Share “vmbackup” for VM backup storage.
- Then select the VZDump backup file in the Content drop-down and also change Max Backups to 5, as we need to maintain five full copies of VMs for safety purposes.
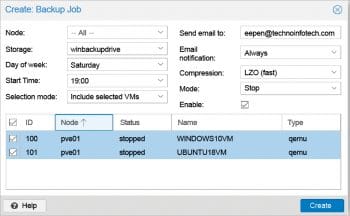
Now we select Backup from Data centre in the right-side section, and click on Add to add a schedule to take backups of both VMs.
- In the pop-up window, select winbackupdrive in the Storage section with Days of week as Saturday and Start Time as 19:00 and, finally, select both VMs from the list and click on the Create button.
So now we can create a full VM backup every Saturday, which can be restored in the event of a crash as a different or the same VM on this cluster or on another Proxmox cluster.


Can’t create another a zfs in pve02 using the same name set at pve01:
Error: storage ID ‘zfsdata’ already defined (500)
Of course you cant. This whole idea is crazy, you can do offline migration on 2 nodes. For online migration you need shared storage. This is another article written to show in portfolio.
@bno (sorry did not get post notification), while creating zfsdata on 2nd server , you need to make sure you do not select “Add to Storage” option as its already added in Proxmox Data-center. (this part some how got missed in above document).
@oleg Zech as this is cluster, the ZFS does back-end Async data-replication, similar to offline one. as this is via Proxmox GUI you are getting replication up with same-storage name. The Document is based on working setup.
Yes if you want 100% realtime SYNC data go for Ceph storage supported by Proxmox , which is good for same-premises setup. While ZFS replication given in above document support multi-location too.
Hope this help.