The Jenkins project was originally named Hudson, but was later renamed after a dispute with Oracle. Jenkins helps to automate those parts of the software development process that do not involve humans. Jenkins is important as it is a continuous integration, continuous delivery tool, that is easy to use for the end-to-end automation of an application’s life cycle management phases.
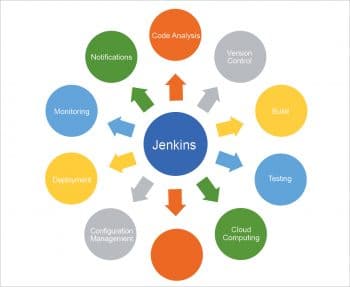
Jenkins is an open source ‘automation server’. It is not just a continuous integration (CI) tool or continuous delivery tool any more. After the release of Jenkins 2.0, the focus is broad and is on making Jenkins easy to use for the end-to-end automation of an application’s life cycle management phases.
Jenkins can be easily used to create a pipeline that can be utilised for continuous code inspection, CI, continuous delivery (CD), continuous testing, continuous deployment, and so on.
One of the biggest benefits of Jenkins is the availability of packages for different operating systems and containers. We only need the Java Runtime Environment (JRE) to install Jenkins.
There are two release lines in Jenkins.
1) Long-term support (LTS): These releases are selected every 12 weeks from the regular releases. They are considered stable releases. The Jenkins LTS Upgrade Guide is available at https://jenkins.io/doc/upgrade-guide/. Past stable releases are available at http://mirrors.jenkins.io/war-stable/. The LTS changelog is available at https://jenkins.io/changelog-stable/.
The following options are available for Jenkins LTS installation:
- Microsoft Azure
- Docker
- FreeBSD
- Gentoo
- MacOS X
- OpenBSD
- openSUSE
- Red Hat/Fedora/CentOS
- Ubuntu/Debian
- Windows
- Generic Java package (.war)
2) Weekly: A new release is made available every week to deliver bug fixes and features to the Jenkins community. Past stable releases are available at http://mirrors.jenkins.io/war/.
LTS changelog is available at https://jenkins.io/changelog-stable/ https://jenkins.io/changelog/.
The following options are available for installing the Jenkins weekly release:
- Arch Linux
- Docker
- FreeBSD
- Gentoo
- MacOS X
- OpenBSD
- openSUSE
- Red Hat/Fedora/CentOS
- Ubuntu/Debian
- OpenIndiana Hipster
- Windows
- Generic Java package (.war)

Master-agent architecture
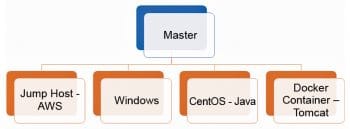
Jenkins supports distributed architecture. Let’s understand how this is useful and how it can be achieved. In the case of large and heavier projects where multiple components are involved, the master node can run out of resources such as CPU and memory while scheduling jobs at regular intervals. It is also important to note that different components need different tools and environments. Different environments may include the following:
- Creating a package for an iOS app, for which a Mac machine is required
- Creating a package for an Android app, for which Android SDK and Gradle are required
- Creating a Java package for which Maven and specific JDK versions are required – Custom Jars
- Creating a hybrid app for which Ionic or Angular JS are required
We can make use of a multiple-environment setup with the help of the master and agent architecture.
The master node is where Jenkins is installed. This node performs the following tasks:
- Schedules the build jobs
- Releases the build for execution to the agent node
- Monitors various conditions such as its status (online or offline)
- Checks agents’ disk space in the workspace
- Captures the build result and generates reports for it, with the master acting as the portal to view it


An agent establishes a bi-directional communication link like TCP/IP with the master in Jenkins. Thus, it distributes the work load from the master and executes jobs dispatched by it. It can run on operating systems such as Windows, Mac and Linux.
You can follow the steps given below to configure an agent node:
- Log in to the Jenkins dashboard, and click on Manage Jenkins > Manage node.
- To create a new agent node click on New node.
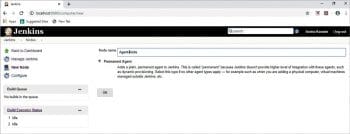
- Enter the name for the agent node and click on Permanent agent. Jenkins also has a provision to copy the existing node configuration once the first agent is created.
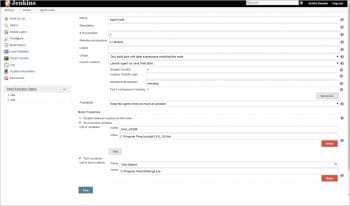
- Fill the node configuration details.
- Every agent node should have a unique name.
- Description: This is a short description of the agent node.
- # of executors: This shows the number of builds apart from the concurrent build which can be executed on this particular node.
- Remote root directory: Set up an absolute path as a working directory on the node dedicated for Jenkins.
- Labels: Multiple agent nodes can be logically grouped together by providing a common tag. Multiple labels must be separated by a space.
- Usage: Use this node as much as possible. Jenkins utilises it freely for jobs that can be executed using this node.
- Only build jobs with label expressions matching this node: Used only when the job is restricted to build on this agent.
Agents can be launched via different methods:
→ Launch agent via SSH
→ Launch agent via Java Web Start
→ Launch agent by executing a command on the master
Here, the Java Web Start method is used to launch the agent. For that we need to enable JNLP port selection to Random in Manage Jenkins > Configure Global Security > TCP port for JNLP agents.
Store the tool locations and environment variable for the system. Click on Save. Now we can launch the agent by executing the following command at the command prompt:
Java -jar agent.jar -jnlpUrl http://192.168.0.104:8080/computer/Agent-node/slave-agent.jnlp
…or by simply downloading and running the slave-agent.jnlp file on the system.
We can see the agent node is online and connected to the master Jenkins without any Jenkins installation process on the agent side.
Plugins
Plugins in Jenkins are used to enhance the usability by integrating different kinds of tools. There are many plugins that can be installed on the Jenkins master. They provide support for different kinds of build tools, testing tools, analysing tools, cloud providers, etc. Through the update centre, plugins can be automatically downloaded along with their dependencies.
Installation of a plugin
- Go to Manage Jenkins > Manage plugins and view the available tab, where you can search for the required plugin’s name; then click the Install button.
- Another method is to use Jenkins-cli for downloading plugins, using the following command:
java -jar jenkins-cli.jar -s http://localhost:8080/ install-plugin SOURCE... [-deploy] [-name VAL] [-restart]
SOURCE: We add the path of local file or provide the URL.
-deploy: Without restarting Jenkins, deploy the plugin.
-name VAL: To provide a specific name to the plugin.
-restart: When the plugin gets installed, restart Jenkins.
• Plugins can also be directly installed in the master Jenkins by uploading the .hpi file, which should be already downloaded in the system. To upload the file, go to the Advanced tab in Manage plugins.
• Jenkins always provides updates of the plugins installed. To check updates, go to the Updates tab; then download the required updates of the plugin.
• Similarly, you can uninstall a particular plugin. Go to Installed Tab and click on Uninstall for a specific plugin.
Blue Ocean
Blue Ocean is a new user experience for Jenkins. Some of its key features are:
→ Visual pipeline editing
→ Pipeline visualisation
→ Pinpoint troubleshooting
→ GitHub and Git integration
→ Personalisation
→ Built with and for declarative pipelines
- To use Blue Ocean, we can install its available plugin. Go to Manage Jenkins -> Manage Plugins -> Available -> Select Blue Ocean.
- After installation, we can see the Blue Ocean option on the Jenkins dashboard
- Click on the Blue Ocean icon, which will open the Blue Ocean UI.
- Click on the New Pipeline icon to add a multi-branch pipeline.
- Then select the repository (Git, Bitbucket) name and URL with your user name and password to create the pipeline.
- This opens the Blue Ocean editor option.
- There we can add the number of stages and the corresponding steps in each stage.
- Each stage can be made to run on different agent nodes.
- Once all the steps are filled in, we can save the configuration, which creates the Jenkins file in the repository.
- After that, run the pipeline in Blue Ocean.

jeJenkins on Docker
Jenkins can be installed in a Docker container. By using Docker images and containers, we get the advantage of an easy setup and replication of Jenkins.
- To use Jenkins on Docker, the latter should be installed in a local machine.
- To start with the setting up, first pull the Docker image from the Docker hub:
Docker pull jenkins/jenkins:lts
- Run the following command:
Docker run -d -p 8080:8080 -v $PWD/jenkins:/var/jenkins_home -t jenkins/jenkins:lts
-d helps Jenkins to run in a detached mode, where even if we terminate the session, it will not exit.
-p 8080:8080 maps the 8080 port of the Docker container to the 8080 port on the host machine. The first number is the host machine’s port number, and it can be set to any other port number.
-v options assign volumes to the Jenkins container. Volumes provide persistent storage that exists independently from containers but can be attached to one or more containers, as necessary.
Finally, jenkins/jenkins is the name of the image we want to use.
- Similarly, there is the Jenkins Blue Ocean image available to build the pipeline with pipeline as code using Blue Ocean.
docker run -d -p 8080:8080 -v $PWD/jenkins:/var/jenkins_home -t jenkinsci/BlueOcean
- To get a bash\ssh inside a running container, we can use this command:
docker exec –i –t jenkins/jenkins:lts bash
- To check the status of containers, use the following command:
docker ps –a
The above procedure was about running Jenkins on Docker. We can also do Jenkins integration with Docker (installed on machine).
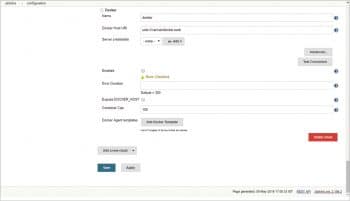
- Go to the Jenkins dashboard. Click on Manage Jenkins > Manage plugin > Install Docker plugin.
- Then go to Configure system > Add a new cloud > Docker.
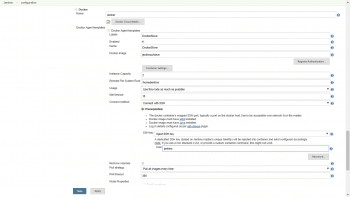
- Add a Docker template to an agent node. Here, we can add a list of images that can act as slaves.
→ Labels: This is the name of the agent node.
→ Docker image: This provides the image name.
→ Remote filing system root: This is Jenkins’ home path in the container.
→ Connect method: Selects the access method to build our image as ‘Connect with SSH’ - Save the template.
- The job can be configured as ‘restrict to run’ on the label of the agent template.
We have now created a Jenkins slave in a Docker container, which is portable and lightweight.


wow! That’s a great information about Jenkins. It is very knowledgeable and helpful article.
Thank You