


Supervisord or Supervisor daemon is an open source process management system. It is a client/ server system that enables the user to control numerous services. If a process crashes for any reason, Supervisor simply restarts it. This article explains how to run multiple services inside a single container, and how to effectively use Docker Compose and persistent volume in a local development environment with Supervisord.
A container is a lightweight platform for running applications along with their dependencies in an isolated environment. It is good to run a single service inside a container.
Though we can access the various services hosted in different containers using a container network, we can get the same benefits by running multiple services in a single container. There are some situations in which we need to run more than one service inside a container, and these services should be accessible from the container host or network — for example, the Apache/Nginx HTTP server along with the FTP server, or some microservices that are running inside the same container with different processes.
We can use different methods such as adding multiple commands in ENTRYPOINT at the end of Dockerfile, writing a wrapper script to spawn multiple services in a container with unique process ids. But the method has some limitations such as increasing the complexity when the number of services that have to be managed in a container increases. There can also be dependency issues while starting multiple services.
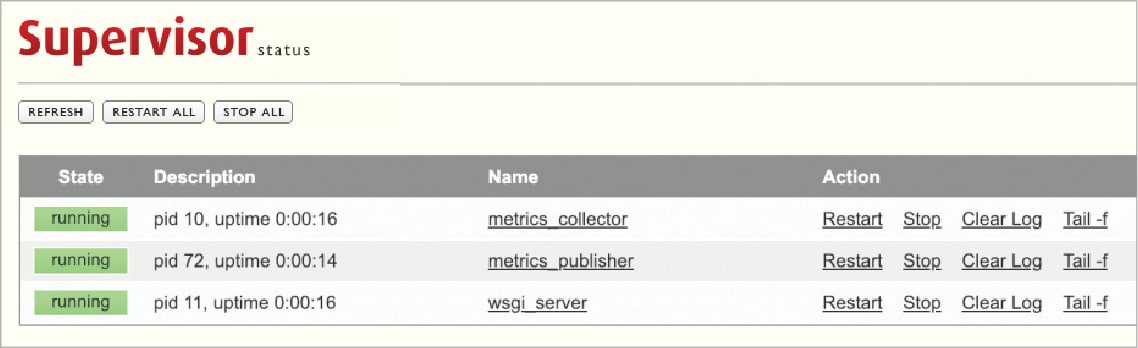
We can use a simple and user friendly process manager like Supervisord to start, stop and restart multiple services. Supervisord is a lightweight tool that can be easily deployed in a container. Its configuration is easy to maintain as the number of services is handled by Supervisor, which can be accessed by a Web interface, XML RPC interface and command line interface.
I am going to deploy a simple multi-service application using Docker Compose. Make sure the Docker daemon and Docker Compose are installed and running in your machine. Docker Compose is a CLI tool that helps you to define and deploy a multi-service containerised application environment. It is ideal for developing applications in your local environment without connecting to a remote host or a virtual machine. It is used to deploy and scale the application in different environments such as a development to production environment. There are multiple advantages of using Docker Compose to manage a multi-service application.
We can have multiple isolated environments in a single host, can enable CI/CD for the environment, and can easily debug and identify the software bugs. We can build a specific service for an application and also get the benefits of using the Docker network and persistent volume to access and store the data layer of an application.
Let’s assume we have a Dockerfile for all services created by docker-compose. Create a docker-compose.yml file and define the specifications for the application. Once the file is created, execute docker-compose in the same directory where the Docker Compose file exists. It will read the definition and interact with a Docker daemon to create the resources. It is recommended that you run it as a daemon process by passing the parameter -d.
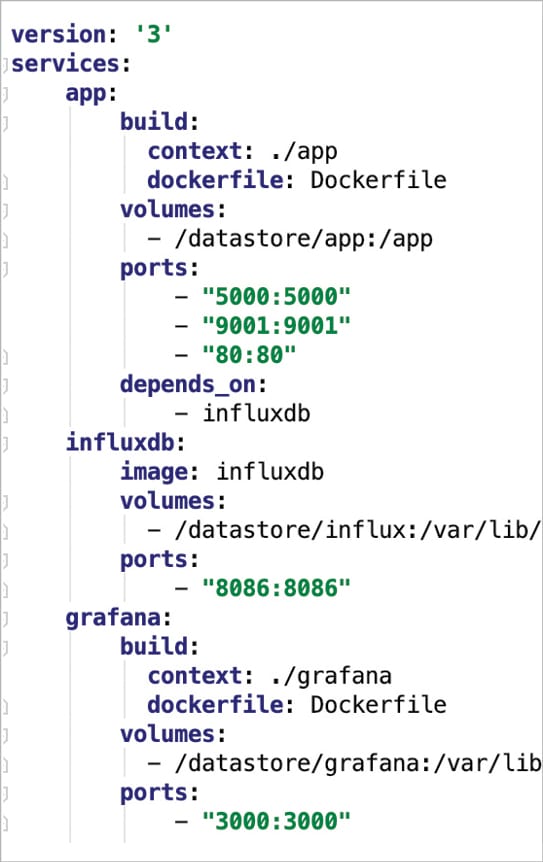
In the example shown in Figure 3, I have defined three services. The first is the app tier, the second is the data tier and the third service is used to monitor the application’s performance using Grafana, employing InfluxDB service as a data source.
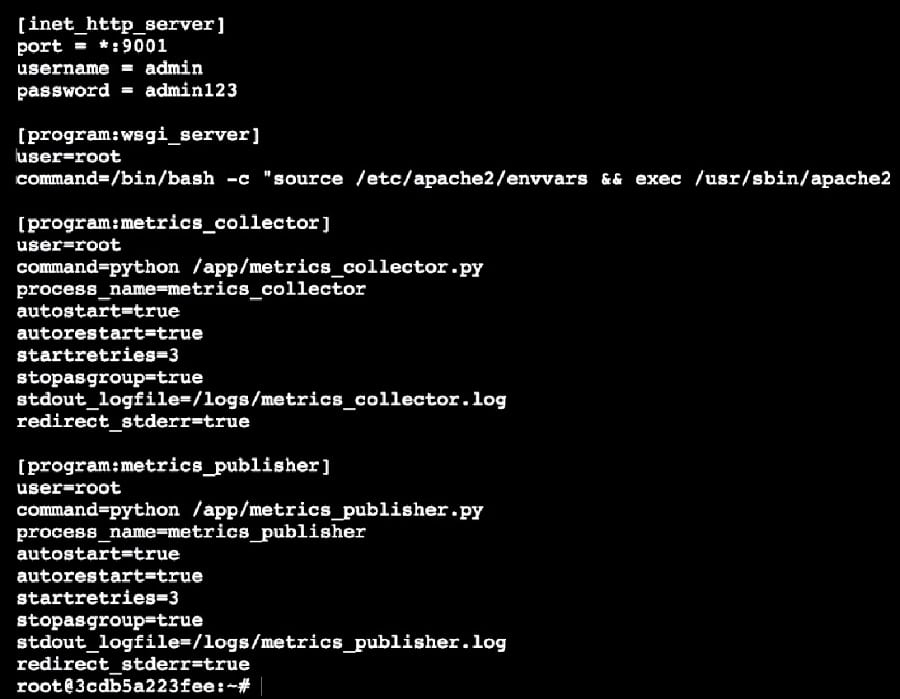
Here, the app tier hosts different services such as the metrics monitor, the metrics collector and a WSGI service. It is controlled and managed by Supervisord.
When an app container is started, Supervisord is started by the ENTRYPOINT script. Supervisord then starts the remaining process.
Docker Compose takes care of provisioning the services in order and maintaining the dependencies. It exposes the service port as per the definition. Persistent volume is mounted on the container for storing database files, Grafana dashboards and application code. Another benefit of using persistent volume for a development environment is that we do not need to build the service for every code change.
So if we are developing an application using Flask in a debug mode, it detects the changes in the source code and reruns the app without restarting. It avoids unnecessary builds and makes development much easier. We can directly use the repo path as a persistent volume mount path in a local environment.


