


spaCy is an open source Python library that lets you break down textual data into machine friendly tokens. It has a wide array of tools that can be used for cleaning, processing and visualising text, which helps in natural language processing.
Natural language processing (NLP) is an important precursor to machine learning (ML) when textual data is involved. Textual data is largely unstructured and requires cleaning, processing and tokenising before a machine learning model can be applied to it. Python has a variety of NLP libraries available for free such as NLTK, TextBlob and Gensim. However, spaCy stands out when it comes to its speed of processing text and applying beautiful visualisations to aid in understanding the structure of text. spaCy is written in Cython; hence the upper case ‘C’ in its name.
This article discusses some key features of the spaCy library in action. By the end of this article, you will have hands-on experience in using spaCy to apply all the basic level text processing techniques in NLP. If you are looking for a lucrative career in machine learning and NLP, I would highly recommend adding spaCy to your roster.
Installing spaCy
As with most of the machine learning libraries in Python, installing spaCy requires a simple pip install command. While it is recommended that you use a virtual environment when experimenting with a new library, for the sake of simplicity, I am going to install spaCy without a virtual environment. To install it, open a terminal and execute the following code:
pip install spacy
python -m spacy download en_core_web_sm
spaCy has different models that you can use. For English, the standard model is en_core_web_sm. For the coding part, you will have to select a Python IDE. I personally like to use Jupyter Notebook, but you can use any IDE that you are comfortable with. Even the built-in Python IDLE works fine for the code covered in this article.
Once you are on your IDE, test if the installation has been successful by running the following code. If you get no errors, then you are good to go.
import spacy
myspacy = spacy.load(‘en_core_web_sm’)
The myspacy object that we have created is an instance of the language model en_core_web_sm. We will use this instance throughout the article for performing NLP on text.
Reading and tokenising text
Let’s start off with the basics. First create some sample text and then convert it into an object that can be understood by spaCy. We will then apply tokenisation to the text. Tokenisation is an essential characteristic of NLP as it helps us in breaking down a piece of text into separate units. This is very important for applying functions to the text such as NER and POS tagging.
#reading and tokenizing text
some_text = “This is some example text that I will be using to demonstrate the features of spacy.”
read_text = myspacy(some_text)
print([token.text for token in read_text])
The following will be the output of the code:
[‘This’, ‘is’, ‘some’, ‘example’, ‘text’, ‘that’, ‘I’, ‘will’, ‘be’, ‘using’, ‘to’, ‘demonstrate’, ‘the’, ‘features’, ‘of’, ‘spacy’, ‘.’]
We can also read text from a file as follows:
#reading and tokenizing text from a file
file_name = ‘sample_text.txt’
sample_file = open(file_name).read()
read_text = myspacy(sample_file)
print([token.text for token in read_text])
Sentence detection
A key feature of NLP libraries is detecting sentences. By finding the beginning and end of a sentence, you can break down text into linguistically meaningful units, which can be very important for applying machine learning models. It also helps you in applying parts of speech tagging and named entity recognition. spaCy has a sents property that can be used for sentence extraction.
#sentence detection
sample_passage = “This is an example of a passage. A passage contains many sentences. Sentences are denoted using the dot sign. It is important to detect sentences in nlp.”
read_text = myspacy(sample_passage)
sentences = list(read_text.sents)
for sentence in sentences:
print(sentence)
As you can see in the following output, we have successfully broken down the sample_passage into discernible sentences.
This is an example of a passage.
A passage contains many sentences.
Sentences are denoted using the dot sign.
It is important to detect sentences in nlp.
Removing stop words
An important function of NLP is to remove stop words from the text. Stop words are the most commonly repeated words in a language. In English, words such as ‘are’, ‘they’, ‘and’, ‘is’, ‘the’, etc, are some of the common stop words. You cannot form sentences that make semantic sense without the usage of stop words. However, when it comes to machine learning, it is important to remove stop words as they tend to distort the word frequency count, thus affecting the accuracy of the model.
spaCy has a list of stop words in its library for English. To be precise, there are 326 stop words in English. You can remove them from the text using the is_stop property of spaCy.
#removing stopwords
print([token.text for token in read_text if not token.is_stop])
After removing the stop words, the following will be the output of our sample text.
[‘example’, ‘passage’, ‘.’, ‘passage’, ‘contains’, ‘sentences’, ‘.’, ‘Sentences’, ‘denoted’, ‘dot’, ‘sign’, ‘.’, ‘important’, ‘detect’, ‘sentences’, ‘nlp’, ‘.’]
Lemmatisation of text
Lemmatisation is the process of reducing the inflected forms of a word such that we are left with the root of the word. For example, ‘characterisation’, ‘characteristic’ and ‘characterise’, are all inflected forms of the word ‘character’. Here, ‘character’ is the lemma or the root word. Lemmatisation is essential for normalising text. We use the lemma_ property in spaCy to lemmatise text.
#lemmatisation of text
for word in read_text:
print(word, word.lemma_)
The following is the lemmatised output of the sample text. We output the word along with its lemmatised form. To preserve page space, I am sharing the output of a single sentence from our sample text.
Sentences sentence are be denoted denote using use the dot dot sign sign
. .
Finding word frequency
The frequency at which each word occurs in a text can be vital information when applying a machine learning model. It helps us to find the main topic of discussion in a piece of text and helps search engines provide users with relevant information. To find the frequency of words in our sample text, we will import the Counter method from the collections module.
#finding word frequency
from collections import Counter
word_frequency = Counter(read_text)
print(word_frequency)
The following is the output for the frequency of words in our sample text:
Counter({This: 1, is: 1, an: 1, example: 1, of: 1, a: 1, passage: 1, .: 1, A: 1, passage: 1, contains: 1, many: 1, sentences: 1, .: 1, Sentences: 1, are: 1, denoted: 1, using: 1, the: 1, dot: 1, sign: 1, .: 1, It: 1, is: 1, important: 1, to: 1, detect: 1, sentences: 1, in: 1, nlp: 1, .: 1})
POS tagging
Parts of speech (POS) tagging helps us in breaking down a sentence and understanding what role each word in the sentence plays. There are eight parts of speech in the English language, i.e., noun, pronoun, adjective, verb, adverb, preposition, conjunction and interjection.
In POS tagging, we apply a tag to each word in a sentence that defines what part of speech that word represents in the context of a given sentence. In spaCy, we will make use of two properties — tag, which gives the fine-grained part of speech, and pos, which gives the coarse-grained part of speech. The spacy.explain() method provides a description of a given tag.
#POS tagging
for word in read_text:

print(word, word.tag_, word.pos_, spacy.explain(word.pos_))
The following is the output of the POS tagging of the sample text. In order to preserve page space, I am providing only a portion of the output.
This DT DET determiner
is VBZ AUX auxiliary
an DT DET determiner
example NN NOUN noun
of IN ADP adposition
a DT DET determiner
passage NN NOUN noun
Visualising POS tagging using displaCy
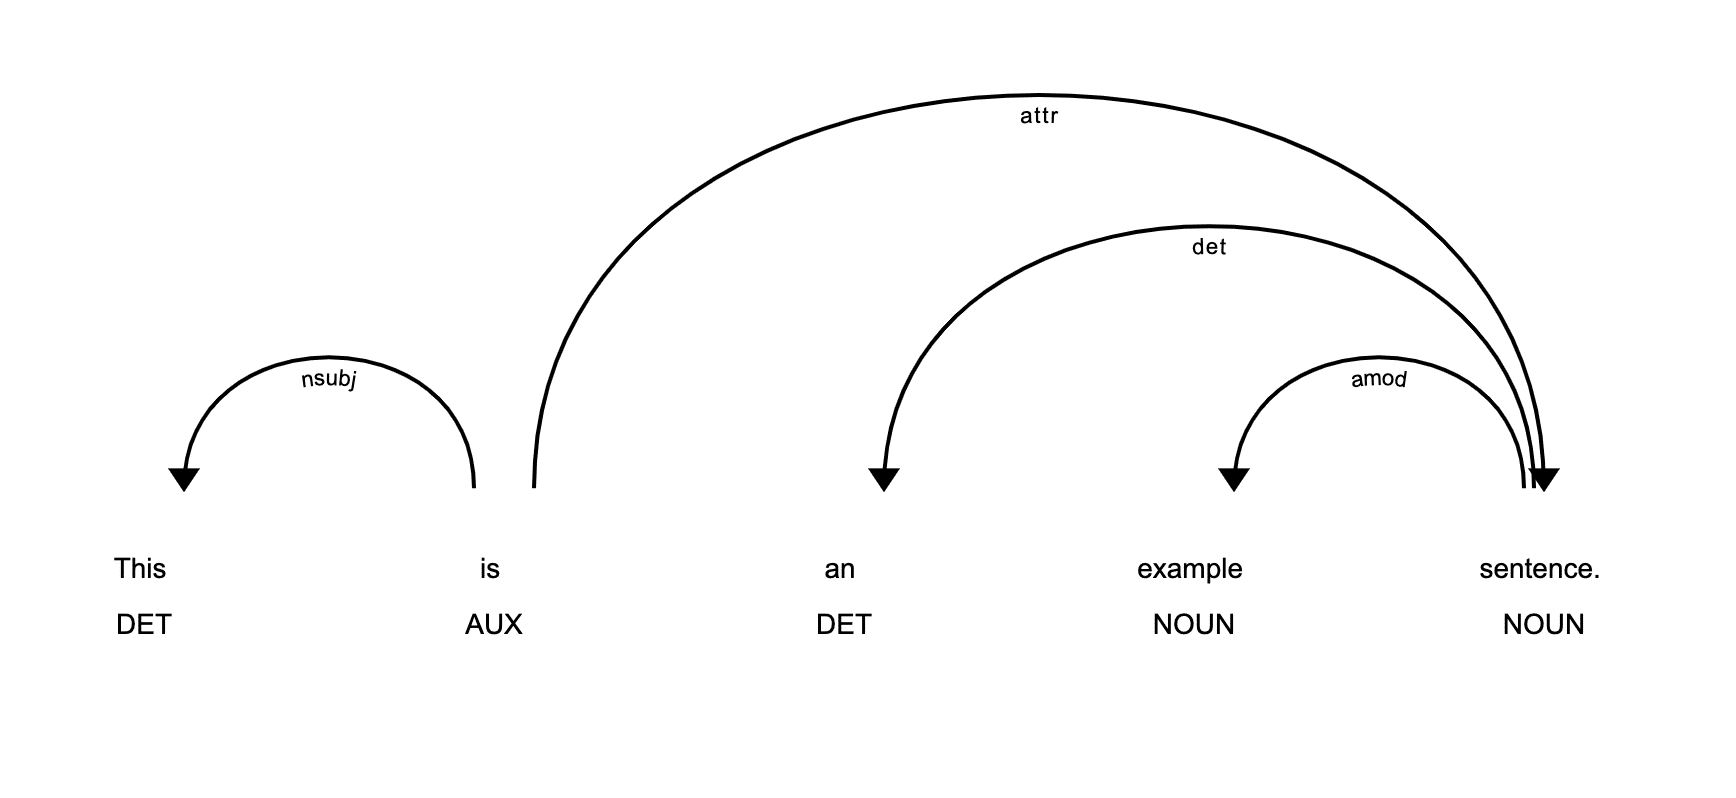
spaCy comes with a built-in visualiser called displaCy, using which we can apply and visualise parts of speech (POS) tagging and named entity recognition (NER). To visualise POS tagging for a sample text, run the following code:
#using displacy for POS tag visualisation
from spacy import displacy
sample_text = “This is an example sentence.”
read_text = myspacy(sample_text)
displacy.serve(read_text, style=”dep”)
Figure 1 shows the output of the code, which you can view by using your browser on the localhost link provided by displaCy.

Visualising NER using displaCy
Named entity recognition (NER) is the process of identifying named entities in a piece of text and tagging them with a pre-defined category, such as a name of a person, location, organisation, percentage, time, etc. spaCy has the property ents, which we can use to apply NER on text. We will also use displaCy to visualise the NER output.
#using displacy for NER visualisation
sample_text = “Every year, Hyderabd hosts the biggest exhibition in India. It has fun rides and food stalls. At least a million people visit it every year.”
read_text = myspacy(sample_text)
displacy.serve(read_text, style=”ent”)
Figure 2 shows the output of the NER visualisation.
In this article, we have discussed the basic functionalities most commonly used for NLP using spaCy and its built-in visualiser displaCy. There are many more advanced features in this library that are absolutely worth exploring and mastering if you want a solid foundation in NLP. However, those features are beyond the scope of this article. Hence, this is a good stopping point. I have shared a few links as reference to help you get a deeper understanding of the spaCy library. I recommend you go through them.


