


This article explains how to build, train and deploy a convolutional neural network using TensorFlow and Keras. It is directed at students, faculties and researchers interested in the area of deep learning applications using these networks.
Artificial intelligence (AI) is the science of making intelligent computer programs or intelligent machines. In AI, deep learning (also called deep neural networks) mimics the working of the human brain for processing information and recognising patterns. There are many types of networks available in the wider family of deep neutral networks. Among them are convolutional neural networks (CNNs), which are used most commonly for the analysis of visual images. A CNN automates the feature extraction task from raw input images and thus eliminates the requirement of handcrafted feature extraction. This makes it a very promising architecture for image recognition and classification. A CNN is made of several types of layers, which include convolution and pooling layers, a rectified linear unit (relu) layer, besides the fully connected layer. It also performs two essential operations — feature learning and classification. Automatic feature learning is performed by a set of the convolution layer, rectified linear unit (relu) layer and pooling layer with batch normalisation, whereas classification is performed by a set of the fully connected layer with activation functions like softmax, sigmoid, etc. Examples of such applications are satellite imagery, video surveillance, leaf disease detection, human pose estimation, etc.
Introduction to TensorFlow and Keras
TensorFlow was developed by the Google Brain team and released in 2015 for performing large scale machine learning tasks. It is an open source and free software library, and is widely used to build, train and infer deep learning models. TensorFlow runs on a variety of platforms like Windows, Linux, macOS and even on Android. It is written in languages like C++, Python and CUDA. It allows training and deploying of ML and DL models very quickly, regardless of the language or platform.
Keras is a Python based open source library that runs on top of TensorFlow. Considered as a high-level API, it is easy to use and is also user friendly. It is more suitable for quick implementations and works well on small data sets. However, the number of projects available online in Keras is lesser as compared with TensorFlow.
Data preparation
The first step in building and deploying a CNN model is to prepare the data set. Accumulating a good quality data set has a major impact on the success of any deep learning model. There is a variety of data sets available for performing experiments using deep learning models. In this article, we have considered the Cat and Dog data set available on Kaggle to implement image classification with CNN using Keras. This data set contains 8007 training images and 2025 testing images. In this article, we have developed a classifier model that classifies a given picture as that of a dog or a cat.
Building a model
We have implemented the CNN using Google Colab – a browser based cloud platform which makes it possible to make complex models on large data sets using Jupyter Notebooks. The first step is to import the necessary packages from Keras. The following code can be used to import the required packages to implement CNN classification:
import os
from glob import glob
from tensorflow import keras
import numpy as np
from tensorflow.keras import layers
from keras.models import Sequential

from keras.layers import Activation, MaxPooling2D, Conv2D, Lambda, Dropout, Dense, Flatten, Input
from keras.utils.vis_utils import plot_model
from keras.layers.normalization import BatchNormalization
We have created a simple CNN in Keras using a sequential API. Sequential API of Keras is basically a linear stack of multiple layers. We can add it layer by layer by using the add() method with parameters. Here, we have added three convolutional blocks, followed by a maxpooling layer and an activation function called relu. The input size considered for an image is 224 x 224:
new = Sequential()
new.add(Conv2D(32, (3, 3), input_shape=(224, 224,3)))
new.add(BatchNormalization())
new.add(MaxPooling2D())

new.add(Conv2D(32, (3, 3), activation=’relu’))
new.add(MaxPooling2D())

new.add(Conv2D(32, (3, 3), activation=’relu’))
new.add(MaxPooling2D())

new.add(Conv2D(64, (3, 3), activation=’relu’))
new.add(MaxPooling2D())
As mentioned earlier in the article, the above part of the CNN mode performs feature learning and generates a feature map. After feature learning, it is required to classify images using fully connected layers. For that, we have added two dense layers. The classification problem mentioned here is a type of binary classification; therefore, we have used sigmoid as an activation function. To convert the feature map into the fully connected layer, we have to first flatten the array of the former. After that, using a dense layer, we add two fully connected layers:
new.add(Flatten())
new.add(Dense(64))
new.add(Activation(‘relu’))
new.add(Dense(32))
new.add(Activation(‘relu’))

new.add(Dense(1))
new.add(Activation(‘sigmoid’))
new.summary();
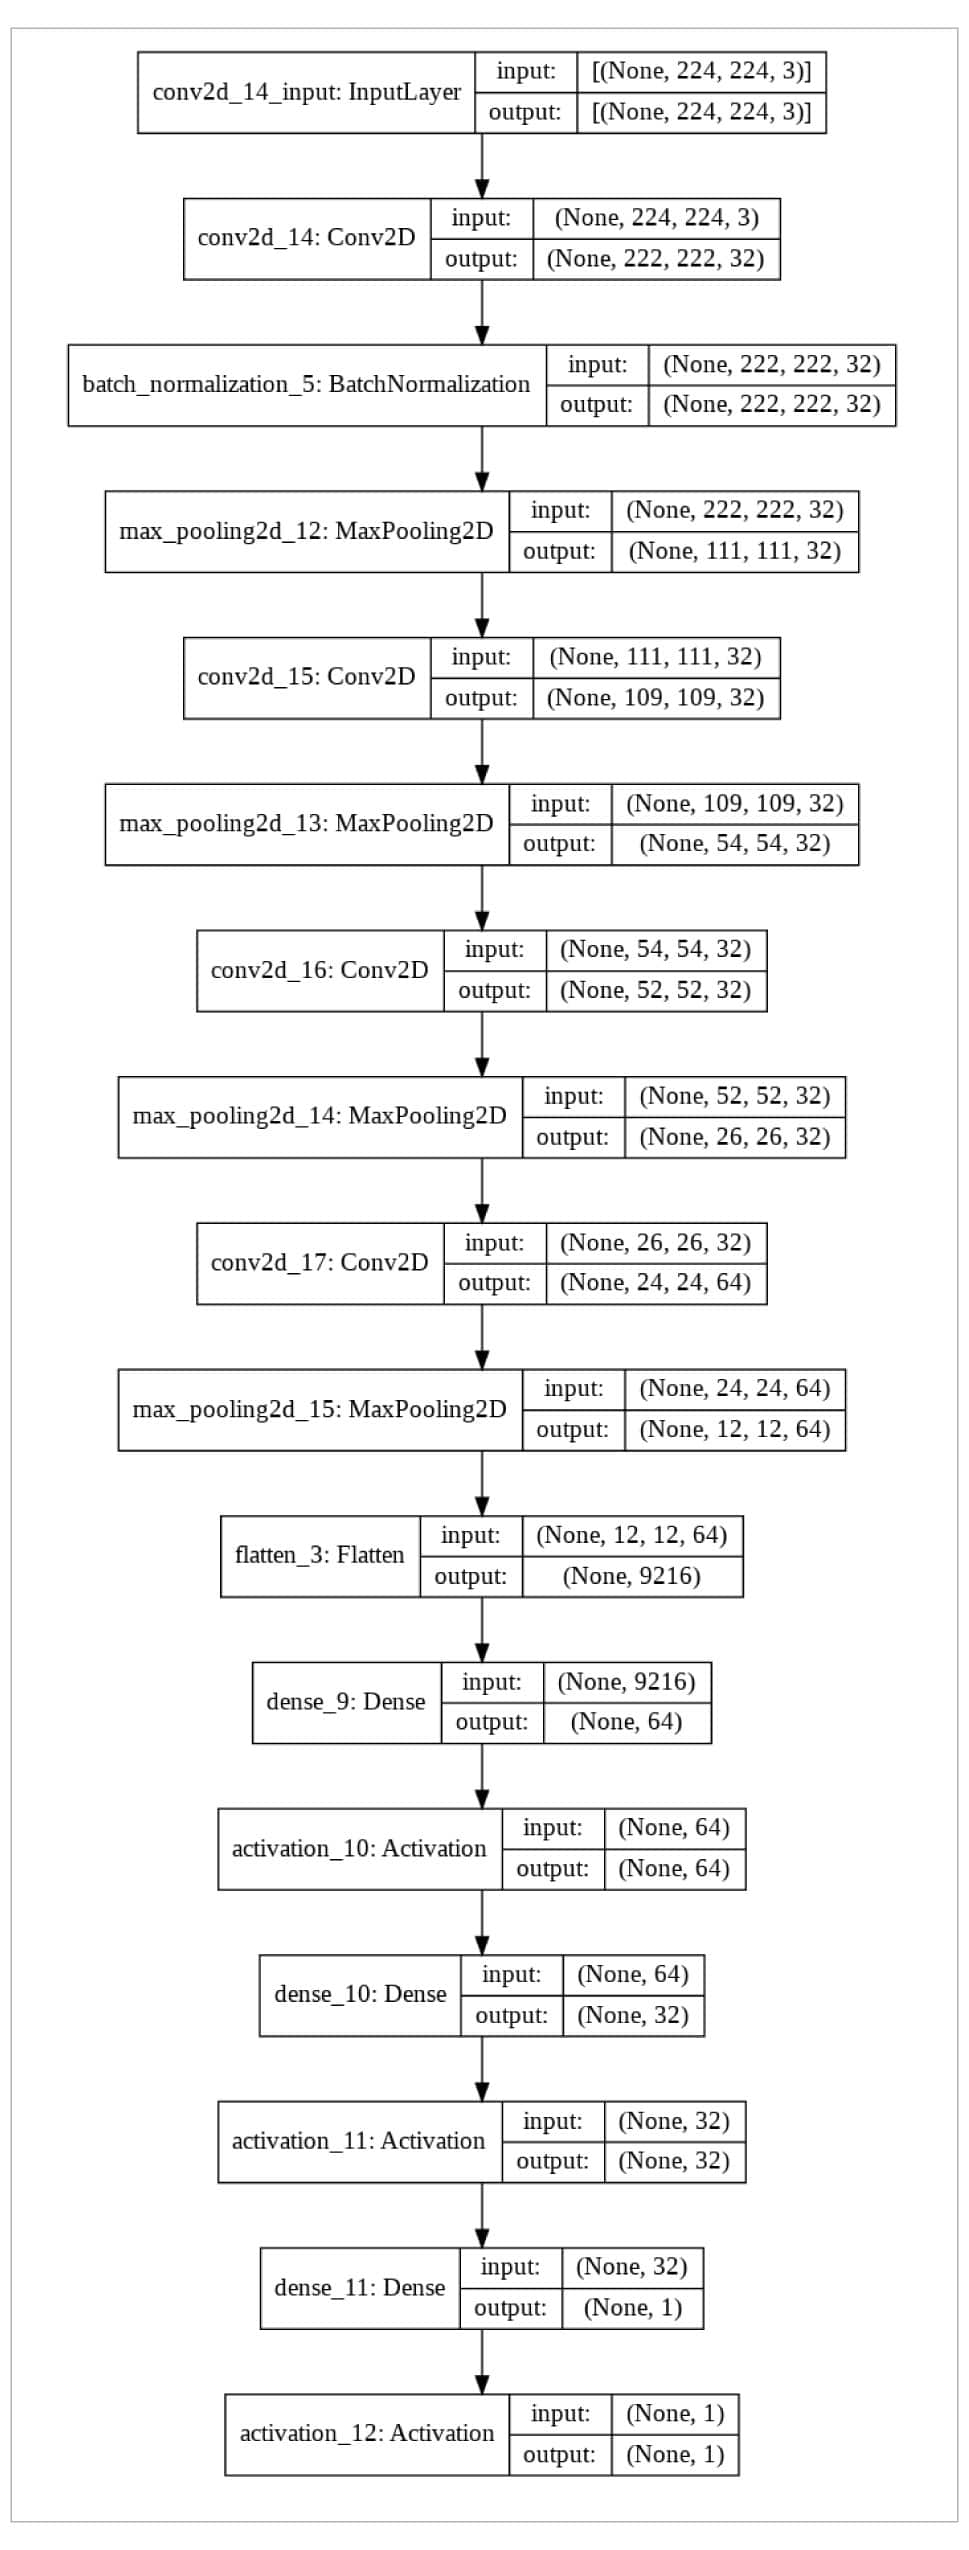
The model can also be plotted using the plot_model() method. Figure 1 shows the plotted model.
Compiling and training a model
After a model is built, it is first compiled and then trained using the training data set prepared. The following is the sample code to compile the model:
new.compile(loss=’binary_crossentropy’,
optimizer=’adam’,metrics=[‘accuracy’])
The model is thereafter trained using the fit_generator() methods, where the number of epochs and steps per epochs are specified:
new.fit_generator(training_image_generator,
steps_per_epoch = no_train_image // 32,
epochs=5,
validation_data=val_datagen,
validation_steps= no_val_image // 32,
verbose=1)
Model evaluation
After successful training, the model now needs to be evaluated using a test data set. The following is the code to evaluate the CNN model:
new.evaluate_generator(test_img_generator, no_test_image // 32)
It returns the values for two parameters — accuracy and loss. These parameters are used to evaluate the performance and efficiency of the model.


