


The main focus of this work is to measure and analyse the real-time performance of the vanilla Linux kernel as against the PREEMPT_RT patched Linux kernel, using the rt-tests test suite. The results show that the PREEMPT_RT patch kernel has a better performance than the vanilla kernel.
PREEMPT_RT patch’s main goal is to reduce the amount of non-preemptible kernel code in the Linux kernel. The technical details of PREEMPT_RT patch are available at https://wiki.linuxfoundation.org/realtime/documentation/technical_details/start.
RT-patched Linux kernel installation
The kernel patch can be downloaded from https://mirrors.edge.kernel.org/pub/linux/kernel/projects/rt/ and the vanilla Linux kernel can be downloaded from https://mirrors.edge.kernel.org/pub/linux/kernel/. It is important to make sure that the version of rt-patch and the kernel are the same.
Now extract the kernel sources and apply the rt-patch. In the config options, set the ‘Fully Preemptible kernel (RT)’ option. Next, build the kernel, update the grub boot loader and reboot into the newly installed real-time patched kernel.
When the command uname -a is run after booting the rt-patched kernel, the output should contain SMP PREEMPT RT, to validate that the system is running on a real-time kernel.
In our work, the following rt-patch and kernel version were used:
$ rt patch-version: patch-5.6.19-rt12.patch
$ Linux Kernel version: linux-5.6.19
Test suite: rt-tests
The rt-tests test suite contains programs to test various real-time Linux features; more details are available at https://wiki.linuxfoundation.org/realtime/documentation/howto/tools/rt-tests. The step-by-step procedure to install the rt-tests suite from the source is given below.
First, you need to install the libraries:
$ sudo apt-get install build-essential libnuma-dev
Next, clone the code and build from the source:
$ git clone git://git.kernel.org/pub/scm/utils/rt-tests/rt-tests.git
$ cd rt-tests
$ git checkout stable/v1.0
$ make all
$ make install
To avoid large booting times, it’s very important to call the make command with the following option:
$ make INSTALL_MOD_STRIP=1
This helps to reduce the size of the suite from 170GB to 20GB approximately. The reason is that the make option has removed the debug statements from the modules.
Setting up the test environment
To set up a test environment where there is competition for system resources, some sort of test load needs to be run to be a determinism disturbance generator or DDG. A commonly used DDG is to start a kernel build using the parallel make feature to run many simultaneous compiles.
Setting up kernel build load: The following steps will start the kernel build; you can open another terminal and run the tests there.
$ wget http://www.kernel.org/pub/linux/kernel/vx.y/linux-x.y.z.tar.bz2
$ tar xf linux-x.y.z.tar.bz2
$ cd linux-x.y.z.tar.bz2
$ mkdir /tmp/build
$ make O=/tmp/build mrproper
$ make O=/tmp/kbuild allmodconfig
$ make O=/tmp/build -j4
Setting up signaltest: The signaltest utility was written by Thomas Gleixner to measure the latencies involved in a simple message passing mechanism, the pthread signals.
By default, two threads will be created. These threads will continuously wait for a signal from the other thread, immediately sending a signal back and restarting the loop. At each loop, a measurement of the signal delivery latency is done, and statistics about the measurements are shown on the terminal.
The command used to start signaltest is:
$ ./signaltest -p 99
The ‘p’ option in the above command execution assigns the number that follows (in this case, 99) as the priority of the highest thread.
Setting up sigwaittest: The sigwaittest utility was written by Carsten Emde to measure the latency between sending and receiving a signal between two threads or two processes via a fork. The program sigwaittest creates a pair of threads or two processes (via a fork), synchronises them via signals, and calculates the latency between sending a signal and returning from sigwait().
The command used to start sigwaittest is:
$ ./sigwaittest -a -t -p99 -i100
The ‘a’ option in the above command specifies on which processor the utility should be run. If nothing is specified, it’s run on the current processor.
The ‘t’ option is used to set the number of test threads (default is 1, if this option is not given). If the ‘t’ option is used and number of threads is not specified, the number of threads is taken as the number of available CPUs.
The ‘p’ option is used to set the priority of the process. So, in the above command, the priority of the process is 99.
The ‘i’ option is used to set the base interval of a thread in microseconds. The interval specifies the time the receiver thread waits for the signal from the sender thread.
Setting up ptsematest: The ptsematest utility was written by Carsten Emde to measure the latency of interprocess communication with POSIX mutex. The program creates a pair of threads that are synchronised using pthread_mutex_unlock () / pthread_mutex_lock (), and the time difference between getting and releasing the lock is measured as the latency.
The command used to start ptsematest is:
$ ./ptsematest -a -t -p99 -i100 -d0
The explanations for the options a, t, p and i are given while describing sigwaittest. The same explanations are applicable for all the tests listed below.
The ‘d’ option is used to set the distance of thread intervals in microseconds. As an example, if we are to create a couple of thread pairs and the distance is set to say 500µs, then the first thread pair interval is 100, the second thread pair interval becomes 100 + 500, the third interval becomes 100 + 500 + 500, and so on. In the above command, the distance is zero, which means all the thread pairs will have the same interval.
Setting up pmqtest: The pmqtest utility was written by Carsten Emde to measure the latency of interprocess communication with POSIX message queues. The program starts two threads that are synchronised using mw_receive (), mw_send (), and the time difference between receiving and sending the message is measured as latency.
The command used to start pmqtest is:
$ ./pmqtest -Sp 99 -i 100 -d 0
The ‘s’ option implies ‘a’ and ‘t’ options with the same priority on all threads. The explanation for the ‘d’ option is the same as given for ptsematest.
Setting up svsematest: The svsematest utility was written by Carsten Emde to measure the latency of SYS V semaphores. The program starts a pair of threads or, optionally, forks two processes that are synchronised via SYS V (System V) semaphores. The time difference between getting the semaphore on one side and releasing it on another side is measured as the latency.
The command used to start svsematest is:
$ ./svsematest -a -t -p99 -i100 -d0
Setting up cyclictest: The cyclictest utility was written by Thomas Gleixner. It measures the time that passes between when a timer expires and when the thread that set the timer actually runs. It does this by taking a time snapshot just prior to waiting for a specific time interval (t1), then taking another time snapshot after the timer finishes (t2), and then comparing the theoretical wakeup time with the actual wakeup time (t2 – (t1 + sleep_time)). This value is the latency for that timer wakeup.
The command used to start cyclictest is:
$ ./cyclictest --s -p95 -m
The ‘s’ option implies ‘a’ and ‘t’ options with the same priority on all threads. The ‘m’ option is to ensure that we lock the memory allocated to the process in the RAM so that it does not get paged out. Internally, the mlock ( ) system call is used to implement this.
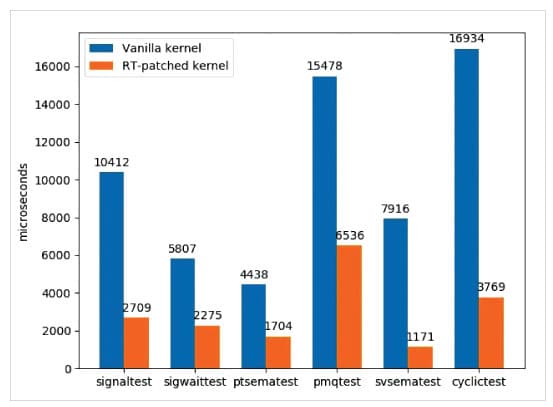
The results
We have run all the above mentioned tests and plotted a graph with the results obtained, which is shown in Figure 1.
The figure shows the PREEMPT_RT patch kernel performance is better than that of the vanilla kernel. The PREEMPT_RT patch provides preemptible critical sections. The preemptibility of normal spinlocks leads to blocking when trying to get a spinlock. This makes it illegal to get a spinlock with either disabled interrupts or preemption. In the PREEMPT_RT patch, the handlers of interrupts run in the process context and only the interrupts designated with SA_NODELAY are run in the interrupt context. It is to be noted that only a few interrupts are designated with SA_NODELAY.
When working in real-time, priority inversion is always a challenge, because we don’t want higher priority tasks waiting because a lower priority task has acquired a common shared resource and got preempted by a medium priority task. The popular solution to solve this problem is priority inheritance. In the PREEMPT_RT patch kernel, the lower priority task gets promoted to higher priority if it shares a common resource with the higher priority task. This allows high priority tasks to acquire the resource after releasing the shared resource to the lower priority task, which helps the former to avoid missing a deadline. The patch’s priority inheritance is transitive, and also provides a way to handle situations where tasks with high priorities need resources or locks designated for low priority tasks. This is why the performance of PREEMPT_RT patch kernel is better than that of the vanilla kernel.


