

The third part of this series of articles on integration of network function virtualization with the DevOps pipeline discusses the architecture of Kubernetes and the various ways to build a cluster for your infrastructure.
Kubernetes is open source container orchestration software. With Kubernetes, users can run multiple containers over many different machines and automate the life cycle of containers over such distributed systems. Kubernetes can automate application deployment, scale the size of the application, and manage the containers. It can scale the application using automation without increasing the size of the operations team. In short, it is container-centric management software.
Kubernetes is often known as the kernel of distributed systems because it abstracts the mounting hardware of the nodes away from the application that is running. It provides a common ground for the workload deployed and the applications running to consume the shared pool of resources. This handling of resources by Kubernetes eases the life cycle of deployment of a large scale containerized application.
Some of the features of Kubernetes include:
- Automated rollouts and rollbacks
- Service discovery and load balancing
- Storage orchestration
- Secret and configuration management
- Horizontal scaling
- Self-healing
Architecture
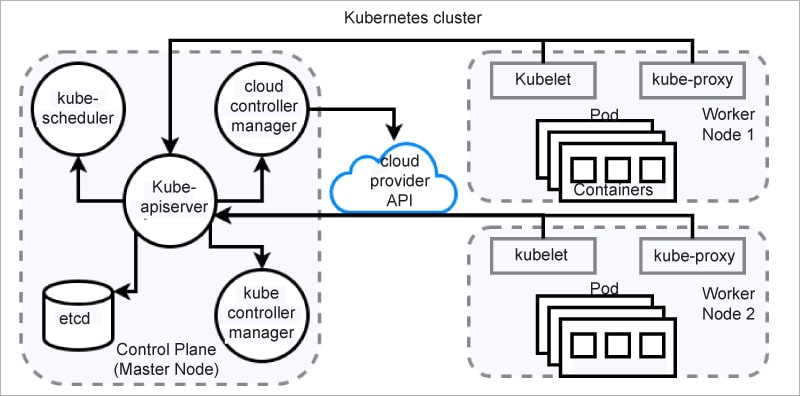
When we talk about Kubernetes architecture, there are two components to look out for — master and worker nodes. These nodes follow the master/slave architecture. The master node is also known as the control plane. Applications are deployed over worker nodes, specifically in pods. Pods are one or more containers that share volumes and a network name space, and are part of a single context.
The control plane is the commanding node of the Kubernetes cluster. It communicates with all the worker nodes of the cluster. It manages the various services of the worker nodes and makes global decisions about the cluster. The components of the control plane are listed below.
kube-apiserver: This exposes the Kubernetes API. The API server is the front end of the Kubernetes control plane.
etcd: This is a distributed, consistent key-value store used for configuration management, service discovery, and coordinating distributed work.
kube-scheduler: This watches for newly created pods with no assigned node, and binds them to a node to run on.
kube-controller-manager: This component manages all core components and makes the necessary changes in an attempt to move the current state towards the desired state.
cloud-controller-manager: This lets you link your cluster to your cloud provider’s API.
The worker node is responsible for managing the running pods and enabling Kubernetes container runtime. Each node in the cluster runs a container runtime and the following components.
kubelet: This is responsible for running your application and reporting the status of the node to the API server in the master node.
kube-proxy: This runs on each node and is responsible for watching the API server for any changes while maintaining the entire network configuration up to date.
The Kubernetes cluster shown in Figure 1 outlines all the components involved. The master node connects to the worker nodes to produce an environment to facilitate all the application pods. Kubelet in worker nodes reports the status via the exposed APIs of the master node while serving the pods within.
Some of the other important components representing the workload, network, and storage of a Kubernetes cluster are given below.
Pod: This is the smallest unit of work or management resource within Kubernetes. It is composed of one or more containers that share their storage, network, and context.
ReplicaSets: This is a method of managing pod replicas and their life cycle. It keeps the specified number of pods constant and is responsible for scheduling, scaling, and deletion of pods.
Deployment: This is a declarative method to manage various pods and their replica sets. With deployment, users can describe the life cycle of applications and images.
Cluster: The resources of this set of nodes are used to run a set of applications.
Jobs: These are best used to run a finite task to completion as opposed to managing an ongoing desired application state.
Service: This exposes an application running on a set of pods as a network service.
ClusterIP: This component exposes the service on a cluster-internal IP. Choosing this value makes the service reachable only from within the cluster (default).
NodePort: This exposes the service on each node’s IP at a static port (the NodePort). A ClusterIP service, to which the NodePort service will route, is automatically created.
Ingress: This is the primary method of exposing a cluster service to the outside world. These are load balancers or routers that usually offer secure sockets layer (SSL) termination, name-based virtual hosting, etc.
Volume: This is storage that is tied to the pod life cycle, consumable by one or more containers within the pod.
Persistent volume (PV): This represents storage resources in the cluster. It is the ‘physical’ volume on the host machine that stores your persistent data.
PersistentVolumeClaim (PVC): This fulfills the request for storage by the user, where it claims the resources from the PersistentVolume.
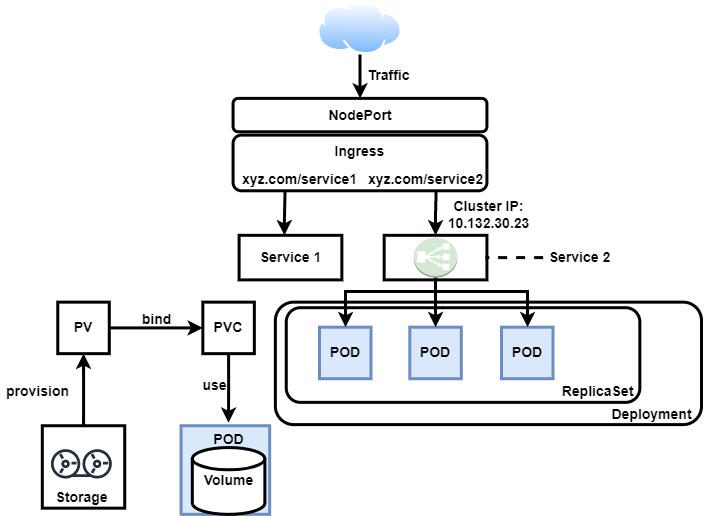
Figure 2 depicts the flow of the request to the deployed application over Kubernetes. The various components of Kubernetes come together to facilitate an environment for the services. The NodePort exposes the static port at which the traffic is intercepted, and based on the request the Ingress segregates it. Ingress filters the request and forwards it to the appropriate service, which is sitting on the top of deployment in the Kubernetes cluster. A deployment can have multiple replicas of a pod, which is responsible for the business logic and data retrieval/modification. Data-based services are handled by the volume associated with the pod. The cluster administrator provisions the infrastructure storage.
Kubernetes container runtime
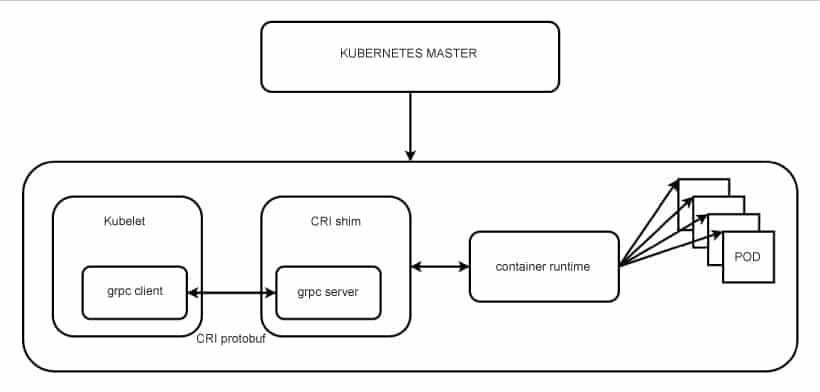
Kubernetes is attached to a container runtime, which is responsible for the life cycle of the containers on Kubernetes nodes while also managing container images and their pods. Container runtime is also responsible for container interactions such as attach, exec, ports, logs, etc. With the release of Kubernetes version 1.5, the Kubernetes community introduced the Container Runtime Interface (CRI). This is a new plugin API for container runtime in Kubernetes which connects container runtime with kubelet.
With its implementation as a separate entity, it allows users to switch out container runtime implementations instead of having them built into the kubelet. As shown in Figure 3, kubelet communicates with the container runtime; it bridges that communication via the use of gRPC (Google remote procedure call), where kubelet acts as a client and the CRI shim acts as the server. A shim is a library that intercepts various API calls and then either redirects the operations elsewhere or handles them itself. In this routine, the shim can change the passed arguments and facilitates communication. Some of the common container runtimes with Kubernetes are containerd, CRI-O, and Docker.
Setting up a Kubernetes cluster using minikube
minikube is a locally deployed single-node Kubernetes cluster environment that can be used as a learning or development environment. It can be started and stopped like any other Linux service. minikube can run components of Kubernetes such as pod, Ingress, service, and others. For minikube to be deployed the machine must have either container or virtual machine managers such as Docker, Hyperkit, HyperV, Kernel-based Virtual Machine (KVM), Parallels, Podman, VirtualBox, or VMware Fusion/Workstation installed on the host machine.
The local installation was done on an Ubuntu 20.04.2 LTS virtual machine, with two CPUs, 8GB memory, and 50GB storage.
Next, we updated and upgraded the target platform:
$ sudo apt update
$ sudo apt upgrade
The following commands get downloaded and install the latest minikube stable release on the target platform:
$ curl -LO https://storage.googleapis.com/minikube/releases/latest/minikube-linux-amd64
$ sudo install minikube-linux-amd64 /usr/local/bin/minikube
And that’s it; Kubernetes is successfully installed over the node. To start the Kubernetes cluster, run the following command:
$ minikube start

Figure 4 shows all the nodes attached to the Kubernetes cluster and proves the point that minikube is a single-node Kubernetes cluster that acts as a control plane (master) node under ROLES. The STATUS tells whether the node is active or inactive. The AGE tells the user how long the node has been active. VERSION depicts the version of the minikube installation.
The minikube cluster is connected to a network, and the network settings give an IP address to the node, which is read as INTERNAL-IP. No EXTERNAL-IP is attached to the node; that’s why we see none here. As mentioned earlier, the installation is done over an Ubuntu-based system, and the OS-IMAGE showcases the same. In KERNEL-VERSION we see the version of the kernel of the OS platform. Finally, minikube uses the container runtime to achieve the life cycle of the containers within the cluster, and CONTAINER-RUNTIME shows which version of container runtime it uses internally as well as its version.
Figure 5 shows all the pods attached to all the name spaces in the minikube cluster. Under NAMESPACES, all the name spaces attached to the minikube cluster are visible. NAME showcases the names of all the pods that are running. READY demonstrates the number of pods running as against the number of pods required. All the pods are running, which is evident from STATUS. If there is any restart in any particular pod, that can be seen under RESTARTS. minikube creates an internal subnet, and some pods are connected to it, while other pods are connected to the internal IP address of the cluster. NODE shows which place each pod is running at. Since we went with the default settings, there was no priority set between nodes — that’s why NOMINATED NODE shows none. READINESS GATES helps implement custom checks for any running pod. Since we went with default settings, it shows none.

Setting up a Kubernetes cluster using KVM
A Kubernetes cluster consists of more than a single node (minikube). The best practice is to have multiple worker nodes to enable high availability. This Kubernetes cluster is managed by the user via the kubeadm tool. Container runtime is deployed over each node of the cluster so that it manages the life cycle of the pods. We’ll learn how to facilitate a Kubernetes cluster over multiple KVM nodes (master and workers) with common container runtimes such as:
- CRI-O
- Docker Engine
- Containerd
The setup of the Kubernetes cluster was done on two Ubuntu 20.04.4 LTS virtual machines. Here the master and worker node configurations were two CPUs, 4GB of memory, and 50GB of storage.
CRI-O with Kubernetes
This is a lightweight CRI runtime, tailored specifically for Kubernetes high-level runtime. CRI-O works in coalition with any OCI runtime, to run pods, manage images and pull from any OCI-compatible image registry. We commonly see CRI-O running along with runC and Clear Containers as low-level runtimes.
The installation procedure is quite complex and involves many steps. The complete installation instructions are kept in our GitHub repository, and the link for the same can be found at https://github.com/shubhamaggarwal890/nginx-vod/blob/master/kubernetes-CRI-o.md.
Figure 6 shows all the nodes attached to the Kubernetes cluster, and we can see our installed master and worker nodes. The CONTAINER-RUNTIME column shows the installed container runtime along with its version. Figure 7 showcases all the pods attached to the name spaces. We can see certain pods running on the master node and on the worker node under the NODE column.

Docker Engine with Kubernetes
Docker was originally developed as a monolithic daemon, but it has evolved over time. Its key components are now distributed, and it supports CRI through containerd. In current versions, containerd is installed along with Docker and interacts with CRI. It manages and runs images.

The installation procedure is quite complex and involves many steps. The complete installation instructions are kept in our GitHub repository, and the link for the same can be found at https://github.com/shubhamaggarwal890/nginx-vod/blob/master/kubernetes-docker.md.
Figure 8 shows all the nodes attached to the Kubernetes cluster, where we can see our installed master and worker nodes. The CONTAINER-RUNTIME column shows the installed container runtime along with its version. Figure 9 showcases all the pods attached to the name spaces. We can see certain pods running on the master node and on the worker node under the NODE column.

Containerd with Kubernetes
Containerd is one of the most popular CRI runtimes today. It is designed to fulfill container life cycle and image management, and is considered resource-efficient and more focused than Docker.

The installation procedure is quite complex and involves many steps. The complete installation instructions are kept in our GitHub repository, and the link for the same can be found at https://github.com/shubhamaggarwal890/nginx-vod/blob/master/kubernetes-containerd.md.
Figure 10 shows all the nodes attached to the Kubernetes cluster, where we can see our installed master and worker nodes. The CONTAINER-RUNTIME column shows the installed container runtime along with its version. Figure 11 showcases all the pods attached to the name spaces. We can see certain pods running on the master node and on the worker node under the NODE column.

Kubernetes orchestrates the running containers and helps them scale up and down based on the need of the hour. The application can be easily patched with the latest changes with a simple rollout from Kubernetes, while also handling rollback in case that is needed. The self-healing feature of Kubernetes helps restart the pods if they crash at any time.
The application was successfully installed over the Kubernetes cluster. There is a plethora of ways in which a Kubernetes cluster can be set up. For the purpose of development, an easy installation of minikube is fine, but for a production-based system, one should go for the installation of master and worker nodes. The choice of container runtime lies with the users; they can choose from a wide variety of container runtimes such as containerd, CRI-O, and Docker.

One can easily install the Kubernetes cluster as shown above, but where to install it is the question. Today, various cloud services offer a Kubernetes engine, but none of these solutions are open source. What if some organisation wants to host an in-house solution for the orchestration of containers? Here, Infrastructure as a Service is a move in the right direction, where we can set up a cloud infrastructure that caters to the computation, networking, and storage requirements. With the advent of open source cloud computing infrastructure, an organisation can easily enhance its computing resources in case of traffic growth, giving it an edge over others that are still embracing traditional deployments.

